Accessory Spotlight Bobbin Work Kit
Simply put, bobbin work is best described as upside down thread embellishment. You can replace the standard bobbin case with the special Brother Bobbin Work bobbin case to sew with thicker threads in the bobbin and standard thread in the needle. This bobbin case was included with some earlier Brother sewing machine models. It’s available for many others, including the Brother Luminaire. SABWRK1
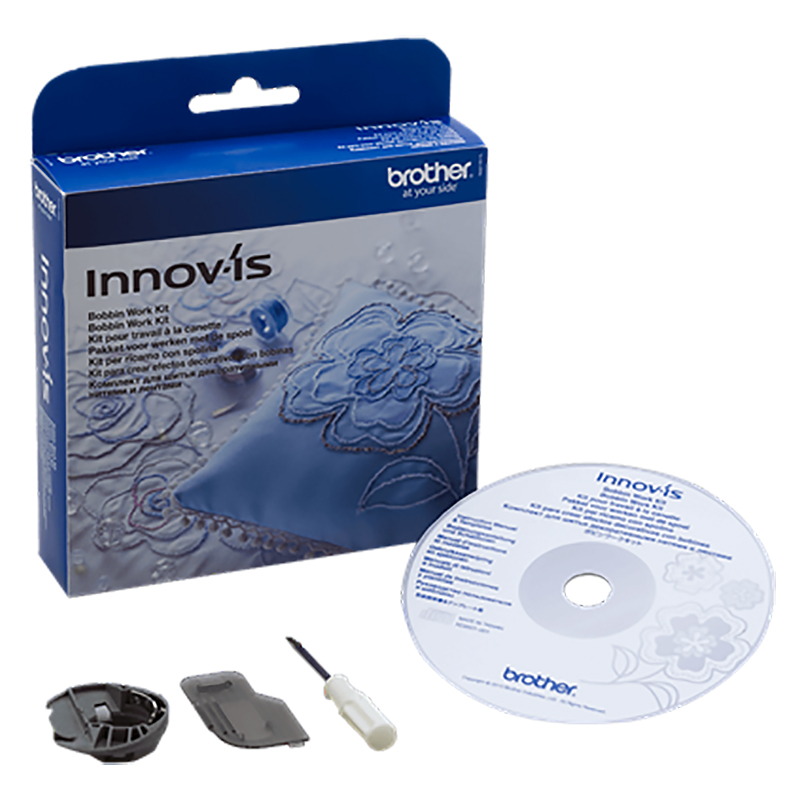
, is the part number for the Brother Bobbin Work Kit. Packed with the kit is a CD-ROM with 20 printable patterns you can use for bobbin work with free motion style stitchery. The kit also includes the bobbin case, bobbin case cover with added ribs to hold bobbin in place, and a tiny screwdriver for fine tuning the tension on the bobbin case. See Figure #1. [caption id="attachment_25770" align="aligncenter" width="800"]
 Figure #1[/caption]
Below, you’ll see that the bobbin work bobbin case is a distinctly different color. The grey case is set with a looser tension, so the thicker thread can easily pass through the tension plate in the bobbin case. Use the tiny screwdriver to fine tune the setting for a variety of novelty threads. Before inserting the new bobbin case you’ll need to remove the throat plate and remove the standard bobbin case. See Figure #2. The process will be different for different sewing machines. This is a great time to clean out the dust bunnies inside your machine! Click on this link for a Brother tip sheet with more information: http://blog.brothersews.com/tips-tricks/november-quick-tip/
Figure #1[/caption]
Below, you’ll see that the bobbin work bobbin case is a distinctly different color. The grey case is set with a looser tension, so the thicker thread can easily pass through the tension plate in the bobbin case. Use the tiny screwdriver to fine tune the setting for a variety of novelty threads. Before inserting the new bobbin case you’ll need to remove the throat plate and remove the standard bobbin case. See Figure #2. The process will be different for different sewing machines. This is a great time to clean out the dust bunnies inside your machine! Click on this link for a Brother tip sheet with more information: http://blog.brothersews.com/tips-tricks/november-quick-tip/[caption id="attachment_25771" align="aligncenter" width="800"]
 Figure #2[/caption]
It’s essential that the bobbin is in properly, sitting flat, with the arrow on the bobbin case matching the dot inside the machine. See Figure #3.
[caption id="attachment_25779" align="aligncenter" width="800"]
 Figure #3[/caption]
Let's' talk about thread options for bobbin work. Remember, the featured “thread” is used in the bobbin instead of the needle. Stitching takes place with the wrong side of the fabric facing up. You can mark your fabric directly on the wrong side. If your fabric requires stabilizer you can mark directly on that. Note that just like ordinary decorative stitching, most projects will require stabilizer for quality results. Use your imagination for patterns!Draw free hand, use quilting patterns, stencil shapes, etc. There are many options for tracing patterns on the wrong side to use for bobbin work stitchery.
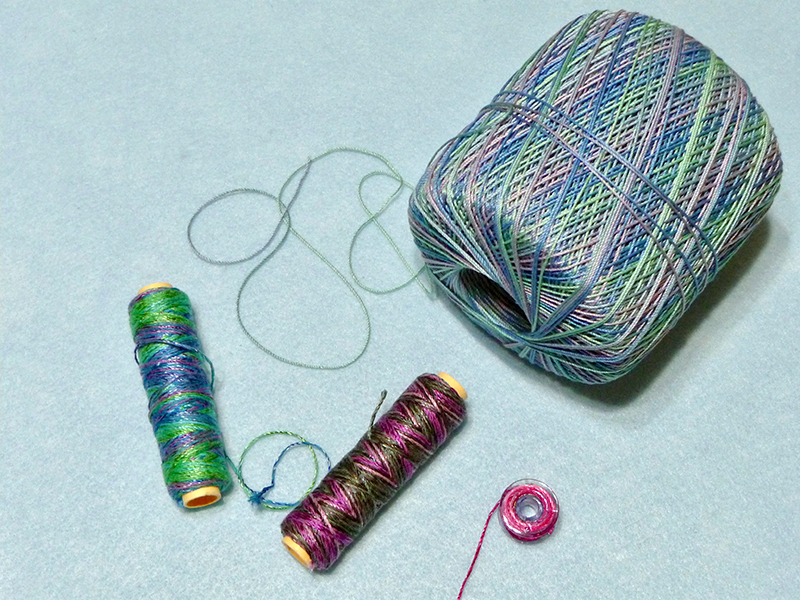
Options for threads are plentiful. Make use of a wide variety of needlework yarns, ribbons, and novelty threads that are impossible to use in the needle. Generally, it is necessary for the thread to be flexible but strong, smooth, and last but not least, not too thick. I’ve successfully used super fine (size1) yarn, pearle cotton designed for hand embroidery, 2mm and 4mm silk ribbon, fine crochet cotton (gauge used for lace), and novelty threads designed for use in the loopers of the serger. See Figure #4a and Figure #4b. [caption id="attachment_25773" align="aligncenter" width="800"]
 Figure #4a[/caption]
[caption id="attachment_25774" align="aligncenter" width="800"]
 Figure #4b[/caption]
It is usually best to hand wind the thread onto the bobbin. It is important to wind smoothly and evenly, without stretching.
Figure #4b[/caption]
It is usually best to hand wind the thread onto the bobbin. It is important to wind smoothly and evenly, without stretching.Because the thread is thick, stop winding the bobbin when it reaches approximately 85% of its capacity. Your chosen thread should reel out freely, without pulling or catching.
If it doesn’t, you will want to loosen the screw on the bobbin case until it does. I prefer to loosen a quarter turn at a time, testing after each adjustment. Note that it is recommended to tighten the needle tension, so that the bobbin thread is the star attraction and the needle thread blends or disappears into the stitching. I like to match my needle thread to the novelty bobbin thread as closely as possible. Place the bobbin into the bobbin case as you would for regular thread, stopping just before you reach the cutter. See Figure #5. [caption id="attachment_25775" align="aligncenter" width="800"]
 Figure #5[/caption]
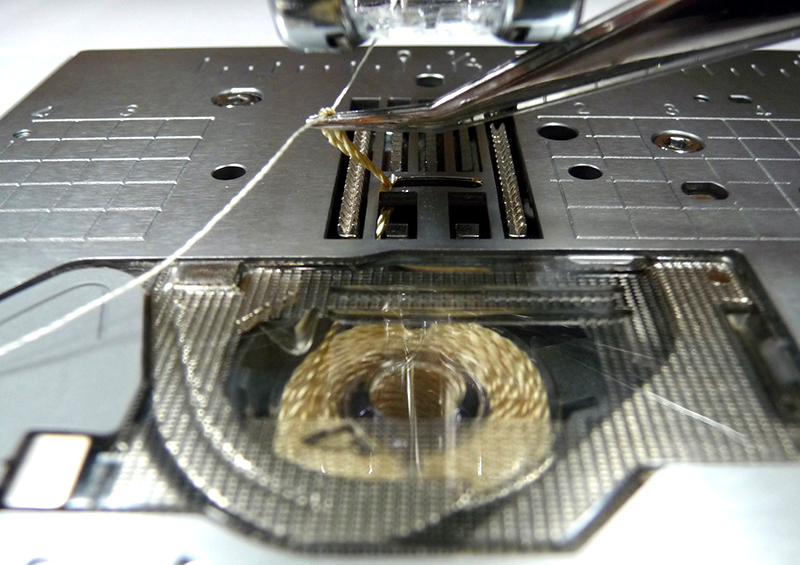
For a looser, more free form look with threads that are on the thicker side of the scale, such as ribbon floss and silk ribbon, some stitching enthusiasts skip the tension altogether and bring the thread up through the throat plate without any tension. Personally, I prefer to place the thread through the tension on the bobbin case, adjusting the tension on the bobbin case as necessary to achieve a more even look to the stitches. After bobbin thread is threaded through the bobbin case and guide on the plate, send the needle down and then up, while tugging on the needle thread to bring the thread to the surface. Tweezers are a handy tool for bringing the thread fully to the surface. See Figure #6.
[caption id="attachment_25776" align="aligncenter" width="800"]
 Figure #6[/caption]
There are some distinct guidelines to follow when stitching bobbin work. Below is a list of important things you’ll need to know before you begin your bobbin work adventure:
- Be sure to read the manual provided by Brother for more detailed information on bobbin work. You’ll find a link to the manual and a short Brother support video at the end of this tutorial.
- Thread used in the bobbin should be smooth and flow freely without catching. If thread seems finicky it is best to set it aside and choose and alternative thread. Always begin by taking the first few stitches by hand to make sure things are sewing smoothly.
- For all bobbin work, do not tie off threads and do not use the cutting option on the machine.
- Leave thread tails at the beginning and end of your stitching. To finish off the stitching, Feed bobbin thread tails to the wrong side of the fabric using a tapestry needle. If necessary, you can use an awl to make a hole through stubborn fabrics. Tie the needle thread and bobbin thread together several times and secure with an application of a small amount of seam sealant or tie the knot and weave thread tails under the stitching to anchor and secure the stitching. Tip: Seam sealant works well for threads easily separated. Be sure to test before seam sealant. Some fabrics will spot.
- Always begin with the bobbin having the maximum amount of thread for stitching large motifs or long lines of stitching. It’s hard to judge how much thread you will need, but practice will help you estimate for future projects. If you see that you are close to running out, stop at the end of a full pattern, tie off stitches as described above and begin where you left off with a new bobbin.
- For decorative stitching in the sewing mode, open style stitches work best. I usually lengthen the stitch by touching the plus end of the length twice, and use stitches with a minimum of 7mm for the width.
- Bobbin work is possible on a wide variety of machine models. Test stitching on scrap fabric prior to working on the actual project, using fabric and stabilizer combinations similar to those you’ve selected for your project. A willingness to experiment and test a variety of decorative stitches yields exciting results!
Additional resources from Brother Support: Bobbin work video: https://support.brother.com/g/b/faqend.aspx?c=us&lang=en&prod=hf_inov1200eus&faqid=faqh00000628_000
Bobbin Work manual: https://support.brother.com/g/s/hf/pdf_pub/accessories/manual/sabwrk1_bwrk1_om.pdf
Note: Bobbin work with the special Brother bobbin case was featured in season nine of the Brother sponsored PBS It’s Sew Easy TV show. Watch the video below on my YouTube channel. Enjoy! " class="link link-external">https://youtu.be/bfrwBJRc1Go
_____________________________ CLICK HERE FOR PDF!


