Embroidered Gift Idea for the Holidays
Materials:
- Bath or Hand Towel
- BES4 Dream Edition Software with Power Pack
- Hoop size of your choice my towel used an 8x8 inch embroidery hoop
- Water Soluble Adhesive Stabilizer
- Water Soluble topping
make this task a snap.
Open the BES4 Software
- Click Create new when the splash screen appears.
- From the Pacesetter menu (the b at the top left of the screen), choose New and then New Project.
- From the Recipe dropdown menu, choose Towels. In the right side of the screen you will find a lot of useful information such as needle size and stabilizer suggestions when you scroll down.
- Choose your machine format from the dropdown list and then click OK.
- Click on the Hoop down arrow and choose Select Hoop. I selected the 8x8 in or 200x200mm hoop. If that size hoop doesn’t work for your project, you may resize the design when finished to fit the hoop.
- Click on the Normal Text tool and then click on the design page to activate the text tool.
- Type in a family name. Left mouse click away from the text or click apply in the Properties window to set the text.
- Now it is time to choose the perfect font for my project. With over 199 fonts, decisions, decisions, decisions….
- Click on the arrow next to the current font and use the up and down arrow keys to navigate through the fonts.
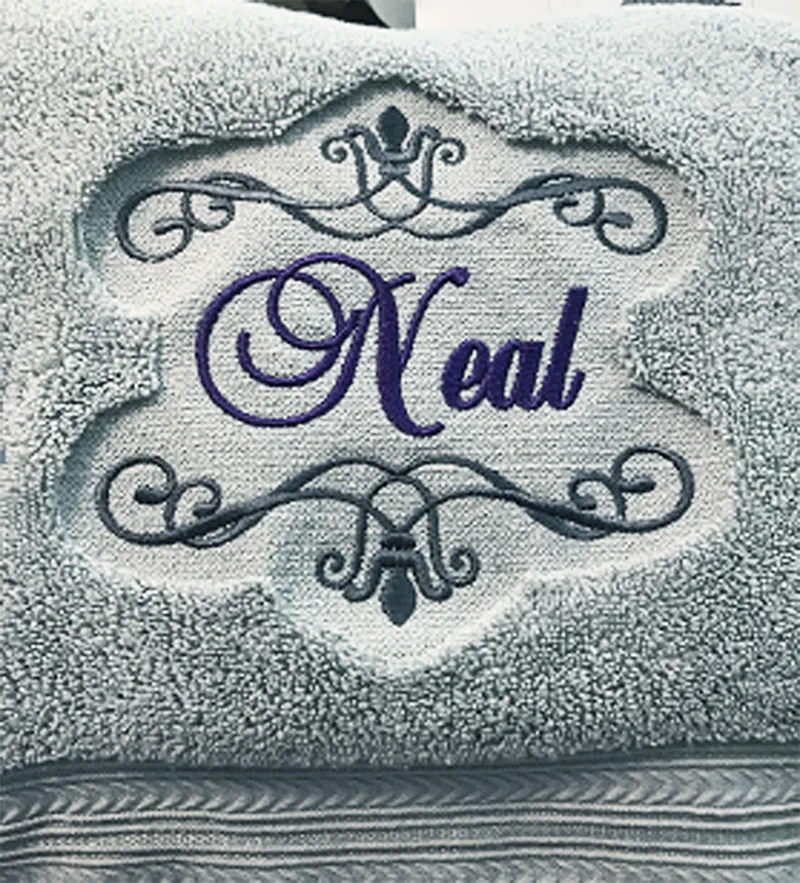
- For my towels, I selected Bella Large and then clicked apply. I really like this font it is nice and elegant and embroiders beautifully.
- I wanted it a bit bolder, so I decided to add in more pull compensation to bulk up the lettering.
- In the Properties window, scroll down until you see Pull compensation.
- Click on the type dropdown and choose Absolute, change the Absolute value to a different number. I went big on mine with 1.0mm as my pull compensation. This really depends on the selected font. If you think it is too bold for your taste, you can always use a lower number such as .3mm.
Note: Even though I have selected English – inches as my system unit, the software knows which attributes should be adjusted in metric and keep those settings in metric.

- Make your pull compensation adjustments and then click Apply.
- The name is nice, but I really wanted to add a bit more to the design.
- I click on the Add Design button.
- From the category menu, I selected Monogram Designer Frames.
- I then selected BMF-BD-0014

- Hold the left mouse button down and drag the mouse until the design is the size you desire. Release the mouse. You want it to surround the name. Quick tip with this design element and most of the frame designs…….
Tip: If you place the cursor to the left center of the name, you can drag the cursor straight across and it is easier to see when the size of the frame is correct.

Now it is time to align the design elements
- Click on the Select tool down arrow and choose Select All.
- Click on the Arrange Tab and choose Horizontal Center and then Vertical Center.
Note: There is one last thing I want to do to the design so that it stands out on the towel, add Nap Control. This will control the loops on the towel and keep my design from disappearing into the loft of the towel. How far from the design you extend the nap control is up to you. I like it to extend around it a bit more than most on this towel.
- Click on the Tools Tab.
- Click on Nap Control. This is only available if you have purchased and activated the Power Pack upgrade.
Note: I played around with the Offset a few times until I was able to get it to surround all the elements without a lot of dips into the design. I wanted it to look whole. I also put a checkmark in front of Add Finishing Run because I want a nice crisp edge around the nap control. Once you adjust your settings click Ok. If you don’t like what you have the first time, click Undo (the green back arrow on the Quick Access Toolbar). Select All and then try it again. Repeat until you like the look.

- Nap Control is automatically placed at the beginning of the Sewing Sequence.
Note: In the Sequence Window, select the background and change the color on the Color Ribbon to match your towel - If you don’t want to do these steps, you do not have to, you can always change the colors on the machine. That is my normal method.
- Click on the Name and choose a color tile on the Color Ribbon.
- Click on the frame and select a color tile on the Color Ribbon.
- Click 3D Draw to view the design realistically.

Note: If your design is too large for your hoop, click on the Hoop down arrow and choose Fit Hoop. This will resize it to fit inside your selected hoop. Keep in mind that if there is a large discrepancy, in size, this may not be the best option. This usually works best when the design is a bit too large or small in the hoop, not for turning a 4x4 design into a jacket back.
Setting up for embroidery
- Hoop a piece of Water Soluble Adhesive Stabilizer into the appropriate size hoop for your project.
- Score the paper of the Adhesive stabilizer and peel out from the center of the hoop.
- Place the towel onto the stabilizer in the area you wish to embroider the design.
- Tape a piece of Water Soluble topping (clear) on top of the towel to help keep the loops of the towel down while embroidering (you don’t have to do this, but I think the end result is better with the topping.)
- Place the hoop into the machine and match the thread color of the Nap Control to the towel.
- Embroider the design.
Create something beautiful or just plain fun!
Related Projects
Stay Connected
* Required fields