In the Hoop Embroidered Label for Quilts and More
Create a quick and easy label using any number of embroidery designs and font style combinations. This in-the-hoop label features a colorful kite design included in the BES 4 Dream Edition Software program.
The Frame Design Menu in the software is full of beautiful options. Since they’re highly re-sizable you can create a decorative combination design for quilt blocks and many more items. Simply add a frame shape outline at the machine and you have the makings of a great label! Are you ready? Let’s go sew!
Materials and Supplies
Note: For another option you can choose to use frame patterns built in to your machine along with built in font styles.
- Brother Embroidery Threads
- Brother Bobbin Thread
- SA5810
Brother medium weight tear-away stabilizer - Lightweight fusible tricot interfacing for lining label and finishing edges
- Non-stick pressing sheet for pressing label
- Fabric for creating label, cut one piece large enough to fit your chosen hoop. If fabric is the standard weight of quilting cotton, I recommend stabilizing it by pre-treating with a liquid fabric stiffener. Be sure to choose a product that is designed to wash out of fabric.
- Low tack tape for securing interfacing in the hoop.
Instructions for Creating Label
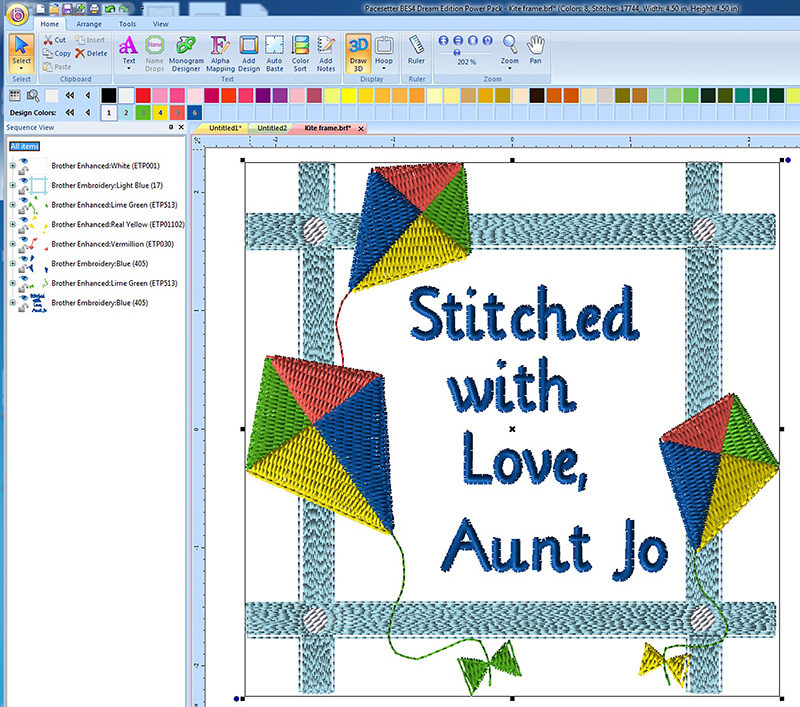
- Open BES Lettering software program. From the Home tab, click on the Add Design icon and select a frame from the design menu. See example in Figure #1.
 Figure #1[/caption]
- Resize the frame to fit your desired project and add text as follows:
- Return to the Home tab and select Normal Text.
- Click on the blank space in the frame.
- Click in the space to the right of the word Font to bring up font selections. Click on the down arrow and select font style. I used the Chalk font style. See finished design in Figure #2.
- Click in the text field to type desired sentiments, using Enter on your keyboard to type multiple lines.
- Click Apply to generate words on the design page. Move lettering until it looks good to you.
 Figure #2[/caption]
Tip: Each font has specific guidelines for sizes. Click on the question mark next to the font and you’ll see recommended sizing. Unless you’re making a really large label, you’ll want to choose a font that’s in the smaller range. See Figure #3.
[caption id="attachment_19530" align="aligncenter" width="402"] Figure #3[/caption]
- Change thread colors as desired. Center design combination. My final design fits in a 5-inch X 7-inch hoop with a design size of 4.50 X 4.50. My design is rotated for the purpose of adding tape in a later step. See Figure #4. Save the design and transfer it to your machine.
 Figure #4[/caption]
Tip: Save combination design as a .brf (working file) if you wish to edit the design at a later date.
- At the machine add a shape from the built-in menu and re-size until it is slightly larger than the design. Selecting a shape with rounded corners will make the label easier to finish. Be sure to choose the single straight stitch option. See Figure #5.
 Figure #5[/caption]
- Cut fabric to fit hoop. If necessary, treat fabric with stiffener following manufacturer’s directions. Hoop fabric with an added layer of the tear away.
Tip: SA5810
is a flexible stabilizer, making it work well when hooped with a piece of light weight fabric. A stiff tear-away will cause issues and should be floated under the hoop instead of layering it with fabric.
is a flexible stabilizer, making it work well when hooped with a piece of light weight fabric. A stiff tear-away will cause issues and should be floated under the hoop instead of layering it with fabric.
- Embroider design, stopping when you reach the final frame shape. Cut a piece of fusible interfacing to amply cover the design and the size of the shape you selected.
- Layer interfacing over design, having fusible side against the right side of the fabric. Tape to secure. Stitch frame, then back up and stitch it a second time for re-enforcement. See Figure #6.
 Figure #6[/caption]
- Remove from hoop and tear away excess stabilizer. Carefully cut interfacing leaving a margin of approximately 1-inch. Trim outside the final frame, leaving a scant 1/8-inch seam allowance. See Figure #7a. Turn right side out and carefully push out the corners. Wash it carefully if you want to remove the stiffener. Use the non-stick sheet to press the piece, having fusible side against the sheet so it doesn’t stick. See Figure #7b.
 Figure #7a[/caption]
[caption id="attachment_19536" align="aligncenter" width="800"]
 Figure #7b[/caption]
- Your label is finished. To attach it to a fabric surface you can lightly press it in place. The fusible agent from the interfacing with hold it temporarily and then you can hand or machine sew in place permanently. Enjoy!


