Quilting a Basket on The Dream Fabric Frame
Choose your favorite method for quilting – free-motion or software, simple or advanced – and make a beautiful basket for storage or to dress up a gift. These instructions will walk you through the process using un-pieced fabric and Dream Motion Pro software,
either with the simplicity of Select & Sew or the versatility of Quilt CAD.
Finished Size:
- 12" x 8" x 6"
Materials
- 1/2 yard each of two 45"-wide cotton solids for exterior and lining
- 1/4 yard of coordinating 45"-wide cotton for binding
- 18" x 45" piece of batting*
- Quilting and sewing threads
- 1 button, 1" – 1 1/2" diameter
Note: You'll cut the pieces after quilting to utilize the excess fabric for hooping.
Set Up
- Make a quilt sandwich from the exterior and lining fabrics and batting. Baste the layers together.
- Set the safe area for the maximum range available. Mount the sandwich on THE Dream Fabric Frame
, using a header cloth to position the first group of quilted motifs near one crosswise edge. The left edge of the sandwich should be about 1" outside the safe area. - Follow the directions below to quilt a rectangle 6" high and 36" wide, beginning near the left edge of the fabric sandwich. Place and sew a triangular design 6" high and 3" wide, with its apex to the right as shown. Choose your favorite method for set-up in Dream Motion Pro, or use your skills to quilt freemotion.
Designing with Select & Sew
- Using chalk or a removable marker, draw a 6" x 39" rectangle on your fabric. Draw a line from top to bottom every 6", beginning at the left end and placing the last mark 3" before the right end. Find the midpoint of the right end and mark.
- Open Dream Motion Pro
and choose Select and Sew. Open a design from the Blocks tab. Position and stitch the design in the first marked square, with the design size at 6" x 6". Continue to position and stitch a total of six block designs, using the same or different motifs. - Choose a triangular motif from the menu and use the triangle positioning option to place the triangle at the right end of the six quilted blocks. The apex of the triangle should point to the right and touch the midpoint of the right edge.
Designing with Quilt CAD
- Open Dream Motion Pro and choose Quilt CAD. Set up a quilt 7 blocks across and 1 block high, with blocks 6" x 6".
- Choose a design from the Blocks tab. Select the first quilt block on the left and place the design there. Repeat to choose and place designs in the first six quilt blocks. Alternatively, select the first six blocks at once and place the same design in all six.
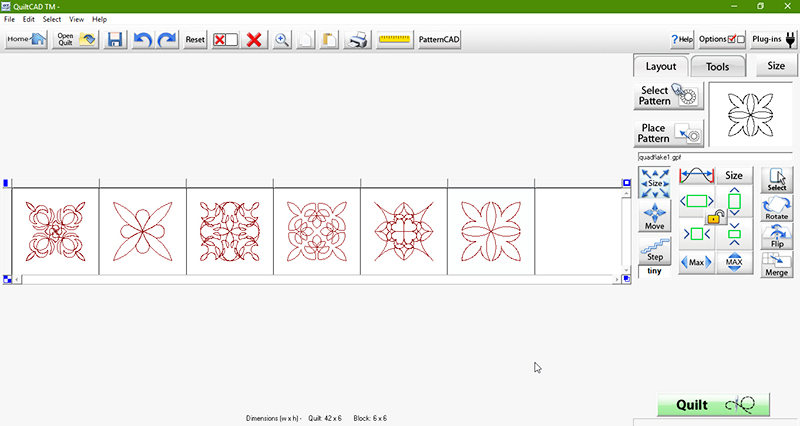
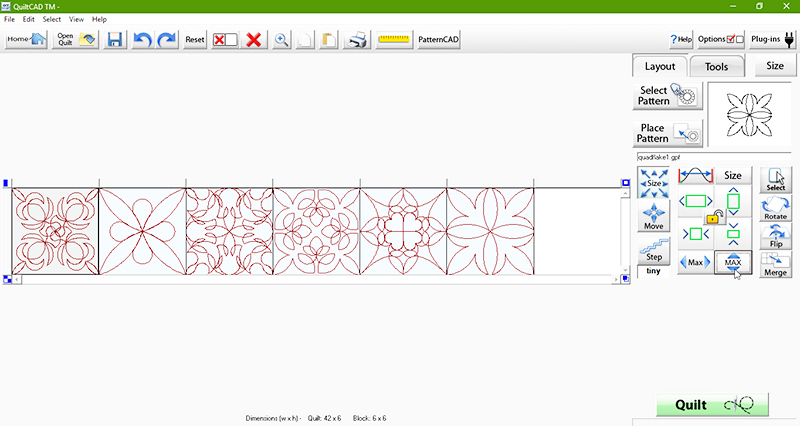
- Select the six filled blocks and click each of the two Max icons in the Size menu to fill each block with its quilting design.
Note: I replaced the third design with one that I felt was more like the other five. This is a good opportunity to view your composition as a whole and rearrange or change designs.

- Select the final block on the right. Choose a design from the Triangle tab and place it in the block. Click Tools.Triangle Blocks.Criss Cross, and then uncheck the top, bottom, and right boxes.

- Save your design and stitch it on the quilt sandwich.
Quilting the Basket Base
- Reposition the fabric in The Dream Fabric Frame so that you can quilt in the open area, leaving at least 1" free around the quilted rectangle.
- Open Pattern CAD and select EZ.Bow Ditches. Choose any pattern settings you like; I used 15, 16, 14. Make the pattern 9" high and 13" wide.
- Stitch the design on the quilt sandwich.
Cutting
From the quilted fabric, cut:- 1 rectangle, 6 1/2" x 39 1/2"
- Keep the quilting centered as you cut. Trim the right end 1/4" outside the triangle quilting to create a point.
- 1 rectangle, 8 1/2" x 12 1/2", from the bow-ditch quilting.
- Use a 6"-diameter circle to round the four corners.
- 2 strips, 2" x width of fabric
- 1 strip, 2 1/4" x width of fabric
Construction
- Join the 2"-wide contrasting strips to make a continuous binding strip and press in half lengthwise with wrong sides together. Use the strip to bind both ends and the top edge of the long, pointed rectangle, mitering the binding at the corners. Leave the bottom edge unbound.
- Bend the long rectangle into a tube, overlapping the ends. The straight end will be on the inside of the tube. Match the inner edges of the binding on the straight and pointed ends to gauge the overlap. Pin securely.

- Pin the tube to the base to check the fit. If necessary, unpin and adjust the overlap for a better fit. A little easing won't be noticed, but you don't want to have pleats or puckers in the basket.
- When the fit is confirmed, remove the tube from the base. Topstitch through both layers along the inner edge of the pointed end's binding, following the shape of the point from the top edge of the tube to the bottom.
- Position and stitch the button in place within the point.
- Place a pin on the bottom edge of the tube at the place where the inner edges of the bindings meet (the same point you matched to determine the overlap). Using the pin as a starting point, divide the bottom edge into quarters. Fold the base in half twice to find and mark its quarter points.
- With wrong sides together, pin the lower edge of the tube to the base, matching the quarter points. Baste 1/8" from the edges.
TIP: If you're like me, you may use pins for most of your basting, skipping the stitch-basting step. This is one time when I really recommend that you stitch-baste the pieces together, to control any ease and keep the fabric layers aligned.
- Fold the 2 1/4"-wide contrasting strip in half lengthwise, wrong sides together, and press. Use the strip to bind the lower edge of the tube and the base.
Related Projects
Stay Connected
* Required fields