Tea Time Linens with Alice in Wonderland
Bring the magical characters of Wonderland to your own Mad Hatter Tea Party. With your Brother sewing & embroidery machine
you can create a fantasy linen tea set for a special little girl’s birthday--or for her unbirthday! Have tea with Alice, the White Rabbit, the March Hare, and more of Disney’s Wonderland personalities, all machine embroidered on a tablecloth and napkins. A tea party is a great opportunity to discuss manners, hospitality and the rules of polite conversation with children. Meanwhile, you can learn about Madeira applique’, pinstitch, the exclusive My Custom Stitch from Brother and a handy technique for wrangling square corners into curves at the hemline.

Materials
- Lightweight linen or 100% cotton:
- white —1 yd. cut into 30” x 30”, four 8x8”
- colors—four blue 5 ½” squares, four 4” square: one each blue, coral, green and yellow
- Flat ¼” edging trim, such as tatting: 2 1/3 yds. Wider edging will require more yardage.
- Needles: #100 wing or #100 standard for hemstitching, #75 for embroidery and construction
- Thread: fine (50/2,-60/2 or 80/2) in colors to match colored linen for pinstitch on Madeira corners: blue, coral, green, yellow; white for basting; water soluble; embroidery
- Notions: washout marking pencil, water soluble pen, tearaway stabilizer
for embroidery - OPTIONAL: narrow paper stabilizer or strips of medium weight water soluble for hemstitching, seam sealant
- Presser feet: open toe
, embroidery - Miscellaneous: for Madeira templates-- quilting template plastic OR card stock; for corner rounding template—stiff white cardboard 5x5”
Alice in Wonderland ibroidery.com designs(Opens in a new tab)
Tablecloth designs
- Alice in Wonderland Curtsy AIW01(Opens in a new tab)
- design center 2 3/8” above center Madeira curve - Queen of hearts BRO-VV005(Opens in a new tab)
- design center 2 3/4” above center Madeira curve - TweedleDee & TweedleDum BRO-AWL002(Opens in a new tab)
- design center 2 5/8” above center Madeira curve - Cheshire Cat BRO-VV008(Opens in a new tab)
- design center 2 ½” above center Madeira curve
- Alice in Wonderland AIW03(Opens in a new tab)
– blue - design center 2 ¾” above center Madeira curve - Mad Hatter AIW04(Opens in a new tab)
– green - design center 2” above center Madeira curve - March Hare AIW05(Opens in a new tab)
– coral - design center 2” above center Madeira curve - White Rabbit BRO-AWL001(Opens in a new tab)
– yellow - design center 2 ¾” above center Madeira curve
Preparation
1. Download the PDF of the Madeira curve templates HERE for both the Napkin and Tablecloth, and cut from cardboard or quilting template plastic Download: Alice in Wonderland Madeira Template(Opens in a new tab)2. Cut corner curve from 5"x5” heavy white card stock. Use a simple curve like a jelly jar. [caption id="attachment_1513" align="aligncenter" width="800"]
 Making corner curve template[/caption]
3. Starch and press all fabric until it is crisp. The tea linen set will turn out ever so much nicer if the fabric is very stiff. Spray starch, press, spray starch again and press once again. This gives good results.
Making corner curve template[/caption]
3. Starch and press all fabric until it is crisp. The tea linen set will turn out ever so much nicer if the fabric is very stiff. Spray starch, press, spray starch again and press once again. This gives good results.
NAPKINS

AUTHOR'S NOTE: Practice and experience gained from stitching the napkins pays off when tackling the larger tablecloth project. Trust me on this.
MADEIRA APPLIQUE CORNERS
1. Press each 4” colored linen in half diagonally. 2. With washable pencil, trace napkin Madeira template on to linen. Make certain the template point is at diagonal fold point before you trace with the pencil. If such a pencil is not available, a #2 pencil is preferable to water soluble. Using such a water soluble marker for this step may make the lines difficult or impossible to remove after the upcoming combination of iron heat and applied water. [caption id="attachment_1681" align="aligncenter" width="800"] Folded corner, template, pencil[/caption]
3. Attach open toe foot then stitch on drawn line with water soluble thread, regular stitch length.
NOTE: Use these features if they are available on your machine-- needle down, knee lift and camera with laser light to show needle entry point. Stitch slowly to reduce thread breakage.
4. Cut a scant ¼” above stitched line. Clip curves and be sure to clip the fold to the stitching line.
[caption id="attachment_1685" align="aligncenter" width="800"]
Folded corner, template, pencil[/caption]
3. Attach open toe foot then stitch on drawn line with water soluble thread, regular stitch length.
NOTE: Use these features if they are available on your machine-- needle down, knee lift and camera with laser light to show needle entry point. Stitch slowly to reduce thread breakage.
4. Cut a scant ¼” above stitched line. Clip curves and be sure to clip the fold to the stitching line.
[caption id="attachment_1685" align="aligncenter" width="800"] Cut, folded blue corner[/caption]
5. Turn right side out and smooth curves with point turner. Press dry.
[caption id="attachment_1687" align="aligncenter" width="800"]
Cut, folded blue corner[/caption]
5. Turn right side out and smooth curves with point turner. Press dry.
[caption id="attachment_1687" align="aligncenter" width="800"] Turned Madeira corner with point turner[/caption]
6. Spritz seam line with water.
[caption id="attachment_1690" align="aligncenter" width="800"]
Turned Madeira corner with point turner[/caption]
6. Spritz seam line with water.
[caption id="attachment_1690" align="aligncenter" width="800"] Corner with water bottle[/caption]
7. Press immediately, placing the iron on the corner piece. Do not move the iron, just press UNTIL ABSOLUTELY, POSITIVELY DRY or you will be really sorry . Then turn it over and press again.
8. Open folded corner gently. If there is resistance, carefully clip one or two stubborn threads to release the seam line.
[caption id="attachment_1693" align="aligncenter" width="800"]
Corner with water bottle[/caption]
7. Press immediately, placing the iron on the corner piece. Do not move the iron, just press UNTIL ABSOLUTELY, POSITIVELY DRY or you will be really sorry . Then turn it over and press again.
8. Open folded corner gently. If there is resistance, carefully clip one or two stubborn threads to release the seam line.
[caption id="attachment_1693" align="aligncenter" width="800"] Opening corner[/caption]
9. Press opened Madeira corner and set aside.
10. REMOVE WATER SOLUBLE THREAD AND STORE IN AIR TIGHT CONTAINER. An empty spice jar or small plastic bag works well. This is so easy to forget but very important. I once inserted a sleeve with this water soluble thread. Totally unaware of my mistake, I rinsed the markings out of the dress and the sleeve fell out. Groannnnnnnnn…
11. Press ¼” to inside of white 8” napkin. If the white napkin was well starched (and it really needs to be—if it is not, starch it again), it can be finger pressed and then ironed. This saves your fingers from being burned as you make that little ¼” fold and press at the same time.
[caption id="attachment_1520" align="aligncenter" width="800"]
Opening corner[/caption]
9. Press opened Madeira corner and set aside.
10. REMOVE WATER SOLUBLE THREAD AND STORE IN AIR TIGHT CONTAINER. An empty spice jar or small plastic bag works well. This is so easy to forget but very important. I once inserted a sleeve with this water soluble thread. Totally unaware of my mistake, I rinsed the markings out of the dress and the sleeve fell out. Groannnnnnnnn…
11. Press ¼” to inside of white 8” napkin. If the white napkin was well starched (and it really needs to be—if it is not, starch it again), it can be finger pressed and then ironed. This saves your fingers from being burned as you make that little ¼” fold and press at the same time.
[caption id="attachment_1520" align="aligncenter" width="800"] Napkin with ¼” folded sides on white linen[/caption]
12. Round 3 corners of white napkin with card stock template. One corner is left square.
[caption id="attachment_1521" align="aligncenter" width="800"]
Napkin with ¼” folded sides on white linen[/caption]
12. Round 3 corners of white napkin with card stock template. One corner is left square.
[caption id="attachment_1521" align="aligncenter" width="800"] Rounded napkin corners[/caption]
Tip: Moisten one corner then wrap around the template with tiny pleats. Press. Repeat with remaining 2 corners. Remember to leave one corner square.
13. Draw curve on WRONG side of unfolded Madeira corner, using cardboard template.
[caption id="attachment_1522" align="aligncenter" width="800"]
Rounded napkin corners[/caption]
Tip: Moisten one corner then wrap around the template with tiny pleats. Press. Repeat with remaining 2 corners. Remember to leave one corner square.
13. Draw curve on WRONG side of unfolded Madeira corner, using cardboard template.
[caption id="attachment_1522" align="aligncenter" width="800"] Unfolded, pressed corner, bottom corner drawn in[/caption]
14. Pin RIGHT side of Madeira corner to WRONG side of white napkin, the side which shows the ¼” folded edges. Match raw edges and corner point.
[caption id="attachment_1523" align="aligncenter" width="800"]
Unfolded, pressed corner, bottom corner drawn in[/caption]
14. Pin RIGHT side of Madeira corner to WRONG side of white napkin, the side which shows the ¼” folded edges. Match raw edges and corner point.
[caption id="attachment_1523" align="aligncenter" width="800"] Madeira corner pinned to napkin[/caption]
15. Attach multipurpose J foot or ¼” foot. Stitch Madeira corner with ¼” seam allowance and white cotton thread. Regard marked curve on Madeira corner as if it were a raw edge.
[caption id="attachment_1524" align="aligncenter" width="800"]
Madeira corner pinned to napkin[/caption]
15. Attach multipurpose J foot or ¼” foot. Stitch Madeira corner with ¼” seam allowance and white cotton thread. Regard marked curve on Madeira corner as if it were a raw edge.
[caption id="attachment_1524" align="aligncenter" width="800"] Corner stitched, not trimmed[/caption]
16. Trim corner along blue marked curve.
[caption id="attachment_1525" align="aligncenter" width="800"]
Corner stitched, not trimmed[/caption]
16. Trim corner along blue marked curve.
[caption id="attachment_1525" align="aligncenter" width="800"] Corner stitched, rounded, trimmed[/caption]
17. Clip curves and turn to right side of white napkin. Clip into ¼” fold on each side of Madeira corner.
[caption id="attachment_1526" align="aligncenter" width="800"]
Corner stitched, rounded, trimmed[/caption]
17. Clip curves and turn to right side of white napkin. Clip into ¼” fold on each side of Madeira corner.
[caption id="attachment_1526" align="aligncenter" width="800"] Madeira corner turned ¼”, clip[/caption]
18. Press ¼” folded edge to wrong side. Baste around white napkin, through the blue Madeira corner and across top of that corner. Alternatively, the entire baste area can be secured with a glue stick. It is important to have all held in place before you begin pinstitching along those edges.
Madeira corner turned ¼”, clip[/caption]
18. Press ¼” folded edge to wrong side. Baste around white napkin, through the blue Madeira corner and across top of that corner. Alternatively, the entire baste area can be secured with a glue stick. It is important to have all held in place before you begin pinstitching along those edges.
PINSTITCH
** Also known as Parisian hemstitch This is such a classic and useful stitch. Traditionally, pinstitch secures a hemmed edge or joins lace to the edge of fabric. Its use at the top of the Madeira appliqué corner is expected, but the finish on the edge of the napkins and tablecloth is unique. It is worth studying the sequence of this stitch then practicing and mastering its uses. OPTION: If you are short of time, the linen edges can be nicely finished with an heirloom roll and whip or a shirttail hem. An appliqué stitch across the top of the Madeira corner could hold it in place.- Attach open toe foot.
- Insert 100 sharp needle. A wing needle makes a larger hole but might have difficulty penetrating several layers of anything heavier than lightweight linen at the beginning of the Madeira corner.
- Thread needle and bobbin with fine thread to match color of Madeira corner.
- Open Utility Stitch menu.
- Select pinstitch which is in screen 3, #304 on The Dream Machine, Quattro, Duetta and ULT series.
Madeira corner turned ¼”, clip[/caption]
If you are sewing on a machine other than the Brother sewing/embroidery machines listed above, choose your pinstitch carefully. It should look like this diagram. Don’t be fooled by the appliqué stitch with a similar appearance.
 Pinstitch advances forward and backward 3 times into the same two needle created holes. It goes forward once more into the second hole created. Next the needle reaches 90 degrees into the adjoining fabric, lace or into the air and returns to the hole it just left. It continues in this manner.
TEA LINEN NOTE: The repeated forward backward stitches which create holes are always worked into the white linen and only into the blue or colored linen at the bottom of Madeira corner curve. At the top of the Madeira corner, the forward backward stitches are in the white linen and the “reach” stitch goes into the blue corner. You will need to mirror image the stitch when you change direction. Look closely and you will see that the “reach” stitch is clearly visible in the blue linen at the top of the Madeira corner. At the bottom, the “reach” stitch goes beyond the fold leaving the pinstitch holes in the blue linen.
[caption id="attachment_1706" align="aligncenter" width="800"] Pinstitch holes up and down[/caption]
1. Set both stitch width and length to 3.0. Practice on a scrap with a fold. If there is any puckering, reduce the tension and/or use narrow paper or strip of water soluble stabilizer. Do not use regular tearaway stabilizer. The fine thread will be damaged when the stabilizer is removed. Stitch first over a folded edge of linen and then over colored linen stacked on folded linen—4 thicknesses—to evaluate whether adjustments to stitch length and/or width are necessary.
[caption id="attachment_1530" align="aligncenter" width="800"]
Pinstitch holes up and down[/caption]
1. Set both stitch width and length to 3.0. Practice on a scrap with a fold. If there is any puckering, reduce the tension and/or use narrow paper or strip of water soluble stabilizer. Do not use regular tearaway stabilizer. The fine thread will be damaged when the stabilizer is removed. Stitch first over a folded edge of linen and then over colored linen stacked on folded linen—4 thicknesses—to evaluate whether adjustments to stitch length and/or width are necessary.
[caption id="attachment_1530" align="aligncenter" width="800"] Pinstitch rehearsal, open toe foot[/caption]
Begin pinstitching the napkins once the stitch pattern is familiar.
2. Pinstitch from lower edge of Madeira corner over scalloped top, creating holes in the white linen. When the top curve is complete, pivot, mirror image stitch pattern to place holes in blue linen, adjust the position of the fabric to go on around bottom edge of corner. Continue around napkin perimeter along the route as shown in image below.
[caption id="attachment_1533" align="aligncenter" width="800"]
Pinstitch rehearsal, open toe foot[/caption]
Begin pinstitching the napkins once the stitch pattern is familiar.
2. Pinstitch from lower edge of Madeira corner over scalloped top, creating holes in the white linen. When the top curve is complete, pivot, mirror image stitch pattern to place holes in blue linen, adjust the position of the fabric to go on around bottom edge of corner. Continue around napkin perimeter along the route as shown in image below.
[caption id="attachment_1533" align="aligncenter" width="800"] Pinstitch route[/caption]
3. Trim excess fabric from behind pinstitched hem. Do not cut away behind the Madeira applique’. Curved snips work well for this job.
[caption id="attachment_1590" align="alignright" width="800"]
Pinstitch route[/caption]
3. Trim excess fabric from behind pinstitched hem. Do not cut away behind the Madeira applique’. Curved snips work well for this job.
[caption id="attachment_1590" align="alignright" width="800"] Trimming behind pinstitch[/caption]
4. Press well after trimming.
Trimming behind pinstitch[/caption]
4. Press well after trimming.
Editors Note: Janice is a wealth of information. For more information on the pinstitch, she has a wonderful post HERE(Opens in a new tab)
on her own blog, Janice Ferguson Sews(Opens in a new tab)
that's chalk full of even more pinstich information!
on her own blog, Janice Ferguson Sews(Opens in a new tab)
that's chalk full of even more pinstich information!
EMBROIDERY
For Disney’s Alice in Wonderland linen tea set, characters for the napkins were paired with colored linen. Each design center should be marked as indicated, measured from the bottom of the center Madeira curve.- Alice in Wonderland AIW03(Opens in a new tab)
– blue - design center 2 ¾” above center Madeira curve - Mad Hatter AIW04(Opens in a new tab)
– green - design center 2” above center Madeira curve - March Hare AIW05(Opens in a new tab)
– coral - design center 2” above center Madeira curve - White Rabbit BRO-AWL001(Opens in a new tab)
– yellow - design center 2 ¾” above center Madeira curve
 Snowman and measurement on napkin[/caption]
5. Attach embroidery unit and embroidery foot.
6. Open Alice file AIW03. Edit to include basting frame as close as possible to the perimeter of the design, so as to add no height to the design.
[caption id="attachment_1531" align="aligncenter" width="800"]
Snowman and measurement on napkin[/caption]
5. Attach embroidery unit and embroidery foot.
6. Open Alice file AIW03. Edit to include basting frame as close as possible to the perimeter of the design, so as to add no height to the design.
[caption id="attachment_1531" align="aligncenter" width="800"] Alice design on screen with basting frame selected[/caption]
7. Hoop tearaway stabilizer in 4x4 frame. Spray back of napkin with temporary adhesive and place on frame with snowman centered. The napkin must be carefully centered as the design is 94.5 mm in a 100 mm frame. If you’re a just-in-case person, hoop in a 5x7 frame so there is room to position the design, “just in case” the napkin was not exactly centered when it was basted.
8. Use snowman function to locate design center, then remove sticker or center design on marked cross hairs.
[caption id="attachment_1534" align="aligncenter" width="800"]
Alice design on screen with basting frame selected[/caption]
7. Hoop tearaway stabilizer in 4x4 frame. Spray back of napkin with temporary adhesive and place on frame with snowman centered. The napkin must be carefully centered as the design is 94.5 mm in a 100 mm frame. If you’re a just-in-case person, hoop in a 5x7 frame so there is room to position the design, “just in case” the napkin was not exactly centered when it was basted.
8. Use snowman function to locate design center, then remove sticker or center design on marked cross hairs.
[caption id="attachment_1534" align="aligncenter" width="800"] 10. Repeat with other three designs.
MADEIRA CORNER FLAT EDGING TRIM
Return to sewing mode. Attach open toe foot.
10. Repeat with other three designs.
MADEIRA CORNER FLAT EDGING TRIM
Return to sewing mode. Attach open toe foot.
- Cut 4 pieces of flat 1/4” edging trim 8 inches long for corners.
- Zig zag from pinstitch hole to tatting or other flat trim, using thread to match the linen color. Take care to add ease to the trim at the corner curve.
- Apply seam sealant to raw edges at beginning and ending of flat trim.
 After adding tatting to the corners, apply seam sealant in these areas[/caption]
FINISHING
- Remove stabilizer and wash out placement marks.
Tea party ready napkins[/caption]
TABLECLOTH
Madeira corners- Fold each 6” blue linen square in half diagonally. Press.
- Finish Madeira corners just as napkins.
- Alice in Wonderland Curtsy AIW01(Opens in a new tab)
- design center 2 3/8” above center Madeira curve - Queen of hearts BRO-VV005(Opens in a new tab)
- design center 2 3/4” above center Madeira curve - TweedleDee & TweedleDum BRO-AWL002(Opens in a new tab)
- design center 2 5/8” above center Madeira curve - Cheshire Cat BRO-VV008(Opens in a new tab)
- design center 2 ½” above center Madeira curve
- Cut 4 pieces of flat edging trim 10 inches long for corners.
- Add flat edging trim just as on napkins.
My Custom Stitch
This exclusive feature on certain Brother machines opens a world of creative possibilities. In My Custom Stitch I created a zig zag patterned feather stitch for use on baby blankets and other items. If you would like to use this My Custom Stitch as shown on the tablecloth, it can be downloaded for FREE here. I used the 3 mm size but it could be widened to 3.5 or 4.0. However, the directions below are specifically for the 3 mm MCS. Because the size of the Disney Alice in Wonderland embroideries varies, the distance between them also varies. By centering 16” of My Custom Stitch zig zag feather stitch between each embroidery it is possible to begin and end each 16” run of the zig zag feather My Custom Stitch with a complete pattern, a complete inverted V. Alternatively, another decorative stitch could be used. [caption id="attachment_1592" align="alignright" width="800"]
 Zig-Zag feather sewn out[/caption]
My Custom Stitch cannot be mirrored. So the zig zag feather must be stitched with the bulk of the tablecloth to the right of the needle. I know, I know--this is not where the bulk is normally placed while stitching. But you can do this, I’m sure.
Zig-Zag feather sewn out[/caption]
My Custom Stitch cannot be mirrored. So the zig zag feather must be stitched with the bulk of the tablecloth to the right of the needle. I know, I know--this is not where the bulk is normally placed while stitching. But you can do this, I’m sure.
- Draw a line 4” above the finished edge around the tablecloth. No need to draw through the embroidery.
- Mark the center of each side.
- Align the 8” mark of a ruler on the marked center of the 4” line and draw a perpendicular line at either end of 16”.
 Marked 16” line[/caption]
- Remove embroidery unit and embroidery foot. Attach sewing ankle with open toe foot.
- Insert memory stick with zig zag feather stitch.
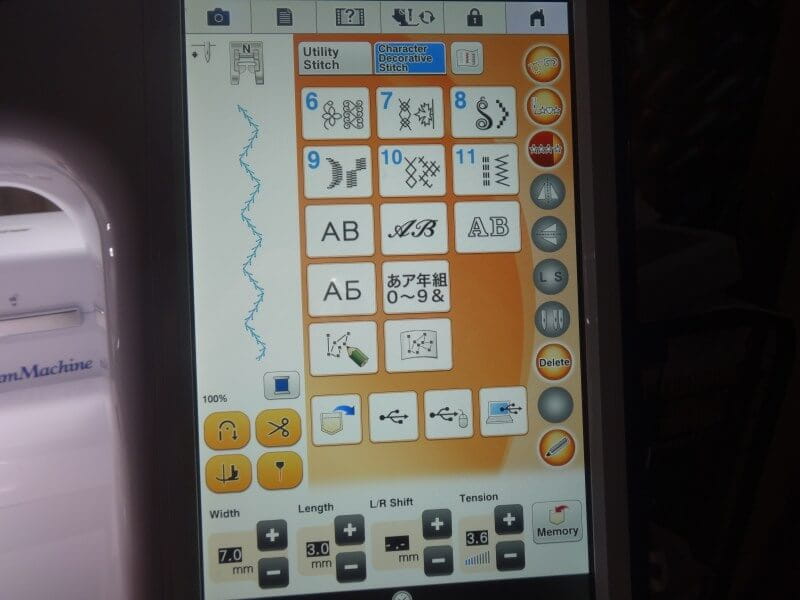
- Select Sewing option.
- Open Character and Decorative Stitch menu.
- Select USB option.
 My Custom Stitch screen 1 USB[/caption]
- Recognize single zig zag feather pattern.
 My Custom Stitch screen 2 shows single feather pattern[/caption]
- Select feather and next screen appears, showing the stitch repeated.
- Retrieve the stitch by selecting the folder with the blue arrow.

- Save stitch to memory by selecting memory pocket with red arrow.
 My Custom Stitch screen 4 memory pocket with red arrow[/caption]
- Place the presser foot at the beginning of the 16” section. The center line on the open toe foot should be in alignment with the marked 4” line.
- Pull an 8” length of bobbin and needle thread to the left side of the tablecloth and hold it for the first few stitches.
- Engage single pattern function as you approach the end of the 16” in order to complete the pattern precisely.
 single pattern icon[/caption]
- Pull again an 8” length of needle and bobbin thread at the end of the 16” run of stitching before cutting. No tie off is built into the MCS stitch so the threads must be hand knotted. Then trim closely for a neat finish on the underside of the tablecloth. Or they can be woven through a few of the feather stitches.
Finishing
Rinse out all markings and press tablecloth. Invite a few children for tea.Kindergarten Tea
- 2/3 cup instant tea
- 2 cups sugar
- 2 tsp. ground cloves
- 2 small envelopes lemonade mix
- 2-3 tsp. cinnamon
- 1 lb. jar Tang
- These Disney embroidery designs have been manufactured by Brother under a licensing agreement with The Walt Disney Company, through which Brother has permission to use Disney images. The embroidery patterns offered on iBroidery are for personal non-commercial use only. No license is granted for any commercial use of these embroidery patterns and any such use is strictly prohibited.
Related Projects
Stay Connected
* Required fields
Follow Us
- Product Support
- Product Support Assistant
- Terms of Sale
- Product-Registration
- Search Supplies/Accessories
- Ordering & Shipping Information
- Ordering & Account FAQs
- View Order Status
- Warranty & Extended Warranty Information
- Recall Information
- Return Policy
- Security Support Information(Opens in a new tab)
- Contact Brother
