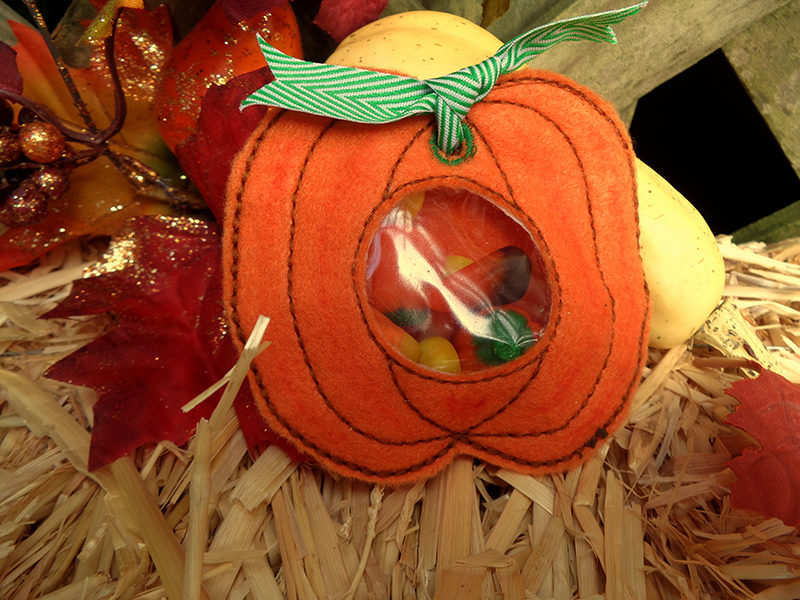
A Pumpkin Patch of Pumpkin Goodies
It’s a pumpkin patch of goodies and so much fun to make! With your Brother Embroidery machine,
you can quickly stitch enough to fill a basket of these cuties. Delight visiting children or any young friends at church or community gatherings. Mail a few to your grandchildren or deliver some to nursing home friends or children at a homeless shelter. Because pumpkin season runs long, from fall to Thanksgiving, a wagon load would not be too many. You will have a good time making and giving these away as the possible variations are unlimited. You will have a hard time stopping with one. I could not! Individual pumpkins are mixed in with the directions. WARNING: These can be addictive. Here are a few variations: Burlap, curly ribbon, burlap strand ribbon, printed felt, printed burlap

Basic Pumpkin
Requirements for one pumpkin- (2) 5” felt orange squares for 4x4 size or (2) 6” squares for 5x7 size
- 3-4” circle of clear vinyl
- Tearaway stabilizer for 4x4 or 5x7 frame
- Plenty of yummy Halloween candy
Notions:
- 10” ribbon
- Large tapestry needle
- Painters masking tape
Thread:
- Embroidery thread green and orange, white and optional green bobbin
Downloads:

Note: There are so many interesting printed burlaps that would make cute pumpkins. I like to cut a wider distance from the stitching to create fringe. Adding curly ribbon makes it more festive.
Tips:
- Pay very close attention to the sequence. There would have been enough pumpkins for a neighborhood full of trick-or-treaters if I had not ruined so many by not following the prescribed order.
- Craft felt pieces come in two styles, stiff and soft. Either will work, but the stiff is more expensive. If I have both kinds in one color, I like to use the stiff felt for the top. It does not distort so much once it is filled with candy.
- If using stiff felt, penetration of the eyelet is easier with the use of a sharp cutting tool such as an art knife.
- The stabilizer will likely be visible on the trimmed outer edges. If using black or dark felt, use black tearaway. Otherwise, trim close to the outer edges BEFORE cutting out the pumpkin shape. It is much easier to trim between two larger pieces of felt than two narrow ones.

Note: This would have looked nice with gold metallic thread. I always get these ideas too late. Maybe I’ll make another one!
Directions:
There are 8 color stops: NOTE that the pumpkin may be stitched entirely in one color. However, do not select the single color icon on your machine as it will eliminate the necessary color stops.- Color Stop #1: Outline pumpkin and window on stabilizer. A dried up red marker was used to add some shading. I think it was too dry to show up much. But you could get some interesting effects with this technique.

- An almost dried up marker was used to add shading. I think it was too far gone to make an impact, but you could get some interesting effects by adding shaded color.
- Color Stop #2: Place vinyl over round window outline. Stitch in place and trim approximately ¼” from stitching line.
Note: No need to trim closely because this won’t show. Cutting wide makes the window more secure when little hands squeeze and play with the pumpkin.

- Cut felt to fit in frame. Print a template or place inner hoop over felt and draw just inside with marking pen. Take care not to mark your hoop. A chalk or water soluble marker would be a better choice, but neither would show up in the photo. Cut the felt generously so as to just fit inside the frame.


Note: Some orange burlap scraps were left over from another project. Threads were pulled from a long edge and twisted together to make a twine cord. Why didn’t I straighten the bow before taking the photo?
- Tape felt in place outside the stitching area. Color Stop #3: Stitch Color Stop #3: The pumpkin outline.

- Trim stabilizer from behind window and close to stitching line. Stabilizer that extends into the window will show on the finished pumpkin.

- Stitch Color #4: Curved lines.

- Stitch Color #5: The circular window outline. Trim away felt 1/8-1/16” from stitching.


Note: Notice BOO! on the ribbon. It is fun to print text on the Brother P-touch Embellish ribbon and tape printer.
This little device can print ribbons for every occasion, or just for fun.
This little device can print ribbons for every occasion, or just for fun.

- Stitch Color #6: The Eyelet


Tip: Use of variegated thread gives interesting effects.
- Stitch Color #7: Pumpkin top curve

Note: Be sure no thread tails extend into the window. After the next step they will be trapped there and visible.
 Ho hum… maybe some marker shading would have spruced this up. Or maybe you prefer a plain-Jane pumpkin..?
- Cut felt for pumpkin back as done in step #3. Remove frame from machine and tape to stabilizer outside stitching area.
 Look at those cute spiders on the ribbon. Materials for Halloween decorating are endless—and cute.
- Stitch Color #8: Outline of lower ¾ of pumpkin. This is the time to trim stabilizer up to outline.

- Trim around pumpkin outline, 1/8-1/4” from stitching.
 This is another printed felt tied up with witches’ feet. So cute.
- Punch hole through eyelet and backing felt with awl or point of scissors.

- Stuff pumpkin with candy. Thread ribbon through hole and tie closed.
 A friend tested the design and couldn’t stop herself either. Here are some of her darling pumpkins. It makes me want to make more!

Related Projects
Stay Connected
* Required fields