Accessory Spotlight: Sewing a Lapped Zipper using Zipper Foot “I”
Brother Sews Blogger
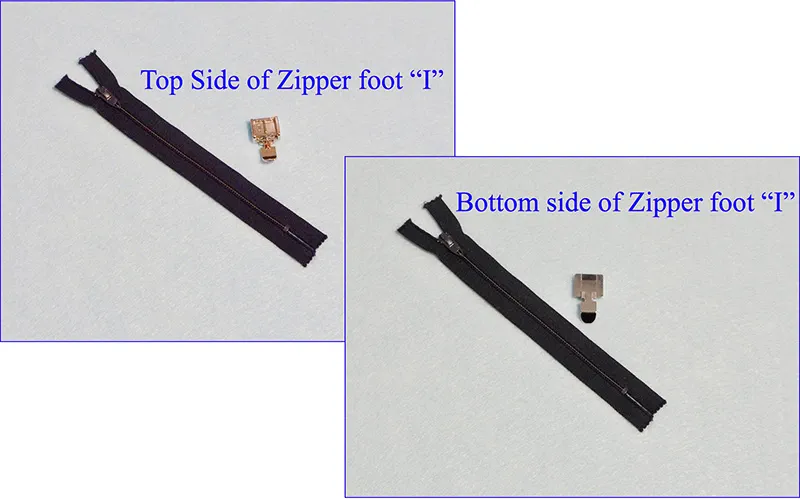
Spring is the perfect time to get back to basics and polish up your sewing skills. This tutorial will guide you through the steps for sewing a lapped zipper application using the zipper foot included with most Brother sewing machines. Zipper foot “I” is listed as part number X59370-051. Check your machine manual to see if this was included with your machine. In most cases it’s part of your standard accessories. If you look closely at this style of zipper foot, you’ll see that it includes a place to snap the foot on the machine in the right or left position. Take a look at the bottom side and you’ll see a distinct groove on each side. These grooves are designed to ride smoothly over the “teeth,” or coils of a standard synthetic zipper made for dressmaker applications. Zipper foot “I” is ideal for sewing close to the zipper teeth. You can achieve a polished, professional look on your next garment project that includes a center back or a side seam zipper. Are you ready to sharpen your zipper sewing skills? Let’s go sew!
Supplies you’ll need for this sample:
In this example I’m sewing a zipper into a small-scale skirt to use as a practice sample. I had this little quarter scale pattern leftover from my fashion school pattern making days. You can create a similar sample by cutting two rectangles of medium weight firm fabric measuring approximately 4-inches wide X 12-inches long, simulating a section of skirt back pattern pieces. Mark one edge of 12-inch piece as the waistline and the other as the hemline. Mark a dot on the 5/8-inch seamline, measuring 7-inches from the top edge. See Figure #1. On an actual pattern the mark for stopping the stitching is shown on the pattern tissue. The pattern notions list would also tell you the right zipper length to select. However, I always choose a zipper a few inches longer that the pattern requires. By extending the zipper beyond the waistline you avoid the bump that often occurs at the waistline seam. Using this method, it’s important to keep from trimming the excess zipper until after the waistband or garment facing is sewn to the top edge. You’ll need a 9-inch or longer zipper to create this sample. I used dark thread and a dark zipper for better visibility.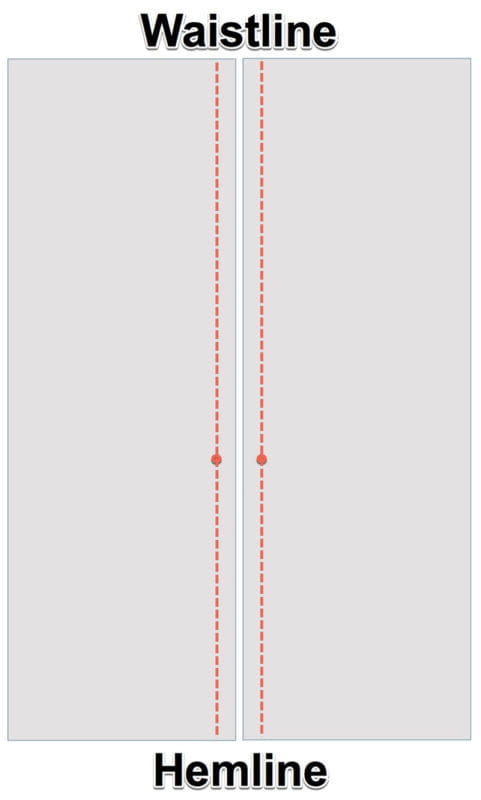 Figure #1[/caption]
Steps to Sew the Zipper Sample
1. Prepare to sew the zipper sample following steps below: • Finish the raw edges of the seam with a serger or overcast stitch on your machine. • Lightly press zipper using a press cloth. • To stabilize the zipper area, fuse a strip of lightweight interfacing to the wrong side of each back piece, having cut edge positioned close to the basting line and aligned with raw edge of the waistline. • Using the standard “J” foot sew a 5/8-inch seam, starting from the bottom edge and stopping at the dot, taking care to backstitch at each end. • Change to a basting length stitch (5.0), and finish the seam, sewing all the way to the waistline edge. Lightly tie off the thread tails of your basting stitch to keep basted seam from pulling out. Snip basting stitches every two inches or so to make stitches easier to remove when you’re finished. Press seam open. See Figure #2a and Figure #2b. [caption id="attachment_24373" align="aligncenter" width="800"] Figure #2a[/caption]
[caption id="attachment_24374" align="aligncenter" width="800"]
Figure #2a[/caption]
[caption id="attachment_24374" align="aligncenter" width="800"] Figure #2b[/caption]
2. Set machine for a straight stitch in the center needle position. It’s a good idea to turn the handwheel of the machine manually and check to see that the needle does not come in contact with the foot. Snap zipper foot “I” on the machine, snapping it onto the bar on the left side of the foot. See Figure #3.
[caption id="attachment_24375" align="aligncenter" width="800"]
Figure #2b[/caption]
2. Set machine for a straight stitch in the center needle position. It’s a good idea to turn the handwheel of the machine manually and check to see that the needle does not come in contact with the foot. Snap zipper foot “I” on the machine, snapping it onto the bar on the left side of the foot. See Figure #3.
[caption id="attachment_24375" align="aligncenter" width="800"] Figure #3[/caption]
3. Lay skirt flat, with the seam completely open and both skirt pieces pushed toward the right-hand side. Open zipper all the way. Lay zipper face down on the open seam. Pin zipper tape to the single layer of the seam allowance, having metal stop on the zipper just below the basting and zipper coils just touching the basted seam. Note: Excess zipper tape extends beyond the waist. See Figure #4.
[caption id="attachment_24376" align="aligncenter" width="800"]
Figure #3[/caption]
3. Lay skirt flat, with the seam completely open and both skirt pieces pushed toward the right-hand side. Open zipper all the way. Lay zipper face down on the open seam. Pin zipper tape to the single layer of the seam allowance, having metal stop on the zipper just below the basting and zipper coils just touching the basted seam. Note: Excess zipper tape extends beyond the waist. See Figure #4.
[caption id="attachment_24376" align="aligncenter" width="800"]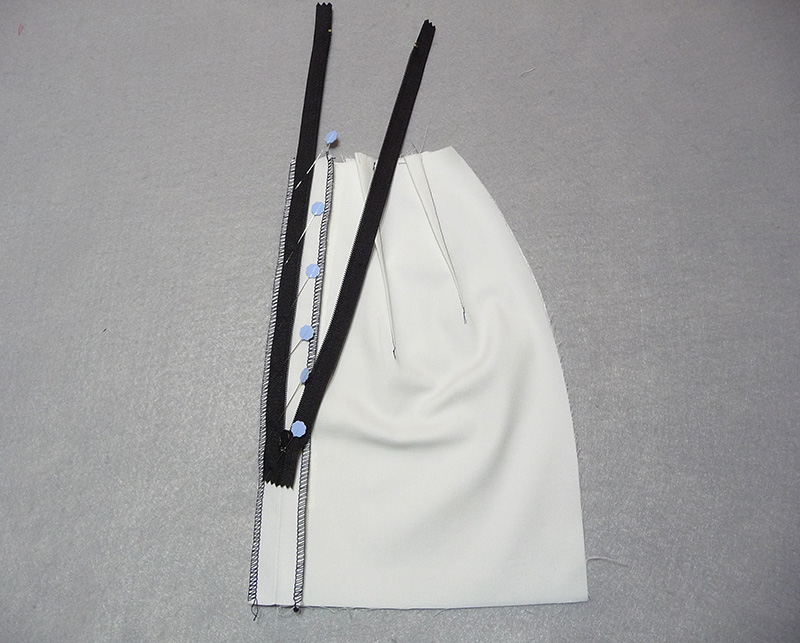 Figure #4[/caption]
4. Turn the skirt and position coils under the groove on the foot, getting as close to the bottom of the zipper as you can. See Figure #5.
[caption id="attachment_24377" align="aligncenter" width="800"]
Figure #4[/caption]
4. Turn the skirt and position coils under the groove on the foot, getting as close to the bottom of the zipper as you can. See Figure #5.
[caption id="attachment_24377" align="aligncenter" width="800"]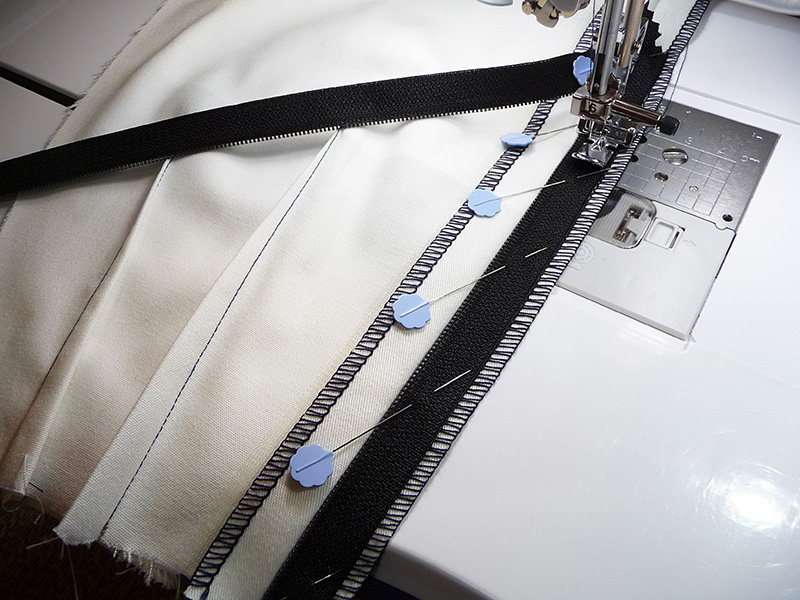 Figure #5[/caption]
5. With the groove on the left side of the foot riding over the zipper coils, sew zipper to the single layer of seam allowance, starting at the bottom and finishing at the waist. There is no need to backstitch at either end. See Figure #6.
[caption id="attachment_24378" align="aligncenter" width="800"]
Figure #5[/caption]
5. With the groove on the left side of the foot riding over the zipper coils, sew zipper to the single layer of seam allowance, starting at the bottom and finishing at the waist. There is no need to backstitch at either end. See Figure #6.
[caption id="attachment_24378" align="aligncenter" width="800"] Figure #6[/caption]
6. Zip up the zipper and then flip it over so that the opposite side of the tape is facing up on the right-hand side. Be sure to keep both layers of the skirt to one side. Next, smooth the seam allowance away from the zipper teeth, exposing 1/8-inch of the seam allowance, finger pressing and forming a narrow fold to the left of the zipper coils. Now, pin the loose end of the tape in place near the zipper stop, smoothing fabric to maintain the narrow fold of fabric evenly from bottom to top. Snap zipper foot onto the bar on the right side of the foot. Position foot so you can stitch close to the fold. Note that you need to stitch through just the fold and the previously stitched zipper tape. See Figure #7.
[caption id="attachment_24379" align="aligncenter" width="800"]
Figure #6[/caption]
6. Zip up the zipper and then flip it over so that the opposite side of the tape is facing up on the right-hand side. Be sure to keep both layers of the skirt to one side. Next, smooth the seam allowance away from the zipper teeth, exposing 1/8-inch of the seam allowance, finger pressing and forming a narrow fold to the left of the zipper coils. Now, pin the loose end of the tape in place near the zipper stop, smoothing fabric to maintain the narrow fold of fabric evenly from bottom to top. Snap zipper foot onto the bar on the right side of the foot. Position foot so you can stitch close to the fold. Note that you need to stitch through just the fold and the previously stitched zipper tape. See Figure #7.
[caption id="attachment_24379" align="aligncenter" width="800"] Figure #7[/caption]
7. Stitch from bottom to top, backstitching at each end and taking care to stitch slowly in the area of the zipper stop.
Figure #7[/caption]
7. Stitch from bottom to top, backstitching at each end and taking care to stitch slowly in the area of the zipper stop.
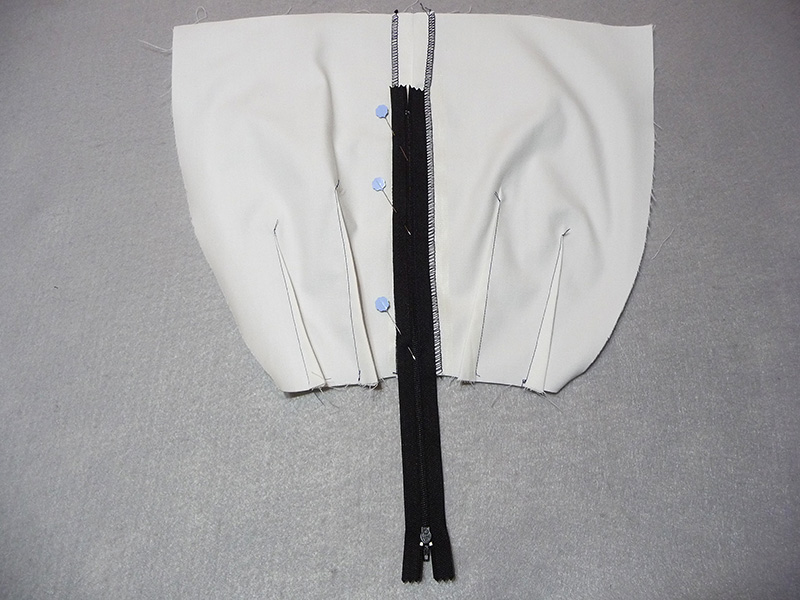 Figure #8[/caption]
 Baste the zipper having the line of stitching form ¼-inch from the edge of the tape. Mark a line with chalk line if you wish or use the Sew Straight laser or projected guideline marker if you have this option. There is no need to stitch across the bottom of the zipper at this point. We’ll do that in the next step. See Figure #10.

 Your sample is finished! Enjoy!
Related Projects
Stay Connected
* Required fields