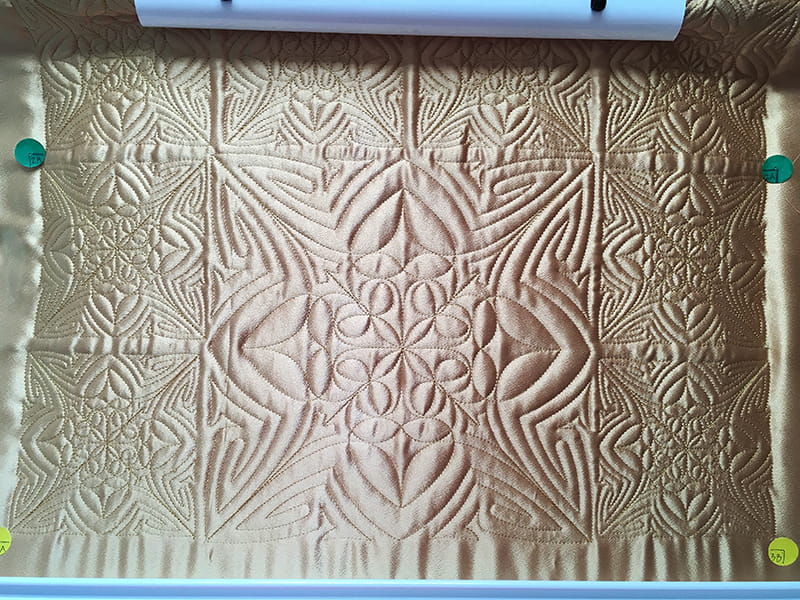
Combining Blocks for Multiple Design Sizes
Sometimes beautiful quilting and the texture it gives a project is intriguing enough to stand alone. Nowhere is that more evident than in a simple wholecloth quilt made with solid-color fabric, and you can add a subtle shimmer by using crepe-backed satin as your fabric. THE Dream Fabric Frame
works like an embroidery hoop to hold even slippery fabrics in place for precise design placement and execution. The tools in THE Dream Motion Pro
software allow you to combine small blocks, simply creating a central motif framed with a quilted border. This project, which can be finished as a wall hanging or large pillow, gives you a chance to explore merging and to see what differences size makes in the appearance of a quilt motif.
Materials:
- 3/4 yard of 60"-wide crepe-backed satin for top
- 3/4 yard of 45"-wide quilting cotton for backing
- 27" x 45" piece of batting
- Quilting and sewing threads* Optional, for pillow: polyester fiberfill or a 20" pillow form
Note: *The quilting thread you choose has a big effect on a project like this. Match the thread to the fabric to emphasize the texture of the quilting, or choose a contrasting thread to make the motifs and stitches more visible. The sample uses a trilobal polyester for the quilting to match the glossy surface of the satin.
Designing:
- Open THE Dream Motion Pro
and select QuiltCAD. Click Size and set up a quilt four blocks across and four blocks high, with the total size 20" x 20".

- Click and drag to select the four central blocks, then click Layout>Merge.

- Select a pattern for the central motif and set it into the merged space. Our sample uses "tri heart complete" from the Block folder. Use the Max icons to stretch the pattern so that it fills the entire merged space.

- Click the Invert Select icon (it's at the bottom right corner of the workspace) to deselect the center block and select the border blocks with just one click.

- Place the same pattern into the border blocks. Click the Lock icon so the width and height will change together, keeping the patterns square, and click either Max icon to fill each block with pattern.

- Because we've chosen block patterns rather than continuous designs, each section of the border will stitch individually. To provide a little wiggle room, make each border motif just a bit smaller so that they don't connect to each other or the central pattern. Click the Step icon twice so Medium appears underneath and click one of the lower sizing icons to decrease the width once.

- Save your design – a good habit to develop!
Quilting:
- Sandwich the quilt backing, batting, and top fabrics and baste the layers together. Mount the sandwich on THE Dream Fabric Frame with the first 5" border in quilting position. If you mount the fabric sideways (with the selvages at the top and bottom of the frame), you can use the extra fabric in place of headers. Center the 20"-square quilting on the fabric, and you'll have leftover fabric at each end that can be used for a pillow back, if you choose.
- Using the Zone method, quilt the design. Because the blocks are different sizes, the zones will not be the usual rows all the way across the frame's safe area. The zone markers may be placed in unexpected locations, but the software will guide you through the process step by step.

- Zone 1 stitched and markers for Zone 2 in place

- Zone 2 stitched and markers for Zone 3 in place
- Remove the fabric from the frame when the quilting is complete.
Finishing:
- Seam allowance is 1/4"
Wall Hanging:
- Trim the quilt sandwich 1/2" outside the quilted area.
- Cut four binding strips, 2" x 27", from the un-quilted fabric and bind the edges of the wall hanging.
Pillow:
- Trim the quilt sandwich 1/2" outside the quilted area.
- From the remnants of the quilt sandwich, cut squares or rectangles and piece together to make a 20 1/2" square. You can quilt the layers of the pillow back, if desired.
- Place the pillow back and front right sides together and stitch the outer edges, leaving an opening for turning.
- Trim the corners diagonally to reduce bulk, turn the pillow right side out, and stuff. Close the opening with hand or machine stitches.

