
I love wearing scarves and making scarves! How about you? I have lots of them in my closet and although some of them are ready-made from a store, I have many that I’ve made myself. My own custom scarves are some of my all-time favorites. In fact, I always have “make more scarves” note on my sewing wish list. Recently I stitched a few from soft lace fabric found in the fancy fabric section of the fabric store. I find myself reaching for these again and again for both casual wear and more dressy days too.
Infinity scarves are a perennially popular style, and so easy to make. This serger style infinity scarf features exposed serger stitching that adds a bit of decoration and makes for a super quick construction method.
Make this scarf from light weight lacy fabric and you’ll have a great wardrobe accent that transitions from late summer into early fall. As an alternative, you could opt for a lightweight, soft knit as well. Make one of these for yourself and I bet you’ll find yourself making many more to give as gifts.
Are you ready? Let’s go sew!
Materials and Supplies:
- Brother Serger to use for long seams on scarf. Serger featured in this project is the Brother Pacesetter PS5234.
- Brother Sewing Machine to use for finishing scarf with center back seam. Machine featured in this project is the Brother Pacesetter PS200T
but another option would be the Brother Pacesetter PS700.
- Three cones of serger thread to match fabrics.
- Basic sewing notions including sewing thread to match fabric and long pins suitable for pinning lace.
- Lightweight lacey fabric or lightweight knit with a nice drape. For each scarf you will need two strips of fabric measuring 14” to 15” wide X 70” long. Cut fabric with length running along the selvedge edge, taking care to trim away the selvedges. Note: Two yards of fabric that is 60-inches wide or slightly wider will allow you to make two scarves, one for you and one for a friend.
Steps to Create Scarf
1. Layer the two strips with wrongs side facing together and all raw edges even. Pin each long edge from end to end, placing pins a good distance from the raw edge.
See Figure #1. Tips for pinning: Flat, flower head pins, also known as lace pins, are ideal for loose weave fabrics as the heads do not easily get lost in the fabric. Pinning at an angle will help secure layers together. When pinning, consider the direction you will be stitching on your serger, and pin so it is easy to remove pins as you stitch. It is extremely important to make sure pins do not come into contact with your serger blades as you stitch.
[caption id="attachment_21330" align="aligncenter" width="800"]
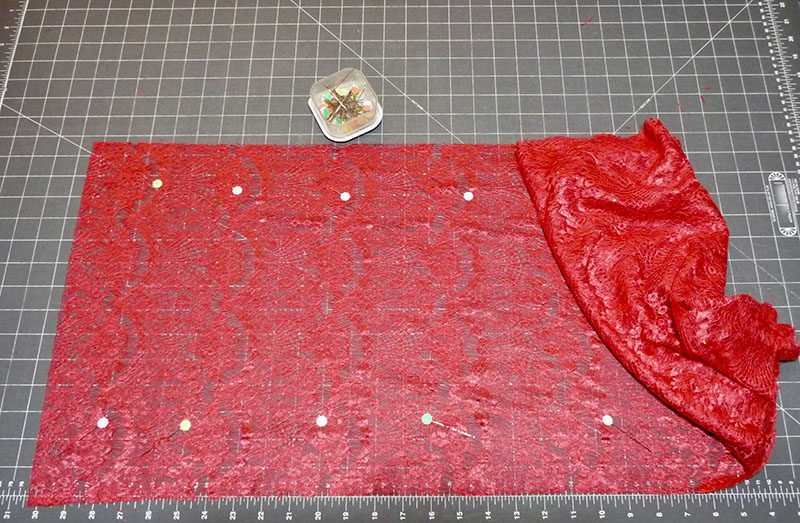
Figure #1[/caption]
If short ends are uneven after pinning long edges simply trim away any excess to straighten out each edge.
2. Using the left needle only, set up the serger for a three-thread balanced stitch. When properly set, the loops will hug the edge of the fabric and the stitch will lay flat and smooth. In this example the stitch is set for a length of 3.0 and the stitch width is increased slightly for a setting of 6. Test the stitching on a remnant of identical or similar fabric. For best results, take care to trim the edge slightly as you stitch.
See Figure #2, noting that the protective door of the serger is open in this photo so you can easily see where the blade is cutting the fabric. When serging, you will want to make certain the door is closed as you stitch.
[caption id="attachment_21331" align="aligncenter" width="800"]
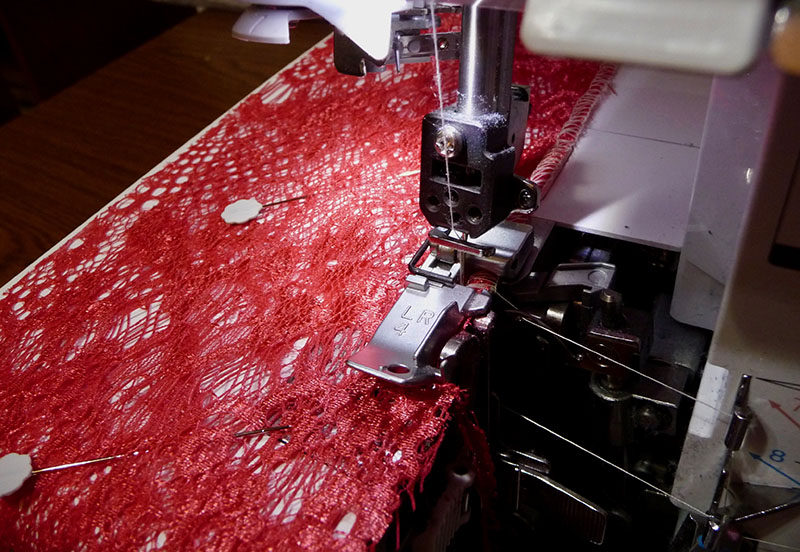
Figure #2[/caption]
Test sample shown in
Figure #3 shows a contrast color thread.
[caption id="attachment_21332" align="aligncenter" width="800"]
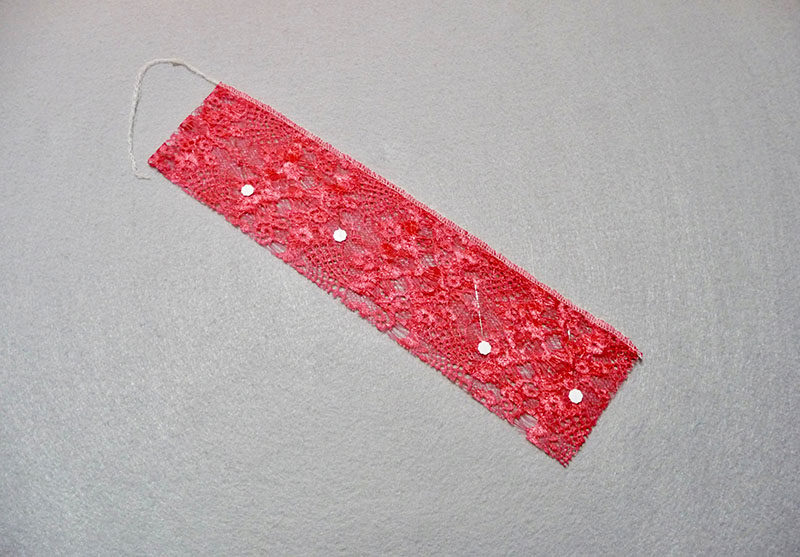
Figure #3[/caption]
3. When you have finished setting up the serger and testing the stitch, serge finish each long edge. With matching thread the stitch will blend into the lacy fabric.
See Figure #4. If you’re using a flat knit the serger stiches will show more as a decorative accent.
[caption id="attachment_21333" align="aligncenter" width="800"]
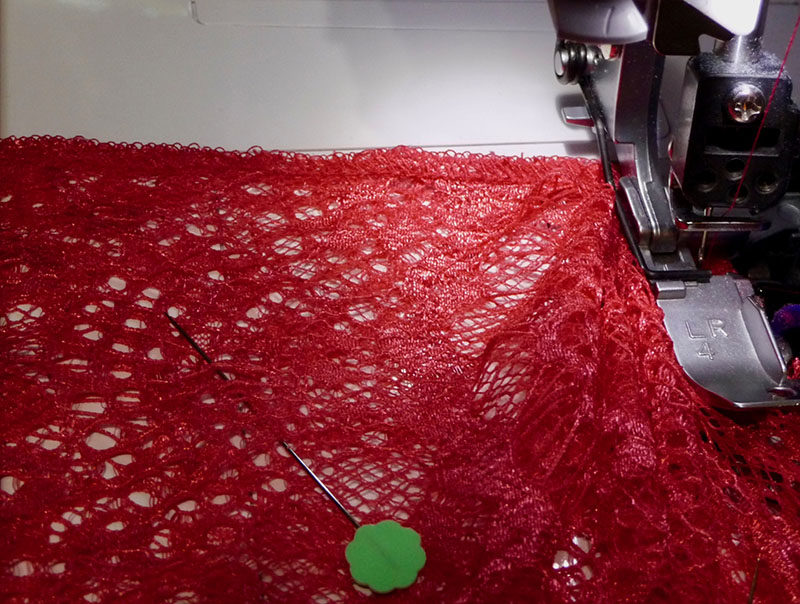
Figure #4[/caption]
4. After serging both edges lay the piece flat on a table making sure the strip is not twisted, and having the short ends facing one another. Pin both short ends. To prepare for the next step you’ll need to flip one end over to create a purposeful twist for the scarf.
See Figure #5.
[caption id="attachment_21334" align="aligncenter" width="800"]
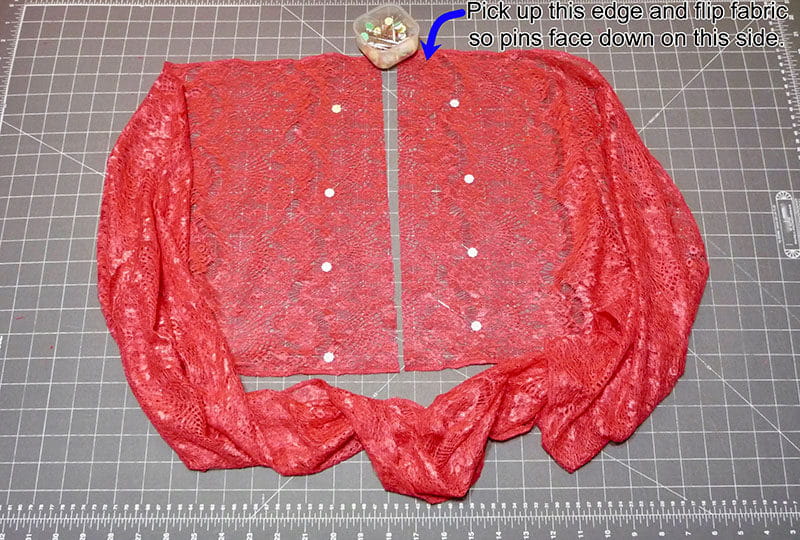
Figure #5[/caption]
5. Now that you have flipped the fabric, one set of pins will face the table. To create a center back seam, place one short side over the other, overlapping the raw ends by ¾-inch. Pin through all layers.
Tip: Don’t be shy with the number of pins you use!
See Figure #6.
[caption id="attachment_21335" align="aligncenter" width="800"]
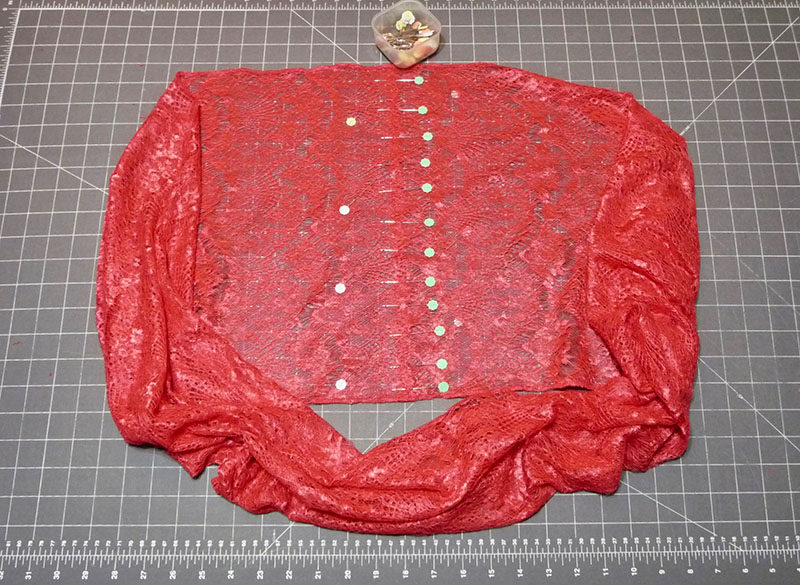
Figure #6[/caption]
6. Now you can remove all the pins except for the ones holding the center back seam together. Set up the sewing machine for a straight stitch using the left needle position and a stitch length of 3.0. Sew two lines of stitching to create a flat center back seam, removing pins as you sew. Lace and knits don’t ravel so this seam can be stitched on the outside instead of the inside, making this a quick and easy way to finish the scarf.
See Figure #7a. See actual stitching lines in enhanced photo in
Figure #7b.
[caption id="attachment_21329" align="aligncenter" width="800"]
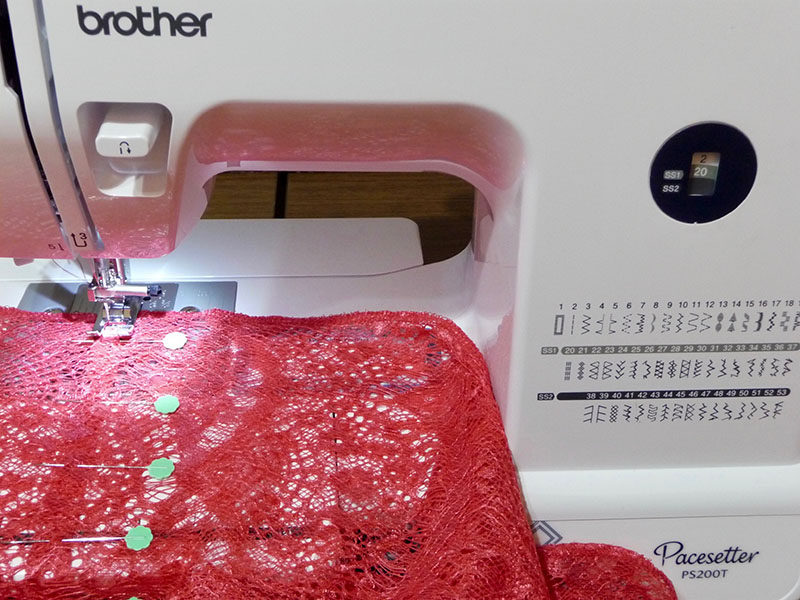
Figure #7a[/caption]
[caption id="attachment_21336" align="aligncenter" width="800"]
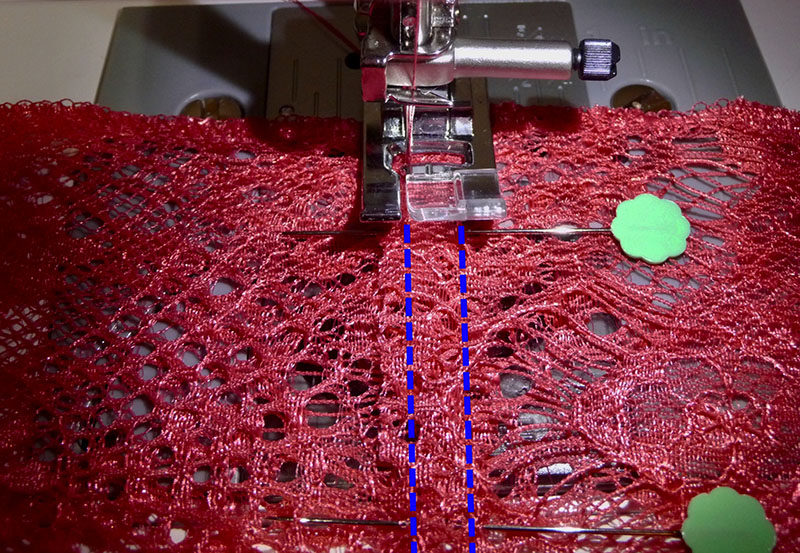
Figure #7b[/caption]
The resulting seam will create a twist in the scarf.
See Figure #8. Wear the scarf by looping it twice around the neck and the twist will allow for a beautiful drape. Adjust the length of the two loops as desired for a personalized look. Your scarf is finished.
Enjoy!
[caption id="attachment_21337" align="aligncenter" width="800"]
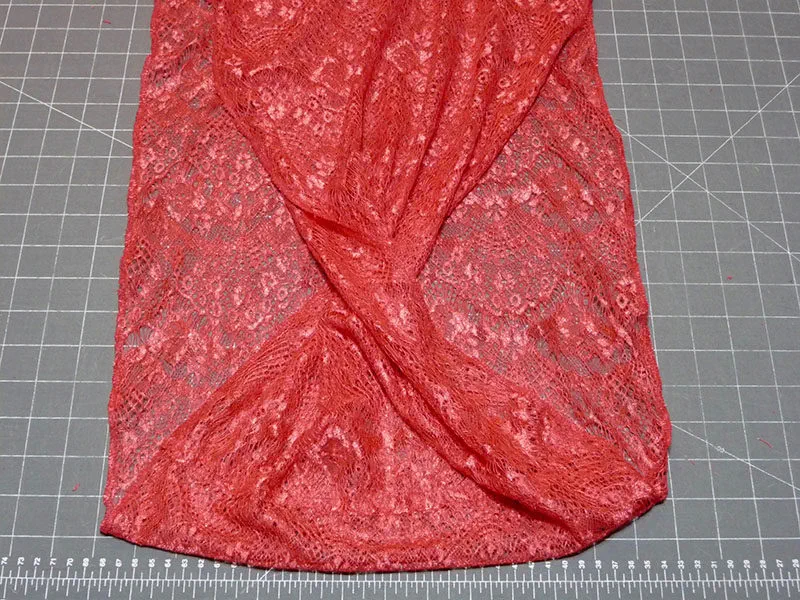
Figure #8[/caption]


 I love wearing scarves and making scarves! How about you? I have lots of them in my closet and although some of them are ready-made from a store, I have many that I’ve made myself. My own custom scarves are some of my all-time favorites. In fact, I always have “make more scarves” note on my sewing wish list. Recently I stitched a few from soft lace fabric found in the fancy fabric section of the fabric store. I find myself reaching for these again and again for both casual wear and more dressy days too.
Infinity scarves are a perennially popular style, and so easy to make. This serger style infinity scarf features exposed serger stitching that adds a bit of decoration and makes for a super quick construction method.
Make this scarf from light weight lacy fabric and you’ll have a great wardrobe accent that transitions from late summer into early fall. As an alternative, you could opt for a lightweight, soft knit as well. Make one of these for yourself and I bet you’ll find yourself making many more to give as gifts. Are you ready? Let’s go sew!
 Figure #1[/caption]
If short ends are uneven after pinning long edges simply trim away any excess to straighten out each edge.
2. Using the left needle only, set up the serger for a three-thread balanced stitch. When properly set, the loops will hug the edge of the fabric and the stitch will lay flat and smooth. In this example the stitch is set for a length of 3.0 and the stitch width is increased slightly for a setting of 6. Test the stitching on a remnant of identical or similar fabric. For best results, take care to trim the edge slightly as you stitch. See Figure #2, noting that the protective door of the serger is open in this photo so you can easily see where the blade is cutting the fabric. When serging, you will want to make certain the door is closed as you stitch.
[caption id="attachment_21331" align="aligncenter" width="800"]
 Figure #2[/caption]
Test sample shown in Figure #3 shows a contrast color thread.
[caption id="attachment_21332" align="aligncenter" width="800"]
 Figure #3[/caption]
3. When you have finished setting up the serger and testing the stitch, serge finish each long edge. With matching thread the stitch will blend into the lacy fabric. See Figure #4. If you’re using a flat knit the serger stiches will show more as a decorative accent.
[caption id="attachment_21333" align="aligncenter" width="800"]
 Figure #4[/caption]
4. After serging both edges lay the piece flat on a table making sure the strip is not twisted, and having the short ends facing one another. Pin both short ends. To prepare for the next step you’ll need to flip one end over to create a purposeful twist for the scarf. See Figure #5.
[caption id="attachment_21334" align="aligncenter" width="800"]
 Figure #5[/caption]
5. Now that you have flipped the fabric, one set of pins will face the table. To create a center back seam, place one short side over the other, overlapping the raw ends by ¾-inch. Pin through all layers. Tip: Don’t be shy with the number of pins you use! See Figure #6.
[caption id="attachment_21335" align="aligncenter" width="800"]
 Figure #6[/caption]
6. Now you can remove all the pins except for the ones holding the center back seam together. Set up the sewing machine for a straight stitch using the left needle position and a stitch length of 3.0. Sew two lines of stitching to create a flat center back seam, removing pins as you sew. Lace and knits don’t ravel so this seam can be stitched on the outside instead of the inside, making this a quick and easy way to finish the scarf. See Figure #7a. See actual stitching lines in enhanced photo in Figure #7b.
[caption id="attachment_21329" align="aligncenter" width="800"]
 Figure #7a[/caption]
[caption id="attachment_21336" align="aligncenter" width="800"]
 Figure #7b[/caption]
The resulting seam will create a twist in the scarf. See Figure #8. Wear the scarf by looping it twice around the neck and the twist will allow for a beautiful drape. Adjust the length of the two loops as desired for a personalized look. Your scarf is finished. Enjoy!
[caption id="attachment_21337" align="aligncenter" width="800"]
 Figure #8[/caption]


