DIY Embroidered Candle Cover
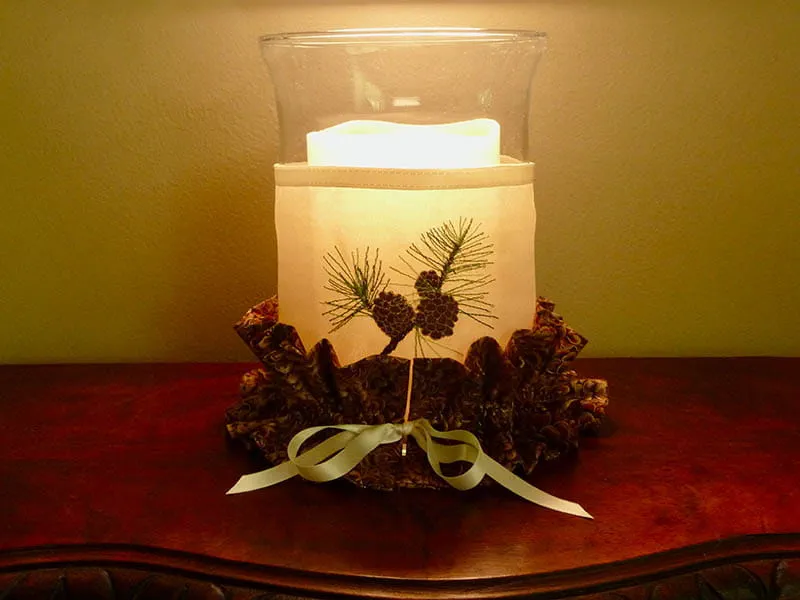
Candles add a warm glow to your seasonal table setting. This candle cover slips over a glass cover and is embroidered with a wonderful design from the Brother iBroidery page. I used the pinecone embroidery design to embellish sheer organza, then added a ruffled fabric accent to decorate the bottom edge. Place this on a dining table or anywhere else to add seasonal décor for special occasions throughout the holiday season!
Supplies for Candle Cover:
- Brother embroidery machine with 4-inch hoop capability.
- SA541 Brother lightweight water-soluble stabilizer.
- SA5906 Adhesive backed water-soluble stabilizer.
- Embroidery threads and size 11 embroidery needle for embroidering.
- Basic notions, including tape measure, tool for inserting ribbon in casing, and thread to sew organza and fabric.
- 3/8-inch-wide double-faced satin ribbon to coordinate with fabrics.
- Polyester or Nylon organza for candle cover on glass. Printed cotton fabric for bottom ruffle. See instructions for sizes.
- Candle and glass vase for candles. Mine candle vase was labeled as an 8-inch vase.
- Brother Pinecone Design, See Figure #1 below.
Figure #1

Please read through all instructions before beginning this project. Basic steps are as follows:
- Measure candle vase and cut fabrics to size.
- Embroider design on organza.
- Sew organza to fit vase and sew ruffle for accent.
All Steps to Create Candle Vase Cover and Ruffle:
- Gather your supplies. See Figure #2a and figure #2b.
- Measure and record height of area you wish to cover on candle vase. Measure and record circumference of candle vase at the widest point. See Figure #3 and Figure #4.
- Cut fabric pieces for candle vase cover as follows:
Double the height measurement and record as total height. Add five inches to circumference measurement, round up or down to a whole number, and record as total width.
Organza for covering vase: Cut a strip of organza using numbers for measurement of total height and total width of strip. Example: My organza strip measured 11-inches total height X 22-inches total width.
Fabric for bottom ruffle: Using the total circumference measurement for length, cut a strip of fabric measuring 8-inches wide. - Prepare organza strip for embroidery as follows:
Fold fabric in half so strip equals your original height measurement. Press piece with iron set for the delicate organza fabric. Overcast the two unfinished layers on the bottom with a medium zig zag stitch. See Figure #5. - Remove excess stabilizer and then wash to remove all. Press with iron temp set for organza. Next, pin fit the piece around the candle vase. Be sure it will easily slip on and off. See Figure #11.
- Construct ruffle as follows: Wrap ribbon around bottom of vase and tie in a bow to determine necessary ribbon length for ruffle. See Figure #14.
Figure #2a

Note: I added a light color of green thread to the mix for a total of three green threads, one dark brown, and one light brown.
Figure #2b

Figure #3

Figure #4

Figure #5

Sew ribbon along the top folded edge. See Figure #6.
Figure #6

Cut a piece of adhesive backed water-soluble stabilizer slightly larger than the 4-inch hoop. See Figure #7.
Figure #7

Peel away paper to expose sticky side. Center strip over stabilizer and secure it in place. Next, cut a piece of non-adhesive water-soluble stabilizer and cover the exposed sticky side, sandwiching the organza strip in between. See Figure #8.
Figure #8

Hoop so ribbon is close to the top edge. See Figure #9.
Figure #9

Embroider design. See Figure #10.
Figure #10

Figure #11

Transfer pin markings, then trim excess fabric from strip, leaving a 5/8-inch seam allowance for sewing a French seam. Sew French seam as follows: Place wrong sides together and sew a ¼-inch seam. See Figure #12a.
Figure #12a

Trim seam to 1/8-inch. Next, place right sides together and sew final seam using a 3/8-inch seam allowance. See Figure #12b.
Figure #12b

See finished seam in Figure 12c.
Figure #12c
Your piece is finished and ready to slip over the vase. Because my vase is wide at the top, I slipped the finished cylinder on from the bottom. See Figure #13.
Figure #13

Figure #14

Hem both short ends of strip cut for bottom ruffle, using a ½-inch seam allowance. Next, place right sides together and sew length of strip using a ½-seam allowance. See Figure #15.
Figure #15

Turn right side out and press with seam along one edge. Measure ribbon for distance, then sew two lines of stitching along the center to form a casing for ribbon. See Figure #16a, along with enhanced photo showing stitching lines in Figure #16b.
Figure #16a

Figure #16b

Insert ribbon into casing using your preferred tool. See Figure #17.
Figure #17

Wrap ruffle around lower edge of candle vase, then pull ribbon, adjust gathers, and tie in place. See final photo for completed cover. You are finished! Enjoy!

Tags
Shop this Project
No sewing or embroidery machine? No problem! Any products mentioned in this project are available to buy here so you can stay stitching.

Brother Sewing and Embroidery Machines
Related Projects
Stay Connected
* Required fields