Embroidered Christmas Cards
Brother Sews Ambassador
Create special greeting cards this holiday season with your Brother embroidery machine. Select from a variety of techniques and an assortment of delightful embroidery designs from iBroidery.com, or create your own! Insert these designs into windowed tri-fold cards and stitch them onto felt and applique them onto card stock. Next, you’ll embroider the designs onto fabric and batting, or simply stitch carefully selected designs directly onto cardstock.
Warm the heart of a grandparent or loved one with a child’s drawings on fabric, outlined or stippled on and batting then crafted into a keepsake card. You can also create fun personalized cards for friends to make them smile with an unexpected surprise.
So let the fun begin! ~~~~~~~~~~~~~~~~~~~~ MATERIALS: NOT ALL NEEDED FOR EVERY CARD
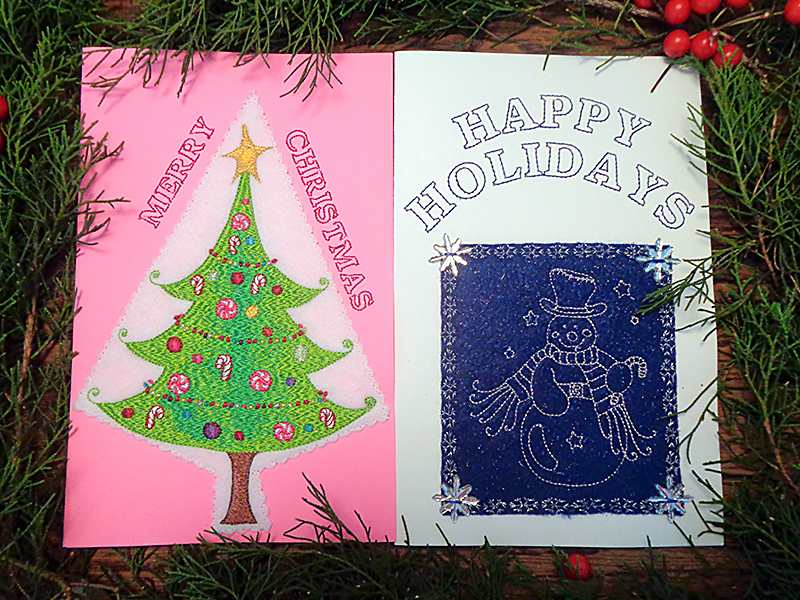
TREE/SNOWMAN - EMBROIDERED ON FELT/APPLIQUE’D ON CARD STOCK
 TREE/SNOWMAN MATERIALS
 11. Cut the second piece of matching card stock 5 3/8 x 8” and secure to the back of the embroidery with tape.
 12. Stitch the snowflake buttons at the corners of the snowman borders.
13. Stitch silver snowflake buttons at corner of snowman design.
14. Write personal message inside the embroidered card.
~~~~~~~~~~~~~~~~~~~~~~~~~~~~~~~~~~~~~~~~~~~~~~~~~~~~~~~~~~~~~
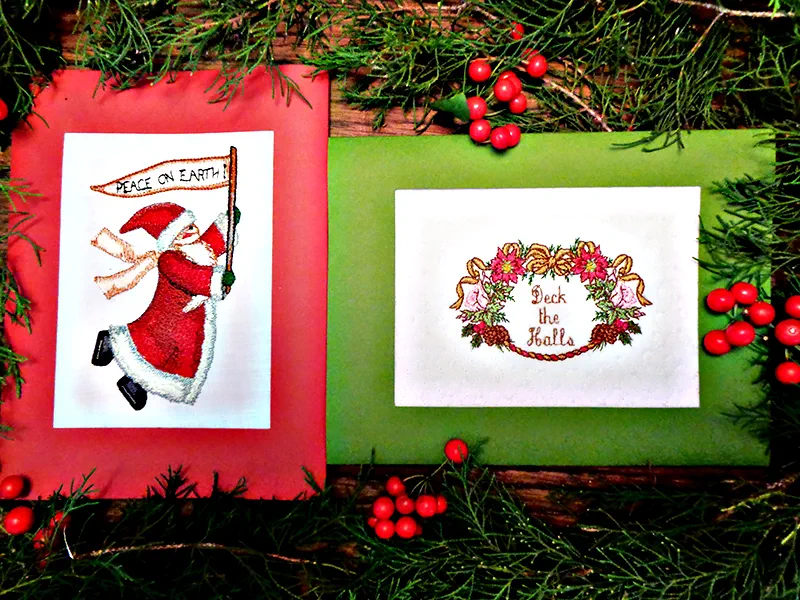
SANTA WREATH - EMBROIDERED ON BATTING/INSERTED INTO WINDOW CARD
12. Stitch the snowflake buttons at the corners of the snowman borders.
13. Stitch silver snowflake buttons at corner of snowman design.
14. Write personal message inside the embroidered card.
~~~~~~~~~~~~~~~~~~~~~~~~~~~~~~~~~~~~~~~~~~~~~~~~~~~~~~~~~~~~~
SANTA WREATH - EMBROIDERED ON BATTING/INSERTED INTO WINDOW CARD
 SANTA WREATH MATERIALS
 5. Apply double sided tape to perimeter of inside window frame.
Press centered embroidery in window. 6. Apply double sided tape generously to inside perimeter and center of shorter panel. Press against back of embroidered piece. 7. Write your personal greeting on third panel. ~~~~~~~~~~~~~~~~~~~~~~~~~~~~~~~~~~~~~~~~~~~~~~~~~~~~~~~~~~~
 CHRISTMAS WREATH MATERIALS
 BELLS MATERIALS
 2.
2.
Extract the musical notes, eliminating the lavender fill, leaving only the black outline.
 3.
3.
Load Christmas Gold bells design into software or Brother embroidery machine, edit mode.
 4. Add musical notes on either side, rotating and mirroring them as necessary.
Then add open lettered text. Arc lettering if desired.
Load design into machine. 5. SPECIAL CONSIDERATIONS WHEN USING METALLIC THREAD:
A.
Disengage thread cutter for jump stitches if using metallic thread. B. Trim jump threads as design progresses. C. Do not use automatic needle threader with metallic thread. D.
Reduce stitching to lowest setting. 6. Fold white card stock in half. Mark center with light pencil mark tiny heat erasable marker. 7. Hoop tearaway stabilizer in 5x7 or 8x8 frame.
Lightly spray one half of folded card stock with adhesive FAR AWAY FROM MACHINE and press against hooped stabilizer. 8. Center design on center mark.
Embroider. ~~~~~~~~~~~~~~~~~~~~~~~~~~~~~~~~~~ PEACE - EMBROIDERY ON BATTING
 PEACE MATERIALS
 8. Stitch through basting frame with same color thread to secure piece in place.
9. Fold along line.
8. Stitch through basting frame with same color thread to secure piece in place.
9. Fold along line.
Slide second card up to fold and hold in place with tape.
 10. Stitch through both layers of card stock.
[caption id="attachment_25957" align="aligncenter" width="800"]
10. Stitch through both layers of card stock.
[caption id="attachment_25957" align="aligncenter" width="800"]
 11.Trim back flap.[/caption]
 ~~~~~~~~~~~~~~~~~~~~~~~~~~~~~~~~~~~~~~~~~~~~~~~~~~~~~~~~~
KID CARDS
~~~~~~~~~~~~~~~~~~~~~~~~~~~~~~~~~~~~~~~~~~~~~~~~~~~~~~~~~
KID CARDS
 KID MATERIALS
Create special greeting cards this holiday season with your Brother embroidery machine. Select from a variety of techniques and an assortment of delightful embroidery designs from iBroidery.com, or create your own! Insert these designs into windowed tri-fold cards and stitch them onto felt and applique them onto card stock. Next, you’ll embroider the designs onto fabric and batting, or simply stitch carefully selected designs directly onto cardstock.
Warm the heart of a grandparent or loved one with a child’s drawings on fabric, outlined or stippled on and batting then crafted into a keepsake card. You can also create fun personalized cards for friends to make them smile with an unexpected surprise.
So let the fun begin! ~~~~~~~~~~~~~~~~~~~~ MATERIALS: NOT ALL NEEDED FOR EVERY CARD
- Card stock, blank tri-fold window cards
- Notions: Cutaway stabilizer, spray adhesive, double sided tape, craft glue, embroidery thread, monofilament thread, silver metallic thread, gold
- OPTIONAL: 4 snowflake buttons (for snowman card)
- Prewashed, spray starched and pressed fabric: linen, dotted Swiss, pima cotton, muslin
- Cotton batting
- Embroidery designs
- Brother Embroidery Machine
- For Children Created Cards - fabric covered cardboard, batting, fabric marking pens, card stock
TREE/SNOWMAN - EMBROIDERED ON FELT/APPLIQUE’D ON CARD STOCK
TREE/SNOWMAN MATERIALS
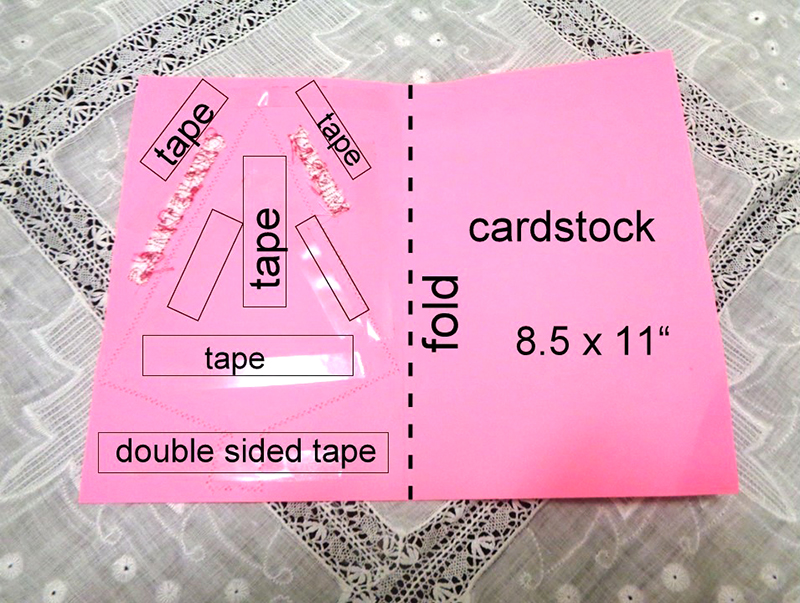
- 2 sheets cardstock 8.5 X 11”
- Craft felt (stiff), 1 white, 1 dark blue
- Notions: threads-embroidery, monofilament, silver metallic; 4 snowflake buttons
- iBroidery.com Christmas tree design on pink cardstock
- Morango Designs
> Candyland Christmas
> ATG-CC001 (Perky Christmas Tree)
- Morango Designs
- iBroidery Snowman design (stitched in Brother metallic silver) on blue craft felt
- Morango Designs
> Christmas Gold
> BIC-ATGCGL008 (Snowman)
- Morango Designs
- Load design into Brother embroidery machine.
Add basting frame. - Hoop cutaway stabilizer.
- Cut craft felt to fit inside 5x7 frame.
AWAY FROM MACHINE, spray with adhesive and press against hooped stabilizer. - Embroider design.
Remove embroidered felt from frame. - Trim close to Christmas tree or it will not fit on the folded card stock.
Trim ½” away from the perimeter of the snowman design to allow room for the border design. Cut away as much stabilizer as possible. - Fold cardstock in half, rendering it 8.5 x 5.5”.
Attach embroidered felt to cardstock with double sided tape. - Secure tree in place with monofilament thread and narrow zig zag w 1.0 L 1.5.
- Secure snowman in place first with double sided tape.
Then stitch snowflake or the decorative stitch of your choice using silver metallic embroidery thread. - Create text with built in machine alphabets.
If your machine has scanning capability, this is a perfect place to use it.
Scan the card then drag the text to the desired location.
Otherwise, you can just hoop more cutaway stabilizer, secure the card stock with tape and embroider the text.
Take care to select an open design, such as the one shown so as not to drill through the card stock. - Apply double sided tape generously to back of card stock with attached embroidery. Do this for the snowman card as well.
11. Cut the second piece of matching card stock 5 3/8 x 8” and secure to the back of the embroidery with tape.
12. Stitch the snowflake buttons at the corners of the snowman borders.
13. Stitch silver snowflake buttons at corner of snowman design.
14. Write personal message inside the embroidered card.
~~~~~~~~~~~~~~~~~~~~~~~~~~~~~~~~~~~~~~~~~~~~~~~~~~~~~~~~~~~~~
SANTA WREATH - EMBROIDERED ON BATTING/INSERTED INTO WINDOW CARD
SANTA WREATH MATERIALS
- Red tri-fold window card to accommodate 4 x 5” design
- Medium batting
- White fabric
- Double sided tape, tearaway stabilizer, embroidery thread
- Morango Designs
> Heart of Christmas
> BIC-MTGHOC005
- Load design into Brother embroidery machine.
NOTE:
Adding a basting frame is helpful. - Stack tearaway stabilizer, medium weight white cotton batting then white fabric.
Hoop in 5x7 frame. NOTE: Fabric used in this design was a loosely woven linen, a very poor choice.
Even prewashed and starched, it is off grain and does not lie flat.
I suggest a more tightly woven fabric. - Embroider design. Remove embroidery from frame and remove stabilizer.
Trim to a size slightly smaller than outer frame. - Baste though embroidery and batting.
5. Apply double sided tape to perimeter of inside window frame.Press centered embroidery in window. 6. Apply double sided tape generously to inside perimeter and center of shorter panel. Press against back of embroidered piece. 7. Write your personal greeting on third panel. ~~~~~~~~~~~~~~~~~~~~~~~~~~~~~~~~~~~~~~~~~~~~~~~~~~~~~~~~~~~
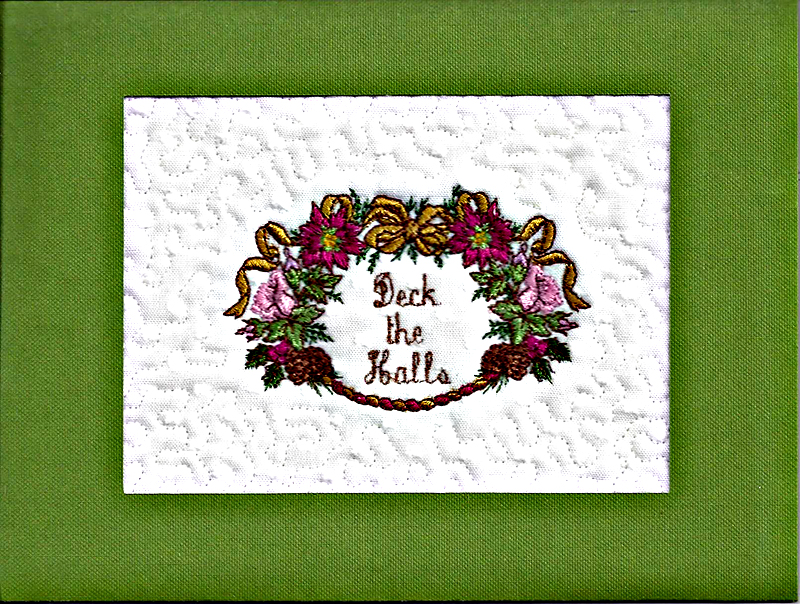
CHRISTMAS WREATH MATERIALS
- Green trifold window card to accommodate 4 x 5”design
- Medium batting, white fabric-dotted Swiss was used to suggest falling snow
- Double sided tape, tearaway stabilizer, embroidery thread, white thread for stippling
- Holidays
> Christmas
> 200810370 - Also available in a larger size as Item Number: 200810370
- Load design into Brother embroidery machine.
Add text from your Brother machine’s built in alphabet menu. - Add automatic stippling around the design if that feature is available on your Brother machine.
Otherwise it can be added manually after the embroidery is completed. - Hoop medium weight batting and white fabric in 5x7 frame.
Embroider design. - Follow steps #4-7 for Peace on Earth Santa to finish the Christmas Wreath card.
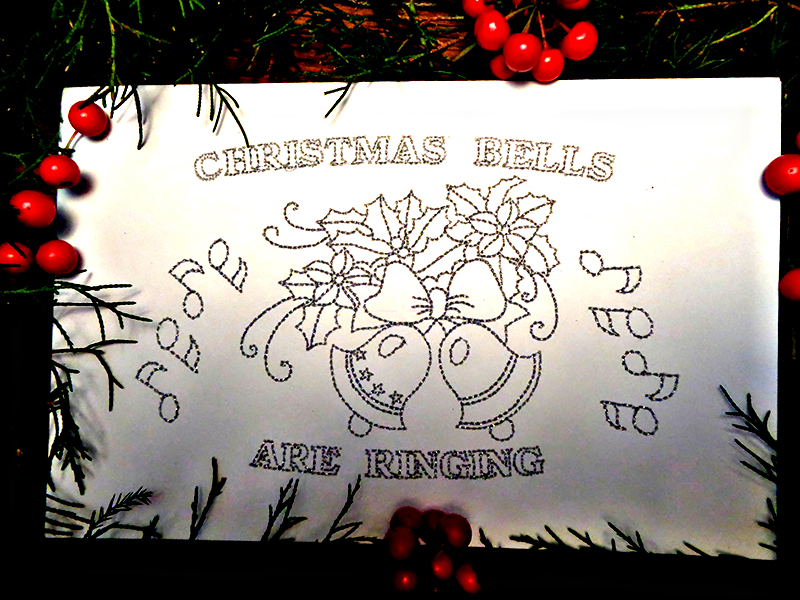
BELLS MATERIALS
- Morango Designs
>
Christmas Gold
> BIC-ATGCGL017 - Hobbies
>
Music/Instruments
> 200910074 - 2 sheets 8.5 x 11” white card stock works or the design can be stitched on 2 sheets luminescent 12 x 12” art craft paper cut to size
- Notions: silver metallic embroidery thread, double sided tape, spray adhesive
- NOTE: Using an 8 x 8 or larger hoop will allow the card stock to lie flat.
Do not use a basting frame as the remaining holes will be visible.
- Load this design into embroidery software.
2.Extract the musical notes, eliminating the lavender fill, leaving only the black outline.
3.Load Christmas Gold bells design into software or Brother embroidery machine, edit mode.
4. Add musical notes on either side, rotating and mirroring them as necessary.Then add open lettered text. Arc lettering if desired.
Load design into machine. 5. SPECIAL CONSIDERATIONS WHEN USING METALLIC THREAD:
A.
Disengage thread cutter for jump stitches if using metallic thread. B. Trim jump threads as design progresses. C. Do not use automatic needle threader with metallic thread. D.
Reduce stitching to lowest setting. 6. Fold white card stock in half. Mark center with light pencil mark tiny heat erasable marker. 7. Hoop tearaway stabilizer in 5x7 or 8x8 frame.
Lightly spray one half of folded card stock with adhesive FAR AWAY FROM MACHINE and press against hooped stabilizer. 8. Center design on center mark.
Embroider. ~~~~~~~~~~~~~~~~~~~~~~~~~~~~~~~~~~ PEACE - EMBROIDERY ON BATTING
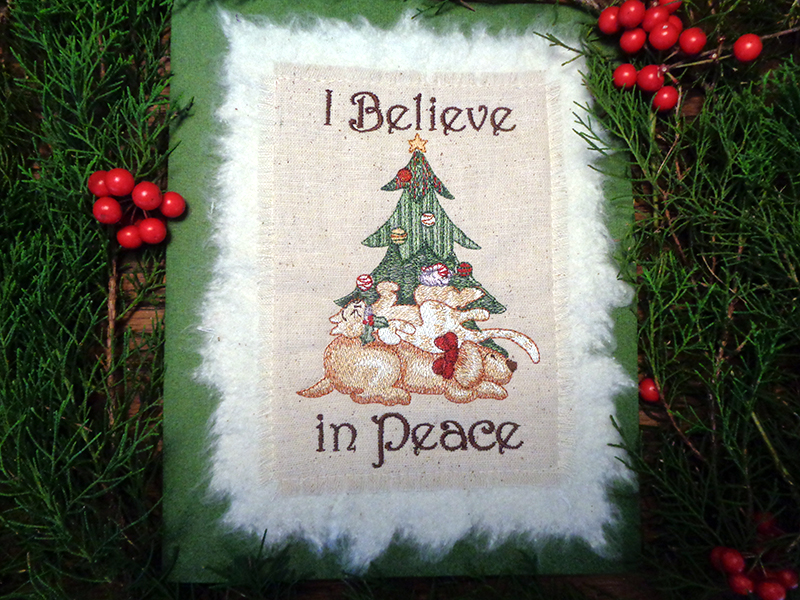
PEACE MATERIALS
- 2 sheets 12 x 12” green art craft card cut to size: one for the front, and one for the back where the message will be written
- Medium weight batting 12 x 15”, natural linen look fabric 12 x 15” (to enable hooping in 8x8 frame, or smaller fabric and batting to fit in 5 x 7 frame, but allow extra fabric for border, fabric fringe and pulled batting edge
- Notions: embroidery thread, natural color sewing thread, spray adhesive, heat erasable marker, double sided tape, spray adhesive
- *Design: https://embroideryonline.com/peace-dog-cat-mouse/
- *embroidery file is a product of OESD, and Brother International Corporation makes no representation or warranties regarding such products
Load design into machine and add basting frame.- Hoop stabilizer.
Spray batting with adhesive (away from machine) then press against stabilizer.
Spray fabric with adhesive and press against batting, smoothing fabric until taut.
Pin layers outside embroidery area. - Baste layers together then embroider.
- Remove embroidery from frame then trim stabilizer up to basting frame.
- Mark a frame 3/8” outside basting stitches with heat erasable marker.
Cut along this line and fringe fabric. - Pull batting away from basting frame to create a stressed cotton border.
- Place and generously tape embroidered piece with batting on art craft stock.
8. Stitch through basting frame with same color thread to secure piece in place.
9. Fold along line.Slide second card up to fold and hold in place with tape.
10. Stitch through both layers of card stock.
[caption id="attachment_25957" align="aligncenter" width="800"] 11.Trim back flap.[/caption]
~~~~~~~~~~~~~~~~~~~~~~~~~~~~~~~~~~~~~~~~~~~~~~~~~~~~~~~~~
KID CARDS
KID MATERIALS
- Fabric wrapped cardboard
- Fabric markers, double sided tape, adhesive spray
- Batting
- Tri-fold cards
Wrap cardboard with white printer paper and tightly woven fabric.- Draw a rectangle frame smaller than the window in the trifold card.
- Give children fabric marking pens to draw a holiday design.
Instruct them to keep their designs inside this frame. - Remove the fabric from the cardboard and spray with adhesive before placing over batting.
- Optional:
Hoop in appropriate sized frame. While still in frame, free motion outline the design then stipple.
It is easier to stipple manually around children’s designs.
If desired, add text at this time. - Add any embellishments such as buttons after text and stippling.
- Remove from frame and add fabric or ribbon border.
- Trim and insert into trifold card as instructed in Santa and Wreath cards above.
Tags
Shop this Project
No sewing machine? No problem. We’ve got a range of easy-to-use, feature-rich machines so you can creat this project – and many more!
Sewing Machines
Related Projects
Stay Connected
* Required fields
Follow Us
- Product Support
- Product Support Assistant
- Terms of Sale
- Product-Registration
- Search Supplies/Accessories
- Ordering & Shipping Information
- Ordering & Account FAQs
- View Order Status
- Warranty & Extended Warranty Information
- Recall Information
- Return Policy
- Security Support Information(Opens in a new tab)
- Contact Brother
