DIY Personalized Embroidered Garden Gloves
One of the things I love most about machine embroidery is the ability to personalize almost anything you can get into an embroidery hoop. With that in mind, how about transforming a pair of utilitarian garden gloves into a stylish set stitched in bright and cheerful colors? Once you combine a small garden-theme accent design with built-in fonts, you’ll have gloves that make you smile each time you put them on. Are you ready to turn ordinary gloves into stylish, cheerful accessories that will brighten your gardening experience? Let's go sew!
Supplies:
- Brother Sewing and Embroidery Machine with 4-inch hoop capability.
- Small embroidery design with garden theme. This project features a design from the Brother iBroidery.com download center. See Figure #1 for more details.
- Brother polyester embroidery threads and bobbin thread
- Embroidery needle
- You'll need a stabilizer, here are some options: SA5906 Brother Adhesive Backed Water-Soluble Stabilizer or SA5815 Brother Adhesive Backed Tear-Away Stabilizer, SA5810 Brother Medium-Weight Tear-Away Stabilizer.
- Basic sewing notions, including a seam ripper, thread to blend with fabric, and a wash-out marker or chalk
- Ruler and gridded surface such as cutting mat
- Cloth garden gloves with a side seam suitable for opening with a seam ripper

The featured design is from iBroidery.com:
- Garden Tools (Item #sa355027)
- Width: 1.65 inches (42.0mm)
- Height: 1.40 inches (35.5mm)
Original thread colors:
 Figure #1
Steps to Create Embroidery on Garden Gloves
1. Hoop adhesive stabilizer-like fabric. Ensure the shiny side is up so adhesive is exposed when you remove the protective layer. Score the paper with a pin, keeping the adhesive layer intact. Peel off the paper to reveal the adhesive across the hoop. See Figure #2a and Figure #2b.
 Figure #2a
 Figure #2b
Stabilizer Tips:
This adhesive stabilizer is ideal for hard-to-hoop or small embroidery projects, acting more as a hooping aid. Depending on the project, additional layers of cut-away or tear-away stabilizer may be necessary. You can choose between wash-away or tear-away adhesives. The wash-away type can be fully removed with washing, while the tear-away may leave paper residue. I used the washout type and gently laundered the gloves afterward. For small designs on firm fabric, I floated a medium-weight tear-away layer to support the stitching. Open the seam as far as necessary to allow for smoothing the glove flat on the adhesive surface. See Figure #3. Figure #3
2. Pay attention to how the glove was sewn to repair it properly. Measure the area you want to embroider, decide on monogram letters, and try different layouts and colors for the best compact design. Your machine may offer options for arranging letters. See examples in Figures #4a and #4b.
 Figure #4a
 Figure #4b
3. Be sure the design will fit the area on your glove with some space at the top, bottom, and sides. See the completed design in Figure #5.
 Figure #5
4. Mark the center of the design on the glove, marking both the right and wrong sides. Place the hoop on a gridded surface so the center point of the hoop aligns with the grid. Fold the glove and match the center markings; smooth the fabric over the adhesive. See Figures #6a and #6b.
 Figure #6a
 Figure #6b
5. Transfer hoop to the machine and slip a piece of tear-away underneath. Make sure the center point is still aligned on the top side. Adjust position if necessary, using the arrow keys on your machine, and then stitch design. See Figure #7.
 Figure #7
6. Repeat the embroidery process for the second glove to make a pair. Remove the excess stabilizer. Change the machine to sewing and re-sew seams. See Figure #8.
 Figure #8
What a difference a little embroidery can make! Take a look at the before and after pictures below:
 Before
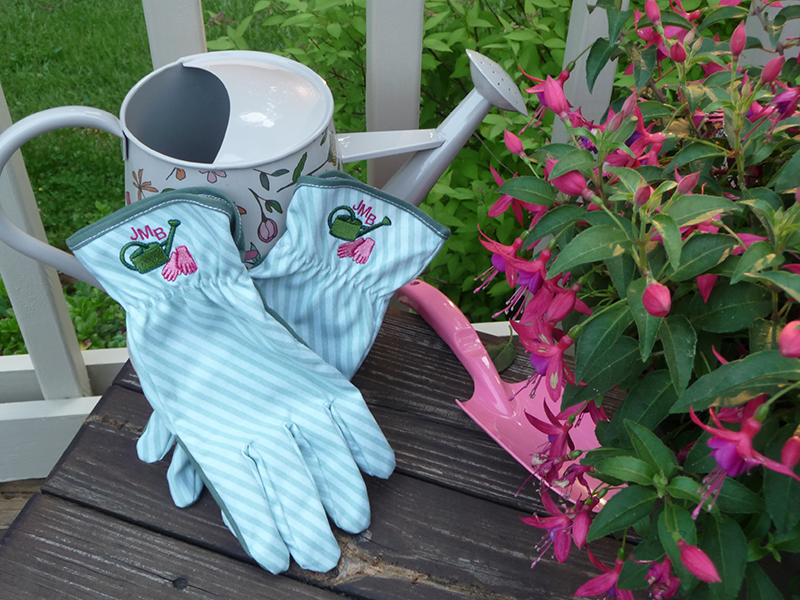 After
After
You are finished! Enjoy!

After you finish the embroidery process, take a moment to appreciate your creation. Personalized gloves elevate your gardening experience while infusing a distinctive style into your outdoor activities. Once you adorn your gloves with vibrant designs, they become not just functional but a true fashion statement.
Looking to elevate your gardening wardrobe even further? Craft a stylish, functional Garden Apron with a Zipper Pocket to keep all your gardening essentials within reach—it's the perfect blend of creativity and utility! And don’t forget to stay cool on hot summer days with your very own embroidered Bucket Hat, ensuring you tackle every gardening task with confidence, comfort, and undeniable style.
FAQs
Q: Can you embroider on any type of gardening gloves?
A: When adding embroidery to gardening gloves, choose a pair made of cloth rather than rubber or latex. Also, look for a pair with a side seam that can be opened/unsewn. This will allow you to flatten the glove and give you more space to embroider.
Q: What stitching styles work best for garden gloves?
A: The space for embroidery on gloves is not very big, so choose a design that is appropriately sized and not overly dense.
Related Projects
Stay Connected
* Required fields