Embroidered Greeting Cards
Making greeting cards is so much fun! With Valentine’s Day around the corner you have time to whip up some really special cards for family and friends. With cardstock, fabric scraps, designs from iBroidery.com
and THE Dream Machine
by Brother, you have all you need for a card making marathon. With regular 8.5 x 11” or specialty cardstock from craft stores, the creative possibilities for personalized greetings are endless. The basic instructions are detailed below for a Disney inspired Pooh and Piglet card. Examples of more cards made in a similar manner are included at the end of the basic tutorial. After reading through the directions and perhaps making a card, you can set yourself free to make cards that would shame the fancy, expensive card available commercially. Get started!
Requirements for each card:
- Card stock: Colored 8.5 x 11” 65 lb. cardstock is readily available at office supply stores. At craft supply stores, a huge variety of fancier, 12 x 12” and even larger card stock is available.
- Linen or felt scraps
- Notions: Necessary: spray adhesive, double-sided tape, glue stick, fray block, Brother tearaway stabilizer. Optional: decorative additions: rick rack or ribbon short lengths, buttons, spaghetti bias, lace or other trims, lightweight batting
- I used THE Dream Machine
but you can use other Disney machines with a 5x7 frame or other Brother embroidery machines for non-Disney designs. - Notions: heat erasable marker, spray adhesive, Brother tearaway stabilizer, glue stick, double sided tape, fray block
Note: Embroidery is done on fabric and then stitched to the cardstock. A tri-folded piece of cardstock offers cover for the stitching. That also reduces the available area for embroidery. An 8.5 x 11” card leaves just 3.66” for the embroidered piece. A bi-folded 8.5 x 11” allows 4.25 x 11” for a vertical card and 5.5 x 8.5” for a horizontal fold. See examples below.
Basic Instructions for Embroidered Greeting Cards
- Determine available width of bi- or tri-folded cardstock.
- Select a design that will fit in the available space.
- Embroider design on chosen fabric and cut to size, ideally smaller than folded section, so that fringe or trim can be seen.
- Apply spray adhesive to cut fabric and center on selected fold of card stock. Fringe fabric if suitable.
- Sew fabric to center section of tri-folded cardstock or front of bi-folded.
- Apply double sided tape to folded section to right of embroidered.
- Hand write your message on inside of card.
Tip: Screen size: Open “information page,” the lined paper image at the top of your screen. Go to page 7 and select Embroidery Frame Display. Chose frame size from menu. This will help as you place your design on the screen.
 Envelopes: tri-folded 8.5 x 11” will fit in business size envelope. Larger bi- or tri-folded cards can fit in specially sized purchased envelopes or self-made envelopes from larger card stock.
So, let’s get started……
Envelopes: tri-folded 8.5 x 11” will fit in business size envelope. Larger bi- or tri-folded cards can fit in specially sized purchased envelopes or self-made envelopes from larger card stock.
So, let’s get started……
Pooh and Piglet Valentine
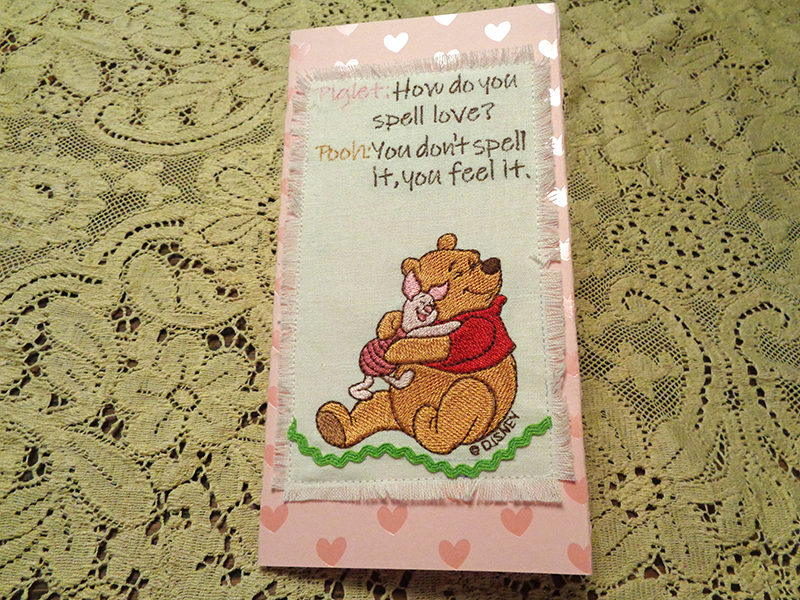 Pooh hugs Piglet on a cardstock trifold, 12” x 12”. Embroidery on linen, stitched to middle section of folded cardstock.
 This is the same embroidery on tri-folded 8.5” x 11” cardstock, just slightly narrower.
- Download text: “How do you spell love?” created in BES 4.
- Design: Pooh hugging Piglet # 200811411
- Pink 12” x 12” or 8.5” x 11” cardstock
- Linen (or fabric that can be fringed) to fit in chosen hoop: 5x7 or 8x8
- 5” green baby rick rack
Preparation
- Press and starch fabric. Hoop in 5x7 or 8x8 frame. Option: This can be embroidered in the 4x4 frame with 2 hoopings.
- Download “How do you spell love” file and Pooh/Piglet design. Save on USB stick.
- Transfer designs to machine memory.
- Open Pooh design and reduce size to 2.89” x 2.57”. This is one Disney design that can be resized just a bit. Save in memory

- Fold card stock into thirds.


Note: That small difference in the available area is important in determining if your design will fit between the folds. Take care to note the size of your design.
Embroidery
- Open “love” text file and center toward top of design area.
- Scan. Note: For instructions on scanning, see Pooh’s Burp Cloth
tutorial. - Add Pooh/Piglet design and drag in place with stylus.

- Go to page 8 and see “embroidery basting distance.” Select 0.00”.

- Insert basting frame.

- Embroider basting frame and design.
- Trim jump threads in text. Because this is a true type font, not a Brother font, the jump stitches are not automatically trimmed.
- Remove embroidery from frame. Use heat erasable marker to outline basting frame before removing basting stitches. This gives you a perfect rectangle of the design without measuring. Cut away fabric 1-2” from marked line.
- Apply glue stick to baby rick rack and apply in curves below Pooh to mimic grass.
- Stitch rick rack in place with monofilament thread, stopping the stitches just inside the outlined rectangle.

- Remark bottom line directly below rick rack.
- Rotary cut ¼” from each line.
- Apply double sided tape on the underside, against the tearaway stabilizer. Press embroidered piece in place, centered in section #2 (middle) of folded card stock, 3/4” from the bottom.
- Straight stitch close to side edges of embroidery and above top edge. Activate laser and set to desired width to keep the stitching line straight.


- Clip rick rack even with stitching line. Treat raw ends with fray block.
- Remove stabilizer between raw edge and stitching line. Press to remove heat erasable lines.
Note: Be sure to remove stabilizer before fringing or it is easy to cut the fringe. Cutting away the stabilizer with curved snips make this an easy job.
- Fringe edges to stitching line.
- Cut way card stock 3/4” above fringe. There may be enough cardstock left for a small embroidery.
- Apply double sided tape generously to underside of section #2, around the perimeter and across the center.
- Press section #1 to section #2 and press against tape. This covers the stitching.
- Write your personal message or one of the suggested texts on the inside of section #3.

Gallery of other Embroidered Valentines
Mickey Mouse gives Minnie Mouse Flowers This is such a sweet design. The inside of the card is embroidered with a quote from Minnie Mouse pertaining to this design. The iBroidery.com design is the Classic Mickey Mouse Gives Minnie Flowers, Item Number: sef5 20L
It was embroidered on linen over lightweight cotton batting to add dimension and hooped with tearaway stabilizer. Tiny red seed beads were added to the centers of the flowers in the bouquet and on Minnie’s hat. Two gold seed beads were stitched over Mickey’s buttons. The vertical tri-fold card was purchased. But now with my new Brother ScanNCut,
I can make essentially any cut out cards I want! I look forward to doing that. The text was created in PE-Design with ttf ink free.7 point, embroidered on linen, stitched to the card then fringed.
 Dalmatians
This design is perfect for the family, especially dog lovers.
Dalmatians
This design is perfect for the family, especially dog lovers.
 The cardstock is 11x17”, bi-folded and then cut down with a decorative rotary cutter blade. It, too, was linen on lightweight cotton battings. The stabilizer was removed before applying it to the cardstock—big mistake! You can see how rippled it is.
The embroidery was stitched to the card, then spaghetti bias secured with glue stick, in short sections. A 2.5 twin needle with monofilament thread stitched the bias over the raw edges of the trimmed embroidery. The heart button covers the raw edge where the cut ends meet. It would have been nicer with a white button. I realized that too late!
Princess Heart
The cardstock is 11x17”, bi-folded and then cut down with a decorative rotary cutter blade. It, too, was linen on lightweight cotton battings. The stabilizer was removed before applying it to the cardstock—big mistake! You can see how rippled it is.
The embroidery was stitched to the card, then spaghetti bias secured with glue stick, in short sections. A 2.5 twin needle with monofilament thread stitched the bias over the raw edges of the trimmed embroidery. The heart button covers the raw edge where the cut ends meet. It would have been nicer with a white button. I realized that too late!
Princess Heart
 Cardstock is a bi-folded, fancy 12 x 12” piece, embroidered with this feminine princess in a floral heart. The design caught my eye when I first got THE Dream Machine.
At last I found my chance to stitch it. It is a built-in design into THE Dream Machine and THE Dream Machine 2.
The embroidery was done on cotton pique’ with lightweight batting and tearaway stabilizer under the fabric. Spaghetti bias covers the raw edges and is secured with monofilament thread. It is stitched to the side closest to the embroidery cut to each length. The piece bias was attached to the bi-folded cardstock with permanent spray adhesive, stitched, again on the outer edge of the bias with monofilament to the pink linen and the cardstock. Finally, the cut ends of the bias were covered with a heart button. This card will be for my six year old granddaughter who, like most little girls, is a huge Disney Princess fan. Inside I will write, “Happy Valentine’s Day, Vivian Rose. You are our favorite princess.” Smack
 How cute is this? The cardstock is tri-folded and width trimmed 11x17”. The embroidery is done on white twill. It is overlaid on black burlap with both pieces fringed. Another built-in design on both Dream Machines, in the Vintage Mickey menu. The text is done in PE-Design.
 Ideal for Valentine’s Day or any day you would like to express the heartfelt sentiment, Love Will Keep Us Warm, is from Morango Designs, All Year Long collection.
The design was embroidered on a linen/cotton blend over lightweight batting and tearaway stabilizer. The “L” and “E” are digitized for applique. Since this was embroidered on white fabric, I skipped the addition of another fabric and simply stitched the letters and heart shaped polka dots on the base linen/cotton blend. The gingham spaghetti bias was stitched with monofilament on the line drawn over the basting frame with each side cut to size. The outside edge of the bias was left free. Base fabric was trimmed close to that stitching line and batting was trimmed 1” from the bias. Spray adhesive centered on the embroidery, avoiding the batting, held the embroidery in place on the bi-folded 12 x 12” cardstock. The outer edge of the spaghetti bias was stitched to the cardstock. Then batting was pulled away by hand, creating the torn effect. It took great restraint to stop making more of these greeting cards—laundry, cooking and life called me away from THE Dream Machine
and my happy place, my sewing room. I hope this tutorial and the photos inspire you make a few cards for Valentine’s Day, other holidays, birthdays and even get well and sympathy cards. They are so much more special than commercially made greetings.
Related Projects
Stay Connected
* Required fields