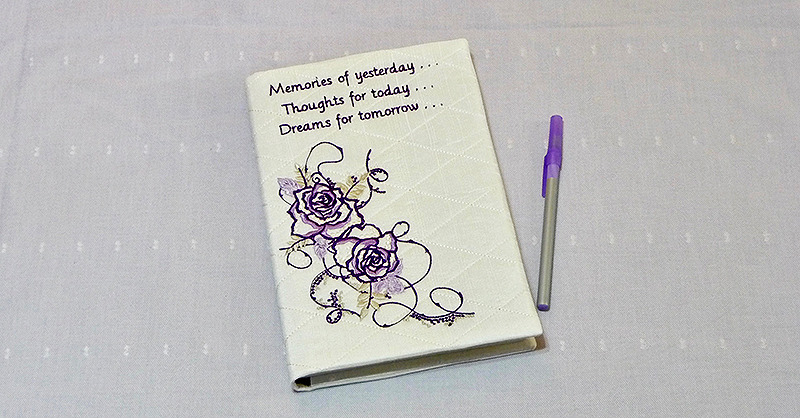
Embroidered Journal Cover
Journaling is a great way to record thoughts, memories, and dreams. It's especially nice to have a beautiful book to hold all of your hand-written ideas and reflections. This embroidered cover is the perfect way to dress up a plain journal. With Mother’s Day just around the corner, you can make this in an afternoon and give it to Mom for a pretty and personalized gift. Are you ready? Let's go sew!
Materials and Supplies
Note: Hoop size will vary depending on your selected design. This project was created using THE Dream Machine XV8550D
along with SAVRXVUGK2, the XV-series software upgrade premium pack.
Embroidery design featured on this book cover is from a gorgeous collection called Faux Embellishments available on the Brother iBroidery.com download center.
Please read instructions for additional design information. See Figure #1a and #1b for more details.
- Brother Polyester Embroidery Threads and bobbin thread for embroidery.
- Embroidery needle for embroidering.
- Fabric and thin batting or craft fleece for front of book cover, fabric for inside flaps, and fabric for lining. You can use the same fabric for all three pieces or choose a coordinating fabric for the lining.
Note: Sizes for fabric pieces are determined by custom patterns created in step one.
- Paper or pattern tracing cloth for making patterns.
- Blank book for journal.
Note: This book cover is designed for a blank, generic journal measuring approximately 6-inches wide, 9-inches long, and ½-inch deep.
- Basic sewing notions, including good quality thread for sewing.
Featured Design
- From the Brother iBroidery.com download center: Item No. eu012_3 Rose Spray2
- Width: 4.76 Inches
- Height: 6.18 Inches
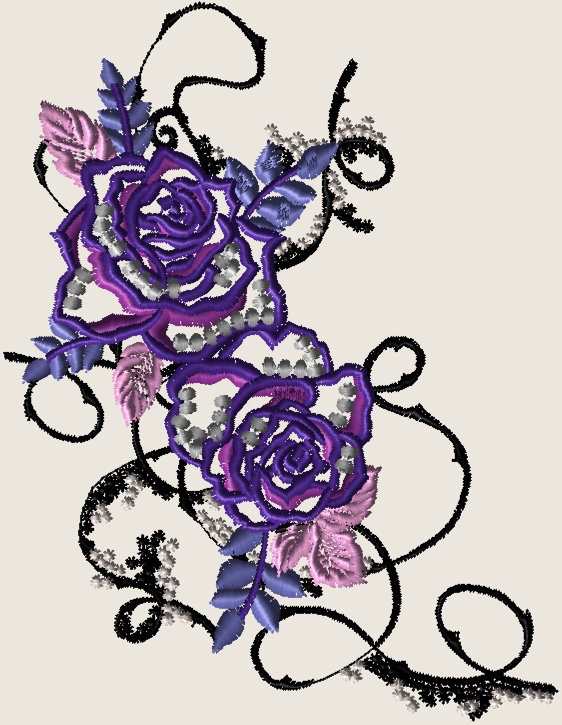 Figure #1a[/caption]
Original Thread Colors:
- Modified thread colors for completed design with lettering:
 Figure #1b[/caption]
Steps to Create Book Cover
- Begin by making patterns to use for determining yardage and cutting fabric pieces. This method allows you to make a custom book cover for variable book sizes. In addition, a pattern makes it easy to precisely cut the oversized, embroidered piece to fit the blank book. Create patterns as follows:
- Measure width of book front, book back, and the depth of the spine. Add together and record measurement as the total width. Measure book front from top to bottom and record as length. Now add 1½-inches to the total width and length for ease and seam allowance. Use measurements to make a pattern and label as Pattern A - OUTSIDE FRONT.
- Measure the width and length of the book front only and record measurements. Next, double this recorded width and add 1½-inches to the length. Use measurements to make a pattern for the front and back flap and label as Label as Pattern B - INSIDE FLAP.
- Make a second copy of pattern A. Modify this second copy by subtracting the measurement determined for the width of the front of the book. Label as Pattern C - LINING.
Tip: If your book measurements produce small fractions round up slightly to make the math easier.
- In this example, the actual book front and book back measures 6 ¼-inches wide, book length is X 9 ¼-inches, and the spine is ½-inch deep.
Note that the length of finished patterns A, B, and C is the same. Flap pattern B has a fold line down the center of the pattern length.
Note that the lining pattern is not designed to cover the entire width of the book. This will make sense when constructing the book cover. See example of finished patterns in Figure #2.
[caption id="attachment_15447" align="aligncenter" width="800"] Figure #2[/caption]
- Decide on the design combination you want to create and determine hoop size needed to embroider fabric for front of book cover. Cut an oversized piece that fits the hoop and is also large enough to use when cutting out pattern piece A. In this example fabric is cut to equal 23-inches X 15-inches to fit the super large 9.5 X 14 embroidery hoop. Cut a piece of thin batting or craft fleece to match piece A and layer the two together. See Figure #3.
 Figure #3[/caption]
Combination design featured here includes the following:
Figure #3[/caption]
Combination design featured here includes the following:
- A diamond shaped background fill from My Design Center for quilting the background.
- Lettering added from BES 4 Dream Edition Software.
Font style is "Chalk." - Rose Spray2 design from iBroidery.com. See Figure #4.
 Figure #4[/caption]
- Other options include quilting the background using a walking foot prior to embroidering, adding small lettering from built-in fonts, and using an alternative design to fit the front of your book cover.
- Create your design for the front area of the cover and embroider on appropriately sized fabric. See example in Figure #5.
 Figure #5[/caption]
Tip: You can easily add a monogram or a name to your combination. Consider adding a personalized greeting to the area opposite the design which will become the back of the book.
- Use custom patterns to cut and prepare the following pieces:
- Pattern A - Position over embroidery, so design is aligned with the front of book cover and cut one for outside front.
- Pattern B - Use pattern B to cut two flaps of fabric to match front piece. To form flaps for front and back of book fold each piece in half crosswise, with wrong sides together.
- Pattern C - Cut one piece from lining fabric.
<> This can be the same fabric as the front cover and flaps or a coordinating fabric. If your fabric ravels, use a serger or an overcast stitch on the sewing machine to clean finish long edges.
- Set up machine for sewing and assemble book cover as follows:
- Place the front piece, (A) right side up. Place a flap (B) at each end, having all raw edges matching and folded edges toward the center.
- Layer the lining (C) on top with right side facing down and lengthwise centers of A and C matching. Lining needs to be the last layer added. See Figure #6.
 Figure #6[/caption]
- Pin all layers securely together. Sew all edges using a ½-inch seam allowance. Trim bulk from corners. Reach through lining and carefully turn right side out. Press carefully on inside and outside. See Figure #7a and #7b.
 Figure #7a Inside [/caption]
[caption id="attachment_15453" align="aligncenter" width="800"]
Figure #7a Inside [/caption]
[caption id="attachment_15453" align="aligncenter" width="800"] Figure #7b Outside[/caption]
- Open book with front and back facing and slip book into flaps. See Figure #8.
 Figure #8[/caption]
You are finished! I hope you enjoyed making an inspiring journal to use for yourself or give as a cherished gift. Consider pairing this with other items to create a spectacular custom gift set.
Figure #8[/caption]
You are finished! I hope you enjoyed making an inspiring journal to use for yourself or give as a cherished gift. Consider pairing this with other items to create a spectacular custom gift set.

Options and Ideas:
- To streamline the process and shorten time for creation you can use pre-quilted fabric for Pattern A.
- Since you now have a custom pattern, consider purchasing a few additional blank journals to have on hand for the future.
- Personalize the inside of the front flap with an embroidered greeting or personal message, making sure the message is upright on the flap inside the book cover front or back.
Related Projects
Stay Connected
* Required fields