Fold & Go Quilted Car Tote Adjustable Bias Binder Foot
Getting ready for a road trip? Handy for occasional travel in rental cars or for day-to-day use, this fold and go car tote keeps essential items close at hand with multiple pockets. The Adjustable Bias Binder Foot is featured as a way to neatly finish the pocket edge and create ties for folding the tote. The main pocket is quilted with fancy fills from My Design Center in THE Brother Dream Machine® upgrade kit. If you have this option you’ll learn a lot about this feature while making this project. If you have another Brother machine you can choose to quilt your own fabric in a traditional manner and create a similar tote.
Finished size: Approximately 12” W X 10” L
 Front of Tote[/caption]
 Back of Tote[/caption]

[caption id="attachment_8340" align="aligncenter" width="467"]
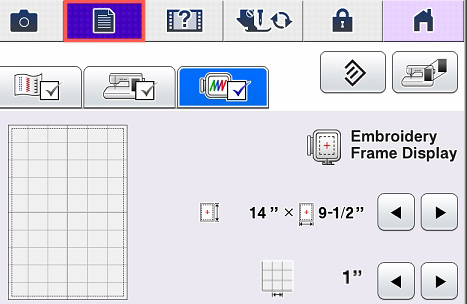 Figure #1a[/caption]
[caption id="attachment_8341" align="aligncenter" width="356"]
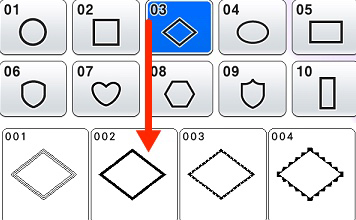 Figure #1b[/caption]
[caption id="attachment_8342" align="aligncenter" width="479"]
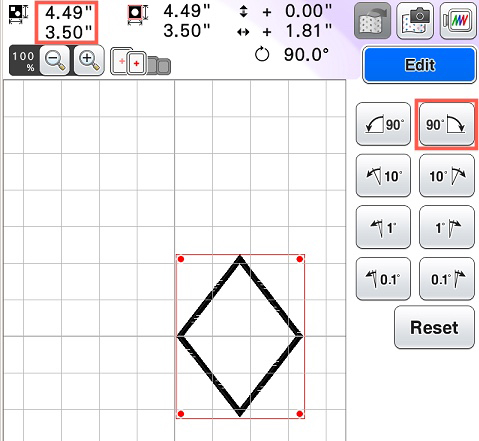 Figure #1c[/caption]
[caption id="attachment_8343" align="aligncenter" width="380"]
 Figure #1d[/caption]
[caption id="attachment_8344" align="aligncenter" width="325"]
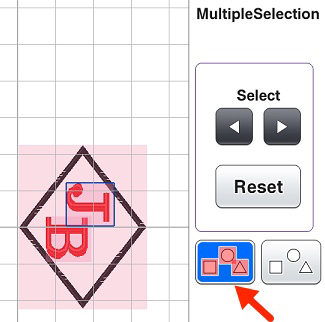 Figure #1e[/caption]
[caption id="attachment_8345" align="aligncenter" width="350"]
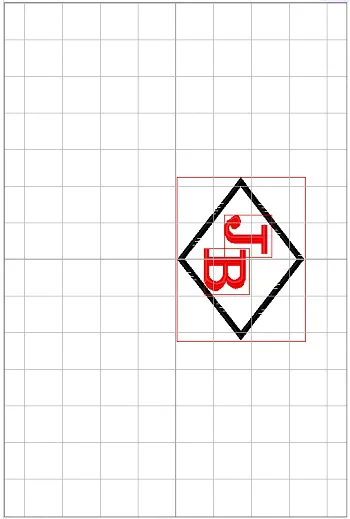 Figure #1f[/caption]
[caption id="attachment_8346" align="aligncenter" width="450"]
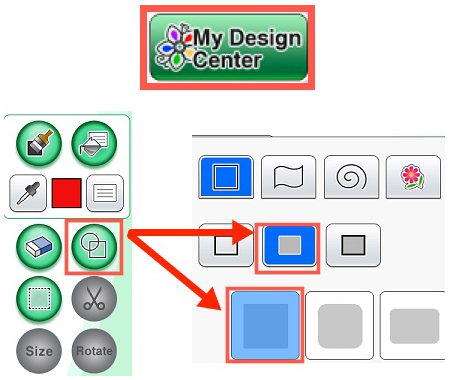 Figure #2a[/caption]
[caption id="attachment_8388" align="aligncenter" width="480"]
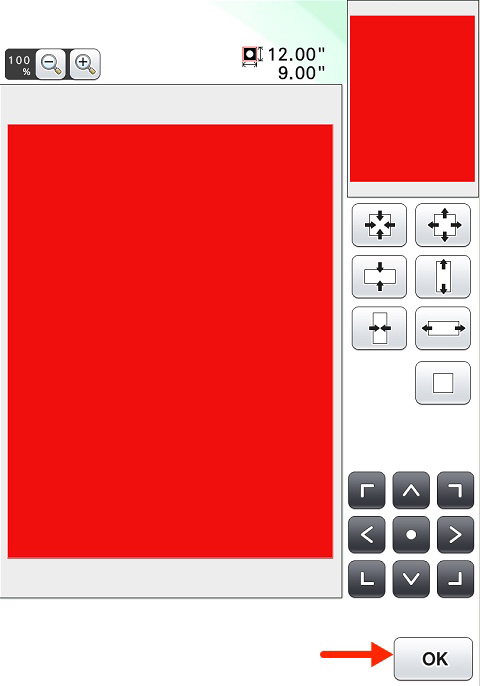 Figure #2b[/caption]

[caption id="attachment_8347" align="aligncenter" width="800"]
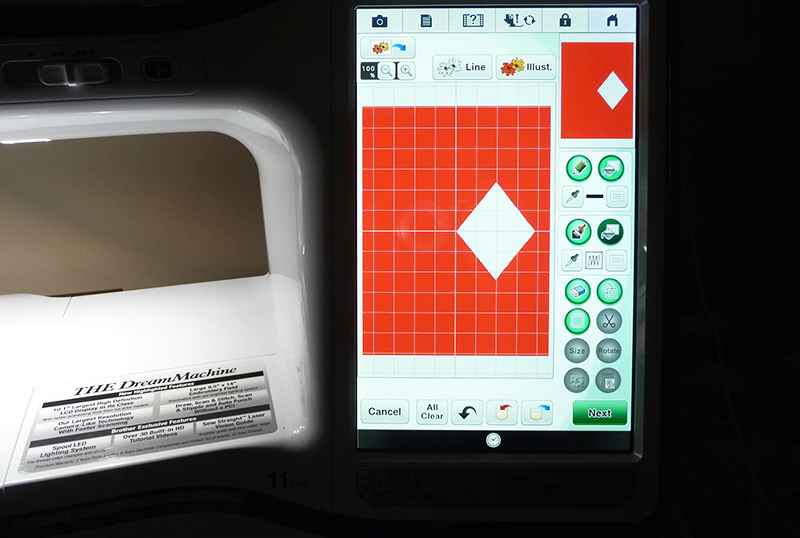 Figure #3[/caption]
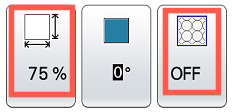 Figure #4[/caption]
[caption id="attachment_8349" align="aligncenter" width="800"]
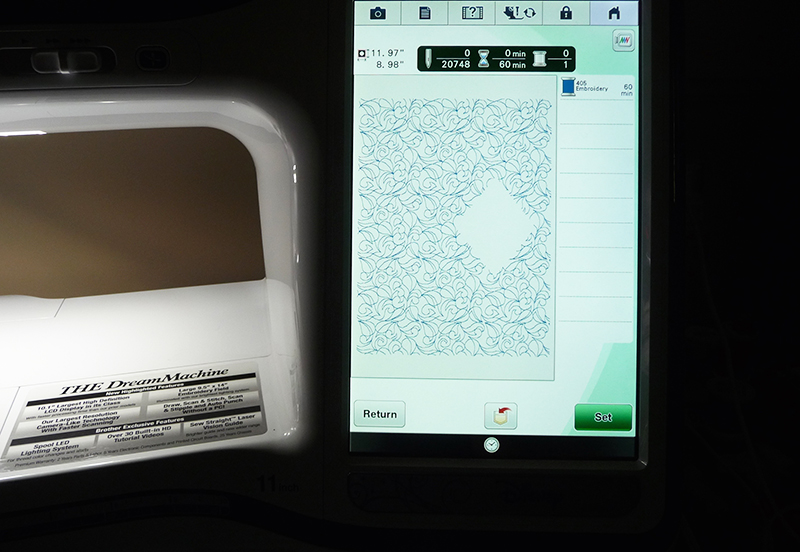 Figure #5[/caption]

[caption id="attachment_8350" align="aligncenter" width="800"]
 Figure #6[/caption]
[caption id="attachment_8351" align="aligncenter" width="800"]
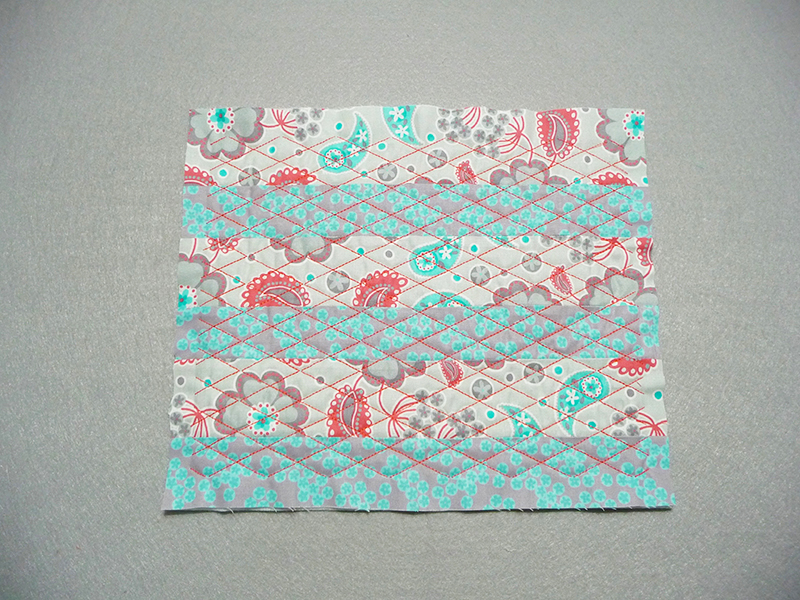 Figure #7[/caption]
[caption id="attachment_8352" align="aligncenter" width="800"]
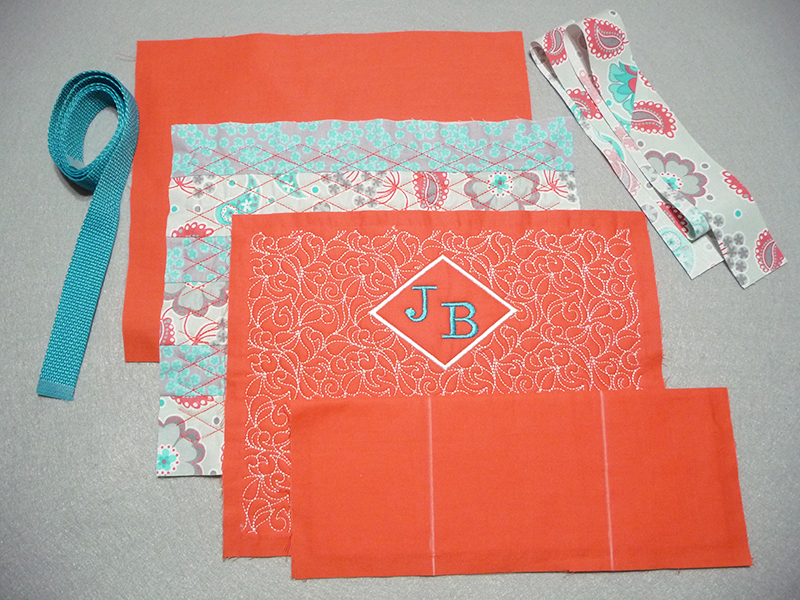 Figure #8[/caption]
[caption id="attachment_8353" align="aligncenter" width="800"]
 Figure #9[/caption]
[caption id="attachment_8354" align="aligncenter" width="800"]
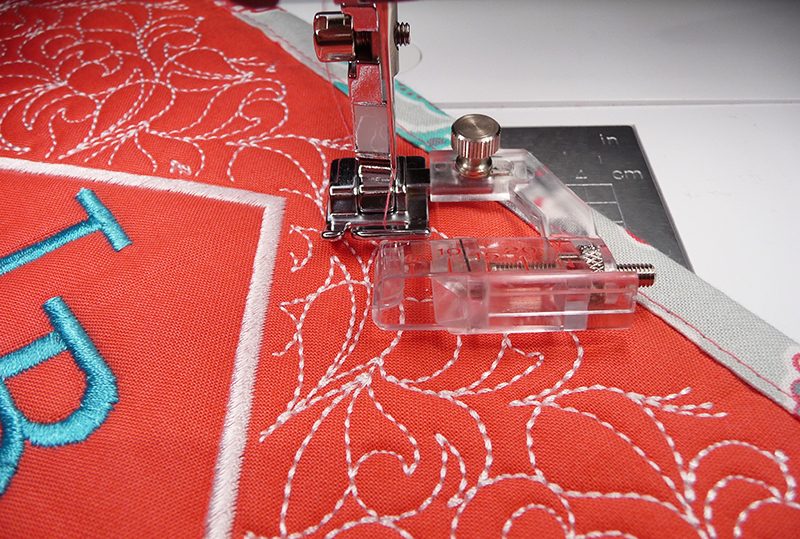 Figure #10[/caption]
[caption id="attachment_8355" align="aligncenter" width="400"]
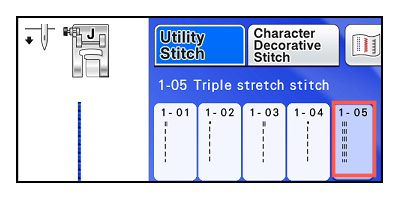 Figure #11[/caption]
[caption id="attachment_8356" align="aligncenter" width="800"]
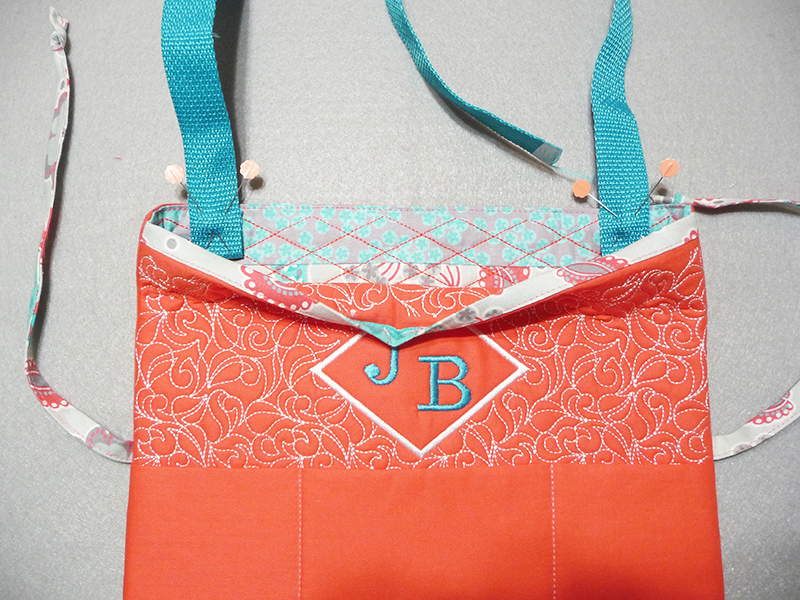 Figure #12a[/caption]
[caption id="attachment_8357" align="aligncenter" width="800"]
Figure #12a[/caption]
[caption id="attachment_8357" align="aligncenter" width="800"]
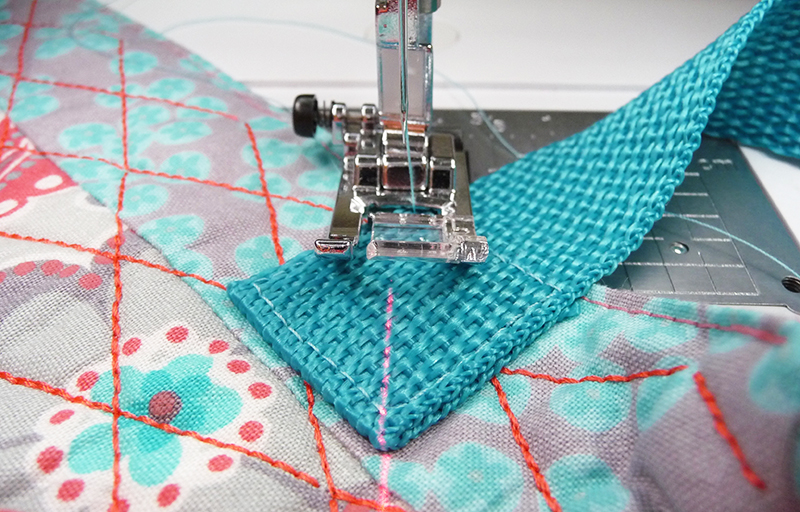 Figure #12b[/caption]
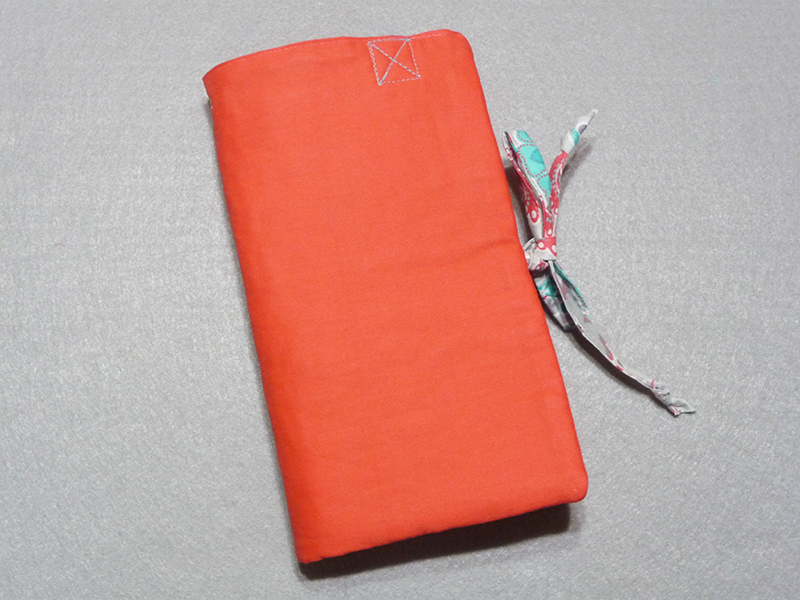
You are finished! Fold in half and tie and you are ready for the road!
 Options and Ideas:
Materials and Supplies
- THE Dream Machine® Innov-ís XV8500D
- SAVRXVUGK1 THE Dream Machine® Upgrade Kit
- Operation guide for Upgrade Kit
- SA198 Brother Adjustable Bias Binder Foot
- Brother Embroidery thread, Bobbin thread, & Embroidery needle for embroidering
- Basic sewing notions including sewing thread to match fabrics
- Jeans needle size 14 for constructing tote
- Seam sealant
Fabrics and notions for tote:
For Section A – Front Divided Pocket:
- One piece of solid cotton fabric measuring 13-inches wide X 10-inches long.
- One piece of thin craft batting measuring 12-inches wide X 4.5-inches long.
For Section B - Quilted Pocket Piece with Monogram:
- Two pieces of solid cotton fabric measuring 15-inches wide X 23-inches long.
- Two pieces of thin craft batting measuring 10-inches wide X 17-inches long.
For Section C - Strip Quilted Pocket and Back of Tote:
- Three strips of fabric 2.5-inches wide X 14-inches long.
- Three strips of fabric 2-inches wide X 14-inches long for pieced section.
- One piece of solid cotton fabric measuring 13-inches wide X 11-inches long for back of tote.
- One piece of thin craft batting measuring 15-inches wide X 23-inches long.
Trim for binding pocket top and ties:
- One contrast strip measuring 2-inches wide X 36-inches long.
Note: You can sew shorter 2-inch wide strips together to make a 36” piece.
Webbing:
- One piece measuring 1-inch wide X 8-inches long
- One piece measuring 1-inch wide X 22-inches long.
- 1-inch Parachute buckle
- Snap for closure
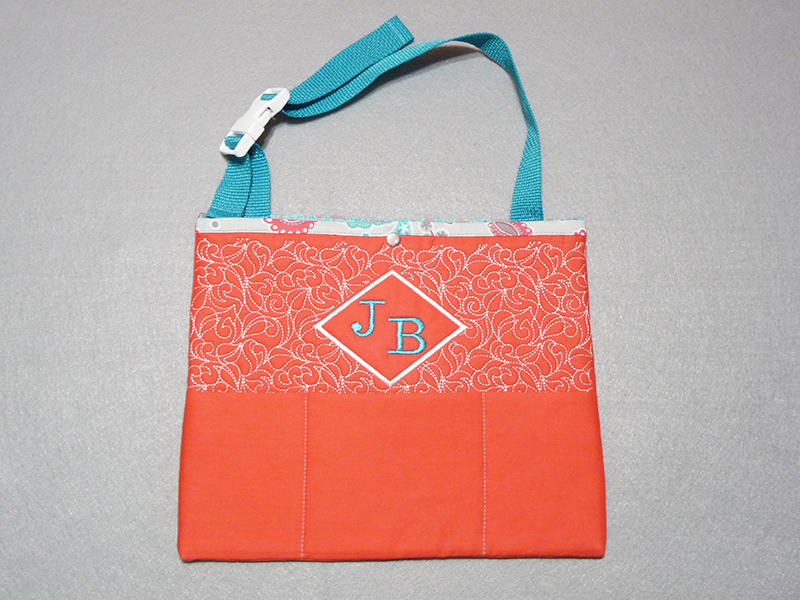
Front of Tote
[caption id="attachment_8380" align="aligncenter" width="800"] Front of Tote[/caption]
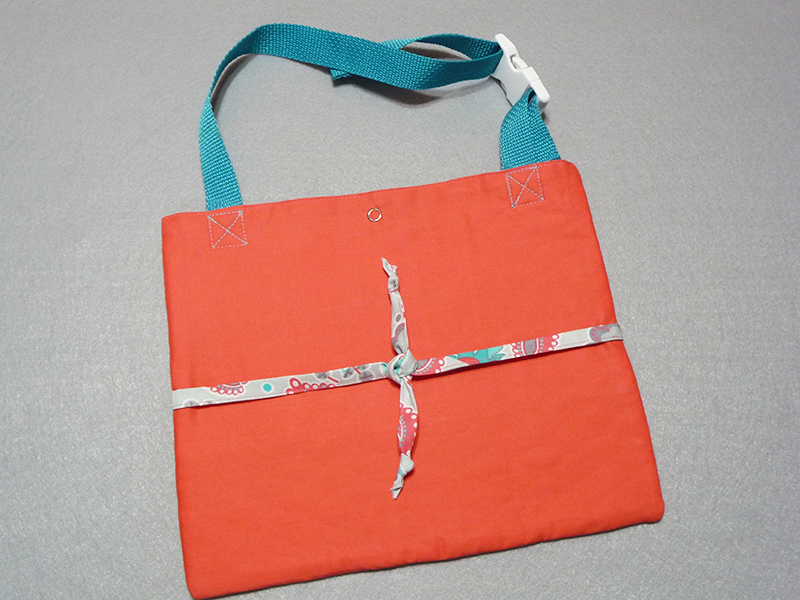
Back of Tote
[caption id="attachment_8378" align="aligncenter" width="800"] Back of Tote[/caption]
Instructions for Creating Car Tote
We’ll create each section separately and then it will be a simple process to layer them together and construct the tote. Along the way you are going to learn a lot about the fancy quilted fill patterns and special features in THE Dream Machine® and the upgrade. If you need help finding the icons and keys refer to your manual and the upgrade operation guide. Ready to explore the possibilities? Follow along, using the illustrations and photos as a guide while we go step-by-step to create sections A through C.Section A:
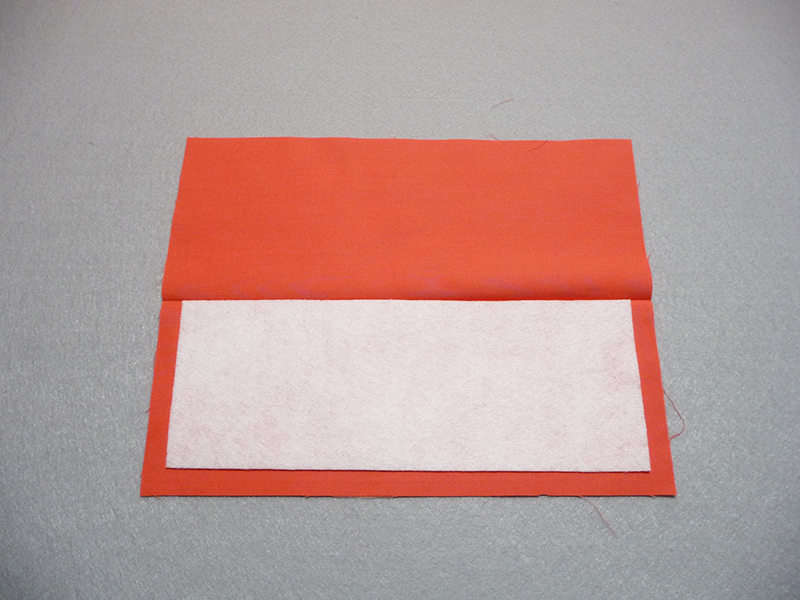
- To form the small pocket piece select the 13” X 10” piece of cotton. Fold in half with wrong sides together and layer the thin craft batting in between.
Section B:
- Choose 14’ X 9.5” hoop & select 1” grid in set mode. To create the monogram, begin by selecting a satin stitch diamond shape in embroidery mode. Re-size to equal approximately 3 ½” high X 4 ½” wide. Rotate 90 degrees to take advantage of the length of the hoop. Move diamond above the center line of the hoop area. Add two individual initials, rotate, position as desired, and re-size as necessary to fit within diamond. Touch group icon to select multiple items and lock the design together as one unit. See steps in Figure #1.
[caption id="attachment_8340" align="aligncenter" width="467"]
Figure #1a[/caption]
[caption id="attachment_8341" align="aligncenter" width="356"]
Figure #1b[/caption]
[caption id="attachment_8342" align="aligncenter" width="479"]
Figure #1c[/caption]
[caption id="attachment_8343" align="aligncenter" width="380"]
Figure #1d[/caption]
[caption id="attachment_8344" align="aligncenter" width="325"]
Figure #1e[/caption]
[caption id="attachment_8345" align="aligncenter" width="350"]
Figure #1f[/caption]
- Next we’ll use the Stamp feature so we can quilt perfect stitches surrounding the diamond frame. Select the Stamp icon from the Edit menu. Save the outline and Touch OK so you can recall this custom stamp from the stamp pattern list in My Design Center.
- Touch Add.
Tip: Return to set mode and turn off the grid for better visibility.
- Select My Design Center from the main menu. Touch Stamp Key and choose a square with fill only. Touch OK. Touch Size Key. Tap the keys and re-size to fill an area measuring 12” high X 9” wide. Touch OK. See steps in Figure #2.
[caption id="attachment_8346" align="aligncenter" width="450"]
Figure #2a[/caption]
[caption id="attachment_8388" align="aligncenter" width="480"]
Figure #2b[/caption]
Tip: Tap and hold to quickly change size. Tap with one touch at a time for precise sizing.
- Touch Stamp Key again. Retrieve Saved Outline from Saved Outlines Menu Key and touch OK.
- Touch the key to select the fill stitch type. Choose the option for
No Fill Stitches and touch OK. Set the Color by selecting the Pouring Ink Tool within the Brush Tool Key set.
- Touch inside diamond. You’ll see empty space inside the diamond. See Figure #3.
[caption id="attachment_8347" align="aligncenter" width="800"]
Figure #3[/caption]
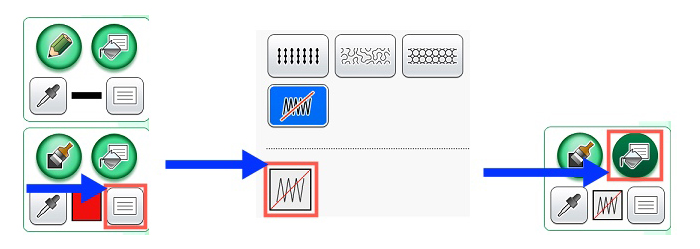
- Now it’s time to fill the rectangle with fancy quilt stitches to surround diamond. Touch the key to select the fill stitch type again and this time select from the menu of fancy fills, pattern 001. Touch OK. You can select different colors for the fill. I choose blue.
- With bucket tool highlighted, touch inside the rectangle to fill the area. Touch Next. For this pocket we’ll set the fill size at 75% and set outline to OFF. See Figure #4.
Figure #4[/caption]
- Touch Preview, OK, and then Set to finish. See Figure #5.
[caption id="attachment_8349" align="aligncenter" width="800"]
Figure #5[/caption]
Tip: You can save your work to return and edit later if you choose.
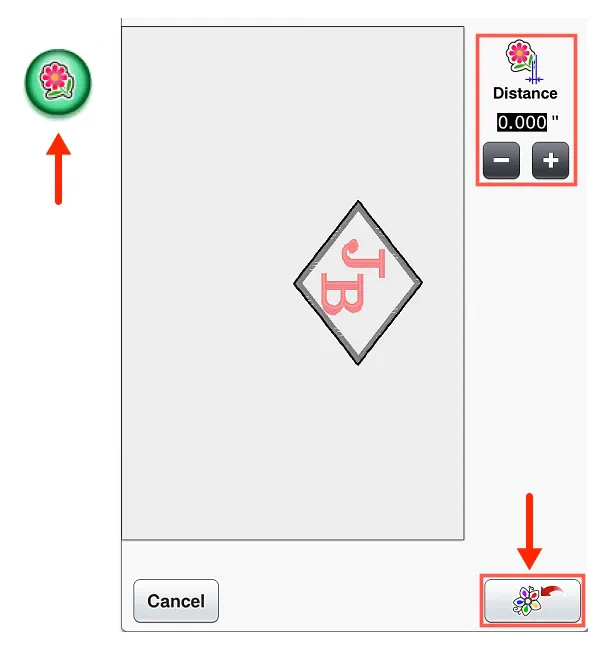
- Touch Embroidery to proceed to embroidery screen. Before you start, return to set mode and flip through pages to set speed and distance for basting as shown below.
Tip: Slower speed is recommended for premium stitch quality on these fill patterns.
- Touch Edit and add a basting outline to help keep the layers secure. With fabric wrong side up, hoop one of the 15” wide X 23” long pieces of solid cotton cut for piece B. Center the two pieces of fleece on top and then layer second piece of fabric over fleece, with right side facing up. Place pins at the corner to keep this “floating” piece from shifting. Stitch basting and design using desired colors. See Figure #6.
[caption id="attachment_8350" align="aligncenter" width="800"]
Figure #6[/caption]
- Remove from hoop. Carefully remove basting stitches and trim batting close to stitching line, eliminating it from the seam allowance. Press lightly. Trim piece to equal 13” wide x 10” long.
Section C:
- Sew all of the strips together using a ¼-inch seam allowance to form one section of fabric. Hoop 15” wide X 23” long piece of fleece and then layer the pieced fabric on top. You can use low tack tape to keep it in place.
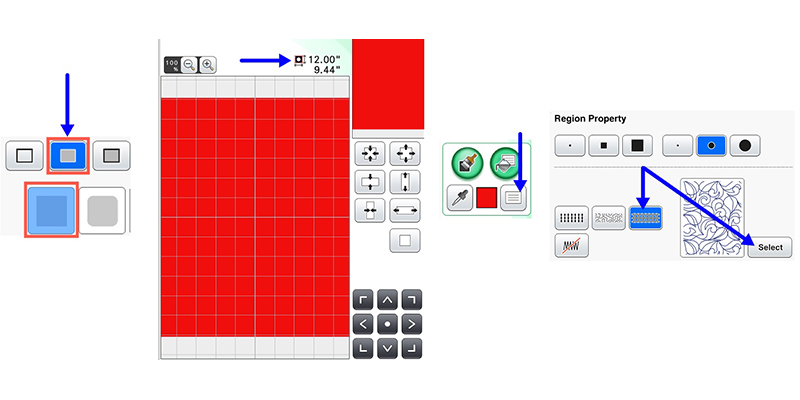
- Use the skills you learned for creating piece B with fancy fill stitches to create another quilted section for C. Begin by selecting My Design Center from the main menu. Touch stamp menu key and choose a square with no outline. Touch OK.
- Touch size and re-size to fill an area measuring 12” high X 9.44” wide. Touch OK. This time use diamond fill 006 for stitch type, using the bucket tool to fill the area. See basic steps below:
- Complete design as you did before, with diamond size at 100% and outline set OFF. Stitch without basting. Remove from hoop and trim to finished size of 13” wide x 11” long. See Figure #7.
[caption id="attachment_8351" align="aligncenter" width="800"]
Figure #7[/caption]
- Gather pieces for sections A-C along with webbing and trim. See Figure #8.
[caption id="attachment_8352" align="aligncenter" width="800"]
Figure #8[/caption]
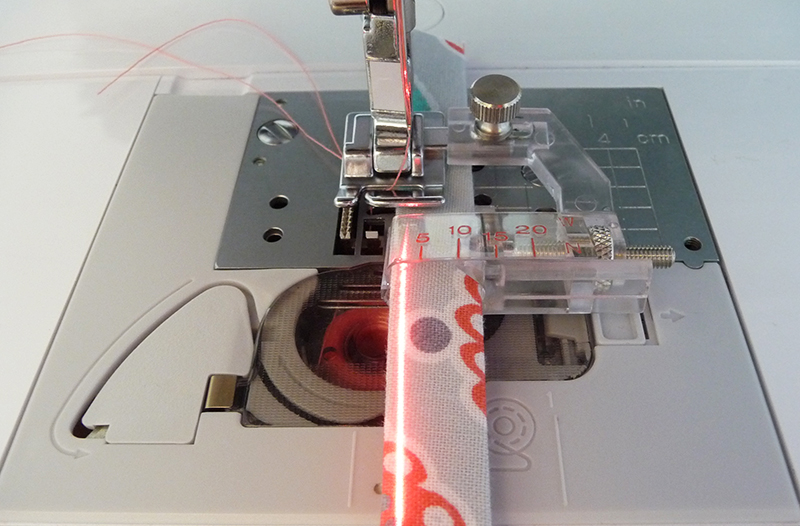
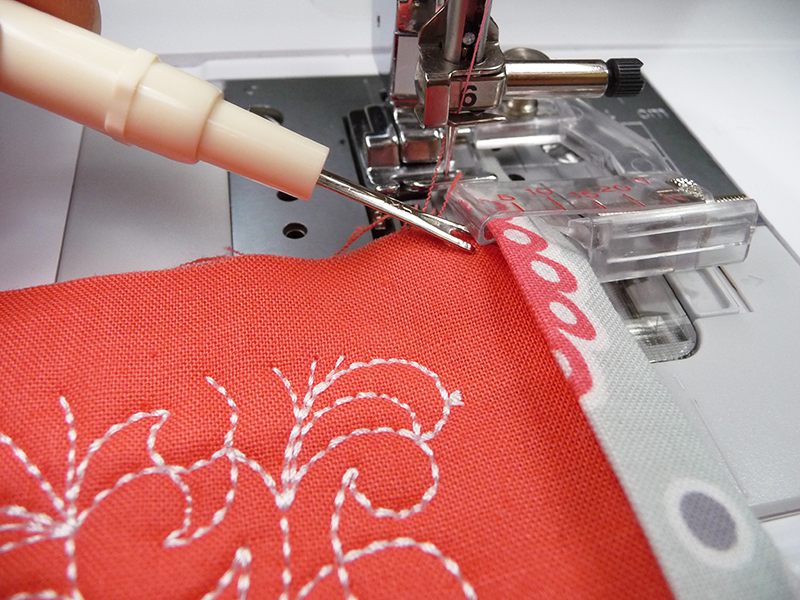
- Select the 36” trim strip. Fold in half lengthwise with wrong sides together, and then fold raw edges toward center to make a folded strip measuring approximately ½-inch wide. Insert into opening on the binder foot. Loosely pin the center of the strip to the center of piece B. See Figure #9.
[caption id="attachment_8353" align="aligncenter" width="800"]
Figure #9[/caption]
- Attach foot to machine. Adjust settings on foot so the needle pieces through all layers. You can use a straight stitch or a zigzag if you like.
- See Figure #10 for more information on adjusting foot for various widths. Engage Sew Straight™ laser as a guide for accurate stitching. Begin stitching at one end and then continue across pocket top and stitch till you reach the opposite end, making sure the top edge of the pocket is inserted into the center opening on the foot.
[caption id="attachment_8354" align="aligncenter" width="800"]
Figure #10[/caption]
Brother Adjustable Bias Binder Foot
- Be sure to read the instruction sheet included with the binder foot. This foot has a clear plastic tape guide for bias or straight grain tape. By adjusting this guide you can sew various widths of double folded tape ranging from ¼” to ¾” (5mm to 20mm). You can also sew single layers such as ribbon by inserting directly into the lower slot on the foot. The adjustment screw at the back adjusts the foot from side to side, bringing it closer or further away from the needle. The adjustment screw on the side is used to adjust the opening for different widths of tape and trim. It is important that the trim is snug but still moves freely through the foot. The fabric layer to be bound needs to go into the center slot and must not be too thick. Batting is trimmed from the seam allowance to eliminate bulk in this project.
Tip: A seam ripper is helpful for pushing the fabric into place.
- Cut excess strip even with each side edge and set aside the two extra pieces.
- Mark lines for pocket openings, making them larger or smaller as desired. Layer A on top of B with raw edges even. Stitch pocket into place using the triple stretch stitch on the machine. See Figure #11.
[caption id="attachment_8355" align="aligncenter" width="400"]
Figure #11[/caption]
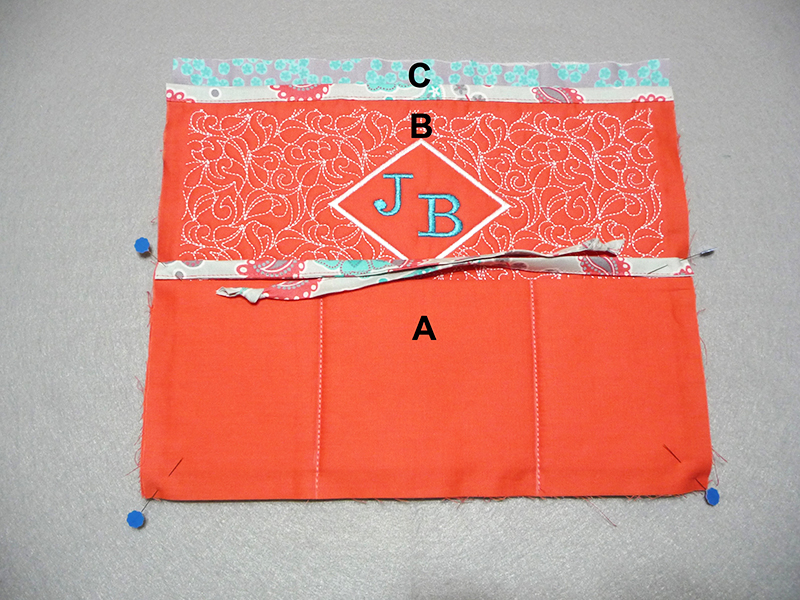
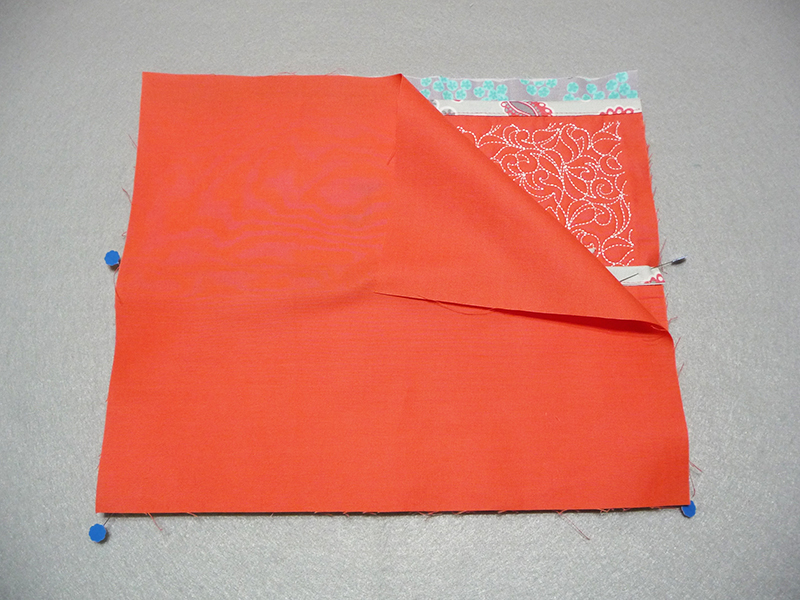
- To finish, layer sections A-C, with ties knotted at one end and even with the raw edge on each side.
- Next, layer remaining solid piece on top with right sides facing and raw edges even.
- Stitch around all edges using a ½-inch seam allowance and leaving a 5-inch opening at the top for turning. Re-enforce corners, then clip to reduce bulk. Turn right side out. Press, pressing opening closed in the process. Edge stitch close to top edge to close the opening.
- Sew each piece of webbing in place at the top edge of section C, using a box formation to make straps secure. See Figure #12a and #12b.
[caption id="attachment_8356" align="aligncenter" width="800"]
Figure #12a[/caption]
[caption id="attachment_8357" align="aligncenter" width="800"] Figure #12b[/caption]
- Attach buckle using package directions. Treat ends of ties with seam sealant and let dry. Add snap to close large pocket.
You are finished! Fold in half and tie and you are ready for the road!
Options and Ideas:
- If you do not have My Design Center options you can quilt your own fabric using the measurements provided here as a guideline.
- Use hook and loop tape or a magnetic closure for the large pocket in place of snap.
- Swing tote from front to back seat as desired.
Related Projects
Stay Connected
* Required fields
Follow Us
- Product Support
- Product Support Assistant
- Terms of Sale
- Product-Registration
- Search Supplies/Accessories
- Ordering & Shipping Information
- Ordering & Account FAQs
- View Order Status
- Warranty & Extended Warranty Information
- Recall Information
- Return Policy
- Security Support Information(Opens in a new tab)
- Contact Brother
