Foot of the Month: Fabric Folder with Piped Edges
Finished folder measures approximately 9 1/2-inches wide X 12 inches high. Why settle for boring folders when you can make a pretty fabric folder trimmed with piping! For this project we used our featured foot of the month, the adjustable zipper and piping foot. Piping is a great addition to so many hand- crafted items! Here it adds a pop of color and additional rigidity to the edges. If you’re a fan of the relaxing art of coloring, you can use this to store colored pencils and coloring books or printable coloring book pages. Of course, it’s great for anything else you would normally store or file in an ordinary folder. You might find yourself making one for the sewing room, kitchen, office, study, etc.
Materials and Supplies
- Brother Sewing Machine
- SA131
Brother Adapter for converting low shank attachments on high shank machines. - SA161
Adjustable Zipper and Piping Foot - Basic sewing notions, including thread to match fabric.
Note: See images of adapter and zipper foot below.
Quilt weight cotton fabric for folder:
- Cut two pieces measuring 20-inches wide X 13-inches long, one for inside and one for outside of folder.
- Cut one piece measuring 20-inches wide X 12-inches long for large lower pocket.
- Cut one piece measuring 6-inches wide X 16-inches long for small inside pocket.
- Medium weight fusible interfacing to back each of the above pieces of fabric.
- Two pieces of grosgrain ribbon measuring 3/8-inch wide X 10-inches long for tie closure.
- One package of pre-purchased piping to coordinate with fabric.
 SA131[/caption]
[caption id="attachment_19470" align="aligncenter" width="800"]
SA131[/caption]
[caption id="attachment_19470" align="aligncenter" width="800"]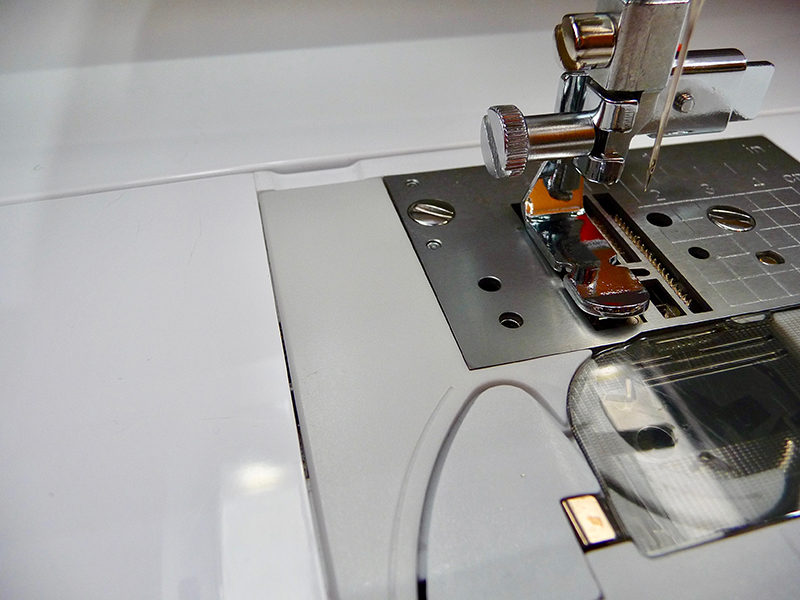 SA161[/caption]
Instructions for Creating Folder
- Fuse interfacing to each piece. Fold large pocket in half and press to equal 20-inches wide X 6- inches deep. Gather supplies. See Figure #1a and Figure #1b.
 Figure #1a[/caption]
[caption id="attachment_19472" align="aligncenter" width="800"]
Figure #1a[/caption]
[caption id="attachment_19472" align="aligncenter" width="800"] Figure #1b[/caption]
- Pin a length of piping to top edge of outside folder piece, folding piping at an angle to keep cording free from the ½-inch seam allowance. See Figure #2.
 Figure #2[/caption]
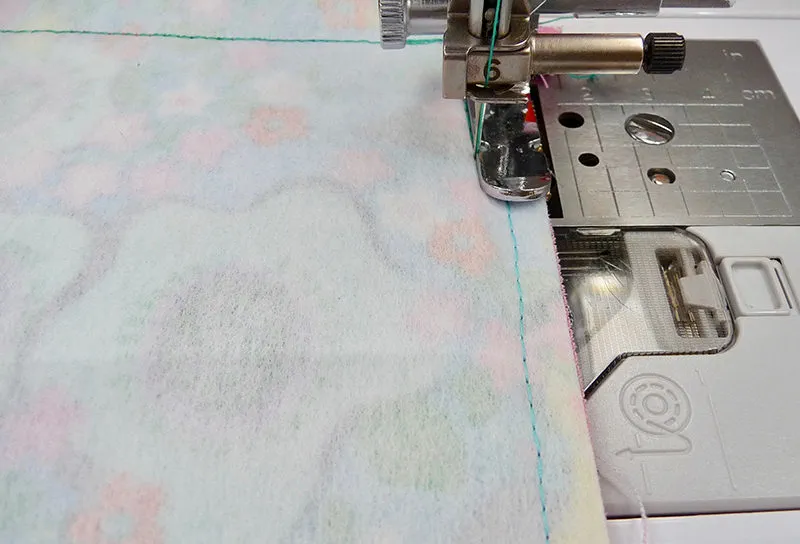
- Select a center needle straight stitch on the machine. Attach adjustable zipper and piping foot, using adapter if necessary. Slide the foot into position and sew piping a slight distance from the line of stitching that holds piping cord in place. See Figure #3a and Figure #3b.
 Figure #3a[/caption]
[caption id="attachment_19475" align="aligncenter" width="800"]
Figure #3a[/caption]
[caption id="attachment_19475" align="aligncenter" width="800"] Figure #3b[/caption]
Repeat the sewing process for opposite edge. Pull out cording and trim it away from seam allowance at the folded ends. See below:
Figure #3b[/caption]
Repeat the sewing process for opposite edge. Pull out cording and trim it away from seam allowance at the folded ends. See below:

Tip: It’s important to use a center needle straight stitch with this adjustable foot. Make adjustments by loosening the screw at the back of the foot, sliding the foot right or left to position it the appropriate distance from piping or zipper teeth.
- Pin ribbon to center of each side edge. See Figure #4.
 Figure #4[/caption]
- Prepare small inside pocket as follows:
- Fold in half to equal 6-inches wide X 8-inches long, having right sides together.
- Sew side edges leaving bottom open.
- Turn right side out through bottom and press.
- Overcast raw edge at the bottom. In this example foot “G” was used with an overcasting stitch. See Figure #5a and #5b.
 Figure #5a[/caption]
[caption id="attachment_19467" align="aligncenter" width="800"]
Figure #5a[/caption]
[caption id="attachment_19467" align="aligncenter" width="800"] Figure #5b[/caption]
- Pin pocket to left side of inside folder piece, centering it 2-inches from the bottom edge and center fold line. Attach pocket by sewing close to the edge. See enhanced photo below:

- Next, layer large folded pocket on top, having pocket even with raw edges of side and bottom. Machine baste along side and bottom edges. See enhanced photo below:

- Layer inside and outside folder pieces and pin with right sides together, marking off a large section along one edge to leave open for turning. See Figure #6.
 Figure #6[/caption]
- Re-attach adjustable zipper foot. Sew top and bottom edge, sewing close to cord in piping. See below:
- Switch to standard presser foot to finish. Sew side edges using a ½-inch seam allowance. Clip corners and turn right side out through opening. Press, folding raw edge in on open side, and tucking ribbon end inside. Top-stitch close to open edge, closing opening in the process. Sew a matching line of top-stitching on opposite edge. Remove basting. Stitch over ribbons a second time to re-enforce. See Figure #7.
 Figure #7[/caption]
- Sew a line of straight stitches along the center fold line. Fold and press to complete the folder. Your folder is ready for use! Fill it with art supplies or anything else you like. It’s perfect for collecting drawings to use with My Design Center on your Brother machine. See Figure #8.
 Figure #8[/caption]
See inside and outside of finished folder below:


Related Projects
Stay Connected
* Required fields