Foot of the Month: Spa Style Men’s Robe
Fit for a king, this spa style robe is designed to be comfortable yet classy. The Brother 5-hole cording foot takes center stage this month, providing an easy way to accent the robe for an upscale, custom look! Perfect for Father’s Day or the first gift for that Grad who will be headed off to College in the fall.
Materials and Supplies
- Brother Sewing Machine
- Brother Embroidery thread
for decorative stitching - SA157 Brother 5-Hole Cording foot
- Pattern and fabric for robe, plus basic notions for sewing
- One skein of size 5 pearl cotton to use for cording
- One package of coordinating, ½-inch wide single fold bias tape for creating trim. One package will easily trim pockets and sleeve hems
- ¼-inch wide lightweight fusible web for attaching trim
- Optional appliqué for upper left chest pocket – You’ll find instructions for the appliqué with FREE DESIGN in our companion project, Slippers Crowned for a King
Featured Accessory
The 5-Hole Cording foot for 7mm machinesThis is a Genuine Brother® Accessory [caption id="attachment_7631" align="aligncenter" width="300"]
 The 5-Hole Cording foot for 7mm machines[/caption]
Notes about fabric, pattern, and trim:
- Please read through instructions before beginning. I used a classic waffle weave fabric for an authentic spa style robe. Pre-shrink fabric before sewing.
- Use the technique presented here to trim patch pockets and any other flat, straight areas you wish to trim. This robe features trim on pockets and along sleeve hems.
- Choose a robe pattern with patch pockets. This project features Burda Style 7640, view A for Men.

Instructions for Making Robe
- Prepare pattern and cut robe using required pieces. This robe features a small pocket added to the upper left chest. If your pattern does not include a chest pocket, cut a fabric rectangle measuring 5-inches wide X 6-inches long. This includes ½-inch for seam allowance at the sides and bottom, and 1-inch for a hem at the top.
- Set up machine for decorative stitching with embroidery thread.
Tips for Decorative Stitching: For the stitch featured here you can use Embroidery Bobbin Thread in the bobbin or wind a bobbin with the decorative thread. Refrain from using regular sewing thread. It is generally too thick for satin style stitches. If you have a setting for changing the presser foot pressure on your machine, change it to 1 or 2. This allows fabric to flow more freely under the foot during decorative stitching. Check your machine manual for settings. PLEASE NOTE: It is important to set the pressure back to standard before doing regular sewing.
- Prepare to create trim by following the steps listed below. Note: Although the Pocket is illustrated here as an example, once you have everything set, it’s a good idea to practice on remnants before trimming actual pieces.
- Select a stitch to accent the cording. This project features a satin stitch commonly found on Brother machines. It is called an elongation stitch because it can be set for different numbers that shorten or elongate the length of the decorative pattern. See Figures #1a and #1b.
 Figure #1a[/caption]
[caption id="attachment_7629" align="aligncenter" width="424"]
Figure #1a[/caption]
[caption id="attachment_7629" align="aligncenter" width="424"] Figure #1b[/caption]
This stitch perfectly covers two cords on the right and two cords on the left. Feel free to experiment with different stitches to see what you like best.
Figure #1b[/caption]
This stitch perfectly covers two cords on the right and two cords on the left. Feel free to experiment with different stitches to see what you like best.
- Decide where you want the trim located. In this example trim is positioned just above the stitching line for the pocket hem. By placing trim just above the stitching line for a hem you can topstitch your hem in place by stitching close to the finished trim.
- Use fusible webbing to fuse bias tape in place on the right side of the fabric, having bias strip extend slightly at both ends.
- Cut four lengths of cording to insert into the 5-hole foot, adding several inches to the length you need to cover strip from end to end. See Figure #2.
 Figure #2[/caption]
- Insert cord one at a time, beginning with the front two holes, feeding the cord into the hole from the top, sliding it into the 7mm opening of the foot, and finishing by feeding the cord under the sole of the presser foot. See Figure #3. In this example four cords were used in the foot, with the center back hole left blank.
 Figure #3[/caption]
Tips for cording: A dental floss threader works well for inserting cording. I prefer to insert cords without having the foot attached to the machine. Tie loose end of cords into a knot behind the foot to keep cords from slipping out of the foot as you stitch.
- Stitch down the center of the bias tape to create trim and thoroughly secure it to the fabric piece. See Figure #4.
[caption id="attachment_7610" align="aligncenter" width="800"]
 Figure #4[/caption]
- Repeat the process for each pocket. Apply the trim anywhere else you choose by following the same method. See Figure #5.
[caption id="attachment_7611" align="aligncenter" width="800"]
 Figure #5[/caption]
Note: In this example all three pockets and both sleeves were trimmed before the robe was constructed. Depending on the location you may need to partially construct the robe before you apply the trim.
- Prepare each pocket for attaching to robe. Here is a neat way to finish pockets for stitching:
- Clean finish raw edges with a serger or overcast stitch to keep from raveling.
- Fold pocket hem to the right side along fold line.
- Stitch top hem in place, beginning at the top fold and ending at the hem edge. Be sure to back stitch at each end. Trim top corners to reduce bulk. Baste a scant distance from the seam allowance on the remaining pocket edges. See below:
- Turn top edge right side out and press. Using basting stitches as a guideline, press side and bottom edges to the wrong side to prepare pocket for stitching. See Figure #6a and #6b.
 Figure #6a[/caption]
[caption id="attachment_7613" align="aligncenter" width="800"]
Figure #6a[/caption]
[caption id="attachment_7613" align="aligncenter" width="800"] Figure #6b[/caption]
- Add optional appliqué to small chest pocket by stitching close to the satin stitching. See below:
- Complete the robe according to pattern instructions.
- Sew hip pockets in place by topstitching along folded edges.
- Sew small pocket in left chest area. Position of the left pocket will vary slightly with sizes. For a medium men’s robe place pocket about 10-inches down from the shoulder having it almost midway between the center front and side seam. If you are unsure of the position you may want to pin in place first and then do a trial fitting to be sure of the location.
Tip: I prefer to sew pockets in place after robe is completed. Admittedly, there’s a little more bulk to handle but with this method I can measure from all finished edges and make sure pockets are placed evenly on each side.
[caption id="attachment_7614" align="aligncenter" width="800"] Close up of finished hip pocket:[/caption]
[caption id="attachment_7607" align="aligncenter" width="800"]
Close up of finished hip pocket:[/caption]
[caption id="attachment_7607" align="aligncenter" width="800"] Close up of left chest pocket[/caption]
[caption id="attachment_7615" align="aligncenter" width="800"]
Close up of left chest pocket[/caption]
[caption id="attachment_7615" align="aligncenter" width="800"]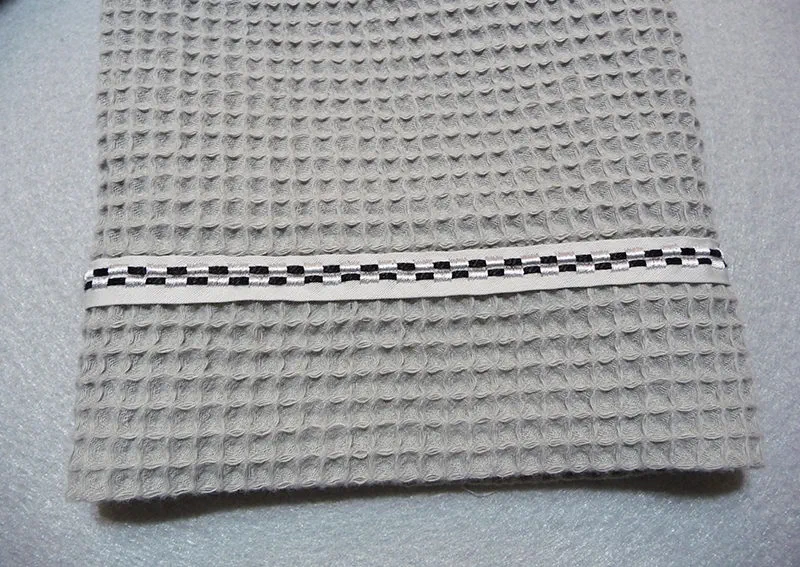 Close up of finished sleeve hem[/caption]
Featured burda style pattern is a product of: Verlag Aenne Burda GmbH & Co.
Featured 10 ounce Silver Turkish Waffle fabric is a product of: Shannon Fabrics Inc.
Brother International Corporation makes no representations or warranties regarding such products.
Related Projects
Stay Connected
* Required fields