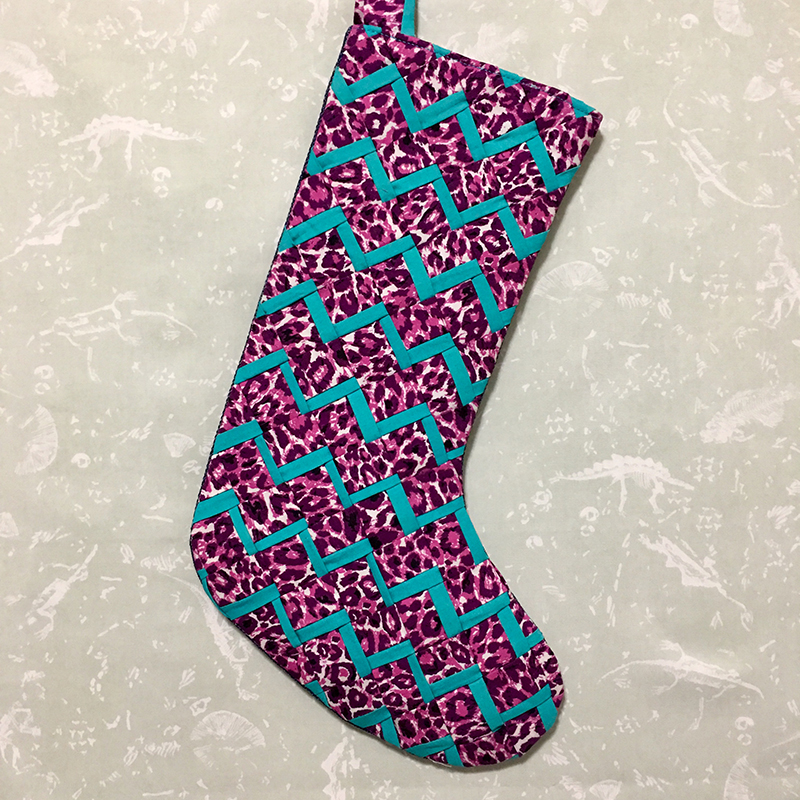
Fun Woven Chevron Stocking!
Y’all may or may not know that I have a 4 1/2 year old daughter named Helena. Well, her self-anointed super power is “stylish” and she has definitely taken us outside of the traditional color scheme this holiday season. This year, pink and purple and sparkles are literally everywhere in my house, so when I asked her to pick the fabric for her stocking, of course she picked the pink leopard print. She conceded with the turquoise accent fabric and the Helena-dada collaboration was pure magic.
Machine Used:
Supplies Used:
- Foam board
- Pins
- Medium woven interfacing
- Weaving needle
- Two fabrics for weaving (One main & one accent)
- Fabric for lining
- Fabric for back
- Thread
- Denim needle
- Masking or washing tape
Fabric Weaving
- The first thing you need to do is print off the stocking template I provided, glue the two sections together and cut it out.
- Next, place the template in the center of the foam board and draw the outline with a marker. Using a ruler and marker, draw a 2” grid on point at 45 degrees inside the outline of the stocking. With the textured side up, place the interfacing over the grid and attach with pins in each corner. Using a marker, trace the outline of the stocking onto the interfacing.
Note: I adjusted the template after these pictures were taken, so your outline and grid might look slightly different at this point.


- From the two fabrics for the weaving, cut the following:
- Ten 2” strips (width of fabric) from main fabric
- Ten 1” strips (width of fabric) from accent fabric

- Take one main fabric strip and one accent fabric strip and, right sides together, sew the two strips together lengthwise using a 1/4” seam allowance. Sew the end closed of one of the ends of the tube and turn inside out. Repeat this for all pair of strips.


- With all strips turned right-side out, press the strips flat where the creases fall in the middle of both the accent and main fabrics.

- Now that you have all of the strips pressed, begin pinning the first layer of strips from top to bottom with the accent fabric all facing down. While the strips don't necessarily need to line up exactly against the line, they should all be parallel. Instead of precutting each strip into smaller strips, cut each strip as you go to the required size.

Now the Weaving Begins
- Starting somewhere in the middle, begin weaving following the perpendicular gridlines with an over-under pattern with the accent fabric facing up. Alternate the over under with each adjacent strip and use your fingers to ensure each strip butts up against each other.


- With a steam iron on medium heat, slowly press the top of the weave allowing the steam to penetrate and fuse to the textured side of the interfacing. Next, use the tape to secure the perimeter of the weave. Unpin the weave from the foam board. Flip the weave over onto an ironing board with the interfacing side up and press the interfacing directly with a steam iron.


- Bring the weave over to the sewing machine. With the interfacing side facing up, stitch 1/8” on the inside of the outline of the stocking. Remove the tape and follow the outline of the stocking with either scissors or rotary cutter to trim the excess off the weave.


Stocking Construction
- Now that you have the front of the stocking complete, you’ll need to cut out the other pieces. On a cutting mat, place the back fabric facing down. Fold the lining fabric in half and place that on top of the back fabric. Place the weave facing up on top of all fabric. Using a rotary cutter, follow the outline of the weave to cut the fabric underneath.
Note: You could alternately use the original paper template. I only used that weave so that I didn’t accidentally cut the back the wrong direction. Additionally, you should have some excess strips left over. Trim a 6” piece that will be used as the hanger.

- Right sides facing, sew both the outer shell and the lining at 1/4” seam allowance. For the concave curve on the stocking, snip the seam allowance a couple spots without snipping the thread. For the convex curves, cut out a few triangles.


- Attach the 6” strip to the left side of the lining with one end of the strip being 1/8” from the seam allowance on one side and the other end being 1/8” from the seam allowance on the other side.


- Turn the outside of the stocking right-side out and the lining inside-out. Press both with an iron to flatten. Also fold over 1/2” on both the lining and outer shell and press with a steam iron.

- Insert the lining into the stocking and line up the seams and top of both. Using clips and/or fusable tape or fabric glue to connect the two will definitely help. Top stitch 1/8” from the edge of the top of the stocking to connect the lining to the outer shell. Enjoy your magical woven chevron stocking and make another and another for every member of the family!


