How to Embroider on Tulle – Removable Tattoo’s!
Designing your own fabric with embroidery can be really fun and it’s easy to do! In celebration of National Embroidery Month, I thought I'd show you one of my favorite fabrics to embellish, tulle. Commonly used for wedding veils and table decorations, but what about embellishing garments such as sleeves for a jacket or dress. Tulle fabric is very fine and see-through, so when we add colorful embroidery and use the fabric for sleeves, the appearance is more of a tattoo or what I call a “removable tattoo!”
Features: Moving, Resizing, and Recoloring Embroidery Designs Techniques: Hooping Tulle, Embroidering on Tulle
 The display screen will show me what the design looks like with the originally programmed colors, but it’s simple to change the colors around if you have something else in mind.


 The embroidery design on the screen will also reflect the new color you’ve chosen. Continue changing colors around until you have the perfect combo. What an easy way to see your design before you even start embroidering!
 There are many options to shrink or expand the design. I’m going to choose the icon with four arrows pointing out, which will stretch my design, in equal proportions, to the largest size it can be.
 Next, I’m going to duplicate my design and move the designs around. I am using the center of the hoop as a placement line for the center of the outside of the sleeve. With the touch screen feature, it is real easy to move and adjust the designs.

 Experiment with the other edit features such as Mirror Image and Rotate.
Using Mirror Image is shown here.
Experiment with the other edit features such as Mirror Image and Rotate.
Using Mirror Image is shown here.
 <>
I’m using rayon and metallic thread for this design. Since this fabric is see-through, carefully choose the bobbin thread. With this design I could use a white or light grey thread for the entire design, or use the same color as the top thread. By using a coordinating color for the top thread in the bobbin thread, the design will look beautiful from the front and back side of the fabric. I wouldn’t advice using metallic thread in the bobbin; instead, choose a polyester, rayon, cotton, or silk thread that is a close color to the metallic.
(photo tulle 50 and 51)
When the design is finished embroidering, un-hoop the stabilizer and the fabric and carefully cut away the excess stabilizer.
<>
I’m using rayon and metallic thread for this design. Since this fabric is see-through, carefully choose the bobbin thread. With this design I could use a white or light grey thread for the entire design, or use the same color as the top thread. By using a coordinating color for the top thread in the bobbin thread, the design will look beautiful from the front and back side of the fabric. I wouldn’t advice using metallic thread in the bobbin; instead, choose a polyester, rayon, cotton, or silk thread that is a close color to the metallic.
(photo tulle 50 and 51)
When the design is finished embroidering, un-hoop the stabilizer and the fabric and carefully cut away the excess stabilizer.
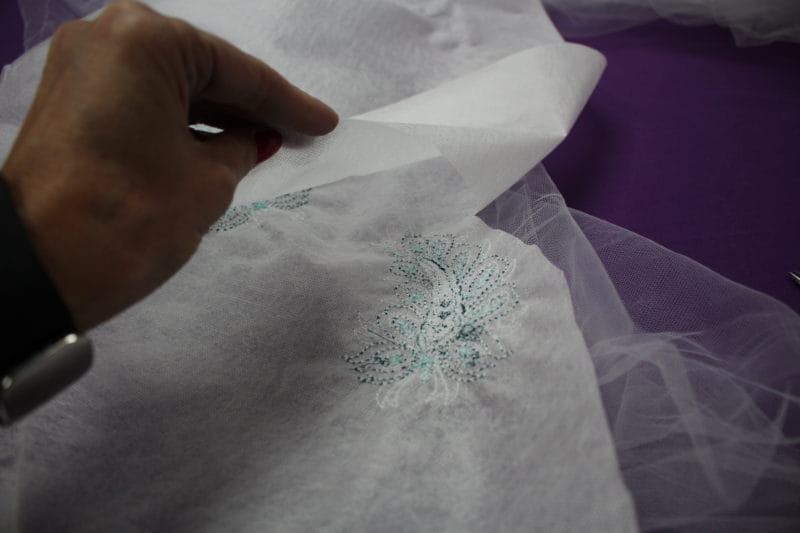 Continue to re-hoop the fabric and add additional designs. When the fabric is finished, rinse away the mesh stabilizer.
 You can see how the embroidery design pops out against the skin or against a contrasting color. A great way to embellish!


 Be sure to share photo’s of your own embroidered tulle items and tag us at @BrotherSews #StitchingSewcial and #AngelaWolfPatterns on Facebook(Opens in a new tab)
and Instagram(Opens in a new tab)
. Happy Sewing! Angela

Machine:
Machine used: THE Dream Machine® or THE Dream Machine® 2(Opens in a new tab)Features: Moving, Resizing, and Recoloring Embroidery Designs Techniques: Hooping Tulle, Embroidering on Tulle
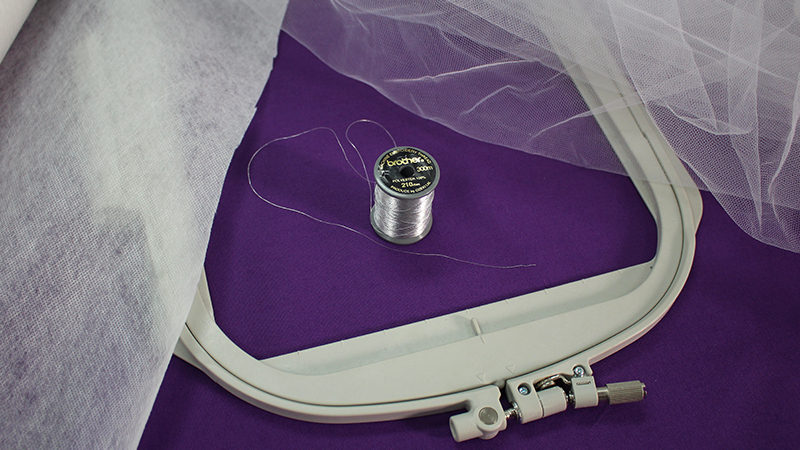
Supplies
- Water-soluble Mesh Stabilizer
- Tulle Fabric
- Rayon Embroidery Thread
- Brother Metallic Embroidery Thread for even more bling!(Opens in a new tab)
- Machine Embroidery Needle(Opens in a new tab)
- Machine Embroidery Bobbin Thread(Opens in a new tab)
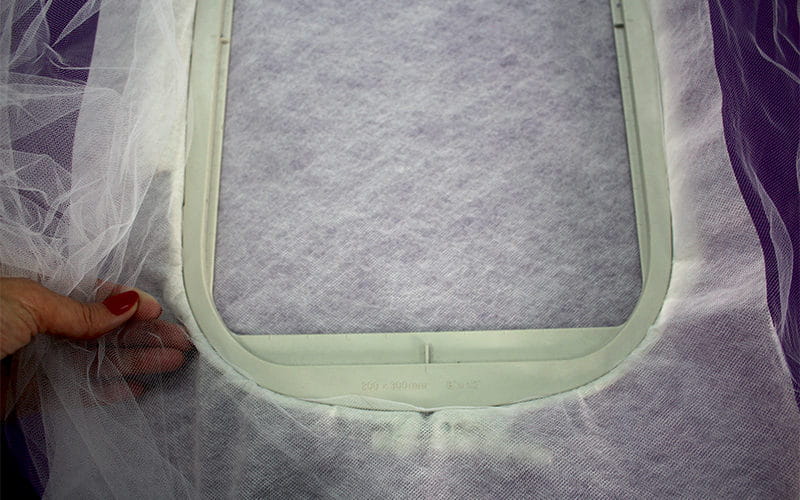
Hooping
Begin by hooping both the stabilizer and the fabric. With the stabilizer on the bottom and the tool fabric on the top, gently pull the tulle until it is snug so there are no wrinkles within the hoop area. Be very careful when you do this, as the tulle fabric is very fragile and can tear easily.
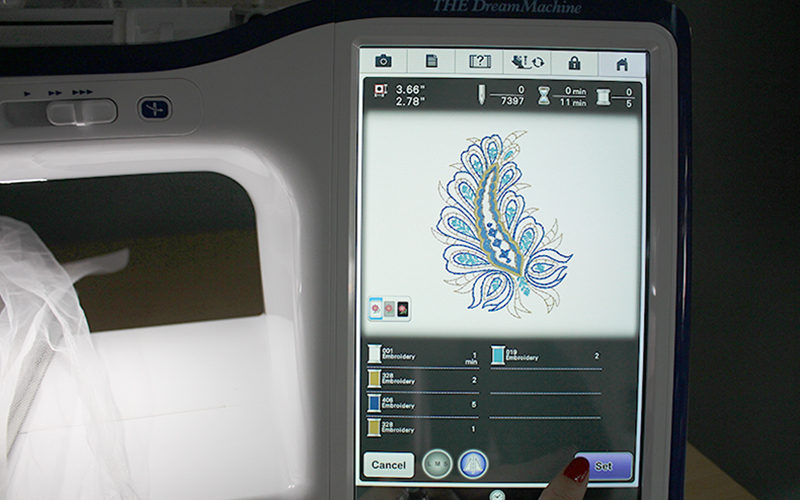
Choosing A Design
I’ve chosen one of the designs in THE Dream Machine®.
The display screen will show me what the design looks like with the originally programmed colors, but it’s simple to change the colors around if you have something else in mind.
Changing the Colors
- Set the design for embroidery by touching the set button as shown two photos above.
- Touch the color in your list that you would like to change.
- The menu of color swatches will pop up. Touch a different color to select it.
- You will see the color change in your line up.
The embroidery design on the screen will also reflect the new color you’ve chosen. Continue changing colors around until you have the perfect combo. What an easy way to see your design before you even start embroidering!
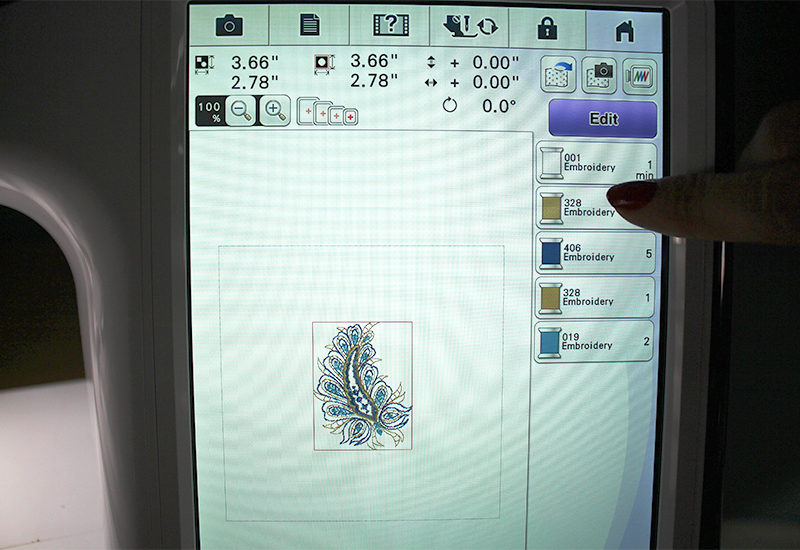
Resizing and Arranging the Design
I’m going to be embellishing the fabric for sleeves, so I want the designs to be as large as possible. Resizing the design is as simple as clicking on:- EDIT
- SIZE
There are many options to shrink or expand the design. I’m going to choose the icon with four arrows pointing out, which will stretch my design, in equal proportions, to the largest size it can be.
Next, I’m going to duplicate my design and move the designs around. I am using the center of the hoop as a placement line for the center of the outside of the sleeve. With the touch screen feature, it is real easy to move and adjust the designs.
Experiment with the other edit features such as Mirror Image and Rotate.
Using Mirror Image is shown here.
<>
I’m using rayon and metallic thread for this design. Since this fabric is see-through, carefully choose the bobbin thread. With this design I could use a white or light grey thread for the entire design, or use the same color as the top thread. By using a coordinating color for the top thread in the bobbin thread, the design will look beautiful from the front and back side of the fabric. I wouldn’t advice using metallic thread in the bobbin; instead, choose a polyester, rayon, cotton, or silk thread that is a close color to the metallic.
(photo tulle 50 and 51)
When the design is finished embroidering, un-hoop the stabilizer and the fabric and carefully cut away the excess stabilizer.
Continue to re-hoop the fabric and add additional designs. When the fabric is finished, rinse away the mesh stabilizer.
You can see how the embroidery design pops out against the skin or against a contrasting color. A great way to embellish!
Be sure to share photo’s of your own embroidered tulle items and tag us at @BrotherSews #StitchingSewcial and #AngelaWolfPatterns on Facebook(Opens in a new tab)and Instagram(Opens in a new tab)
. Happy Sewing! Angela
Related Projects
Stay Connected
* Required fields
Follow Us
- Product Support
- Product Support Assistant
- Terms of Sale
- Product-Registration
- Search Supplies/Accessories
- Ordering & Shipping Information
- Ordering & Account FAQs
- View Order Status
- Warranty & Extended Warranty Information
- Recall Information
- Return Policy
- Security Support Information(Opens in a new tab)
- Contact Brother
