Quick Serged Napkin Rings
Looking for a really quick way to dress up your table for holiday festivities? Thread up your serger with holiday colors, cut some simple squares, and you are ready to serge some napkin rings. This is a super-fast project so you’ll have time to make as many as you need to beautify your holiday place settings. Are you ready? Let’s go sew!
Materials and Supplies
- Brother Serger
to use for long seams on scarf. Serger featured in this project is the Brother Pacesetter PS5234. - Brother Sewing Machine to use for finishing scarf with center back seam. Machine featured in this project is the Brother Pacesetter PS200T.
Fabric and material Requirements for each napkin ring you wish to create:
- Fabric #1: One piece of cotton quilt weight fabric measuring 5-inches square.
- Fabric #2: One piece of cotton quilt weight fabric measuring 5-inches square.
- One piece of paper backed fusible webbing suitable for sewing. Note: Some of the webbing are labeled No-Sew and are not suitable for this type of project.
- Three cones of serger thread. Select one color to match fabric side one and use it in the needle and lower looper, and then select another color to match fabric side two and use it in the upper looper.
- Liquid seam sealant for treating thread ends to prevent raveling.
- Bell with opening to feed threads through.
- Dental floss threader to feed threads through bell opening.
Steps to Create Napkin Rings
1. Prepare pieces for stitching. Note that I’m showing steps for making only one napkin ring. See Figure#1. [caption id="attachment_22864" align="aligncenter" width="800"] Figure #1[/caption]
2. Cut paper backed webbing to fit squares. Place webbing layer in between the two layers of fabric with wrong sides facing together. Fuse according to manufacturer’s directions. See Figure#2.
[caption id="attachment_22865" align="aligncenter" width="800"]
Figure #1[/caption]
2. Cut paper backed webbing to fit squares. Place webbing layer in between the two layers of fabric with wrong sides facing together. Fuse according to manufacturer’s directions. See Figure#2.
[caption id="attachment_22865" align="aligncenter" width="800"] Figure #2[/caption]
3. Set up the serger for a three-thread wide stitch, using the left needle. In this example Red thread is in the needle and the lower looper and green thread is in the upper lopper. For extra coverage on the fabric edges shorten the stitch length. See settings in Figure#3.
[caption id="attachment_22866" align="aligncenter" width="800"]
Figure #2[/caption]
3. Set up the serger for a three-thread wide stitch, using the left needle. In this example Red thread is in the needle and the lower looper and green thread is in the upper lopper. For extra coverage on the fabric edges shorten the stitch length. See settings in Figure#3.
[caption id="attachment_22866" align="aligncenter" width="800"] Figure #3[/caption]
4. Test your stitch on fabric remnants that simulate the fabric used for your project. It’s likely that you’ll need to tighten some or all of the tension for a balanced stitch with this short stitch length. Tip: Tighten one tension dial at a time, changing the tension is very small amounts until the stitch looks even and balanced on both sides. See example in Figure #4.
[caption id="attachment_22867" align="aligncenter" width="800"]
Figure #3[/caption]
4. Test your stitch on fabric remnants that simulate the fabric used for your project. It’s likely that you’ll need to tighten some or all of the tension for a balanced stitch with this short stitch length. Tip: Tighten one tension dial at a time, changing the tension is very small amounts until the stitch looks even and balanced on both sides. See example in Figure #4.
[caption id="attachment_22867" align="aligncenter" width="800"] Figure #4[/caption]
5. When you’re ready to make the napkin right begin by chaining off a thread tail approximately 10-inches long. Disengage the cutting blade on the serger to avoid cutting you fabric edge and previous threads. See Figure #5.
[caption id="attachment_22868" align="aligncenter" width="800"]
Figure #4[/caption]
5. When you’re ready to make the napkin right begin by chaining off a thread tail approximately 10-inches long. Disengage the cutting blade on the serger to avoid cutting you fabric edge and previous threads. See Figure #5.
[caption id="attachment_22868" align="aligncenter" width="800"] Figure #5[/caption]
6. Serge two parallel sides of the square, aligning the raw edge so that the stitch forms directly on the raw edge of the fabric layers. See Figure #6.
[caption id="attachment_22869" align="aligncenter" width="800"]
Figure #5[/caption]
6. Serge two parallel sides of the square, aligning the raw edge so that the stitch forms directly on the raw edge of the fabric layers. See Figure #6.
[caption id="attachment_22869" align="aligncenter" width="800"]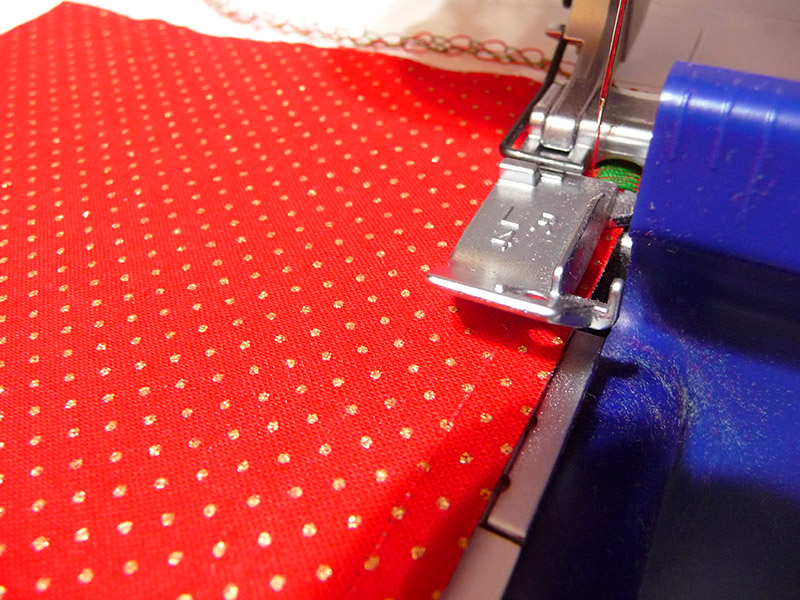 Figure #6[/caption]
Be sure to leave long thread tails each time. Smooth out thread tails and trim to measure approximately 6-inches long. See Figure #7.
[caption id="attachment_22870" align="aligncenter" width="800"]
Figure #6[/caption]
Be sure to leave long thread tails each time. Smooth out thread tails and trim to measure approximately 6-inches long. See Figure #7.
[caption id="attachment_22870" align="aligncenter" width="800"] Figure #7[/caption]
7. Serge remaining two sides, taking care to pull previous tail out of the way as you begin and end the line of stitching. See Figure #8.
[caption id="attachment_22871" align="aligncenter" width="800"]
Figure #7[/caption]
7. Serge remaining two sides, taking care to pull previous tail out of the way as you begin and end the line of stitching. See Figure #8.
[caption id="attachment_22871" align="aligncenter" width="800"] Figure #8[/caption]
8. When all four sides are finished knot each set of threads at the edge of the fabric and then knot them again near the ends of the thread tails. See Figure #9.
[caption id="attachment_22872" align="aligncenter" width="800"]
Figure #8[/caption]
8. When all four sides are finished knot each set of threads at the edge of the fabric and then knot them again near the ends of the thread tails. See Figure #9.
[caption id="attachment_22872" align="aligncenter" width="800"] Figure #9[/caption]
9. Bring two sets of threads together and tie tightly to form the ring. Feed each set through the bell opening and tie again to secure. See Figure #10.
[caption id="attachment_22873" align="aligncenter" width="800"]
Figure #9[/caption]
9. Bring two sets of threads together and tie tightly to form the ring. Feed each set through the bell opening and tie again to secure. See Figure #10.
[caption id="attachment_22873" align="aligncenter" width="800"] Figure #10[/caption]
10. Treat each of the ends with a small amount of seam sealant, let dry, and trim so they are even. You are ready to insert your napkin and set the table. See completed napkin ring in Figure #11.
[caption id="attachment_22874" align="aligncenter" width="800"]
Figure #10[/caption]
10. Treat each of the ends with a small amount of seam sealant, let dry, and trim so they are even. You are ready to insert your napkin and set the table. See completed napkin ring in Figure #11.
[caption id="attachment_22874" align="aligncenter" width="800"] Figure #11[/caption]
Enjoy!
Figure #11[/caption]
Enjoy!

Related Projects
Stay Connected
* Required fields
Follow Us
- Product Support
- Product Support Assistant
- Terms of Sale
- Product-Registration
- Search Supplies/Accessories
- Ordering & Shipping Information
- Ordering & Account FAQs
- View Order Status
- Warranty & Extended Warranty Information
- Recall Information
- Return Policy
- Security Support Information(Opens in a new tab)
- Contact Brother
