Quick Tip: Changing Thread Colors in Brother PE Design 11
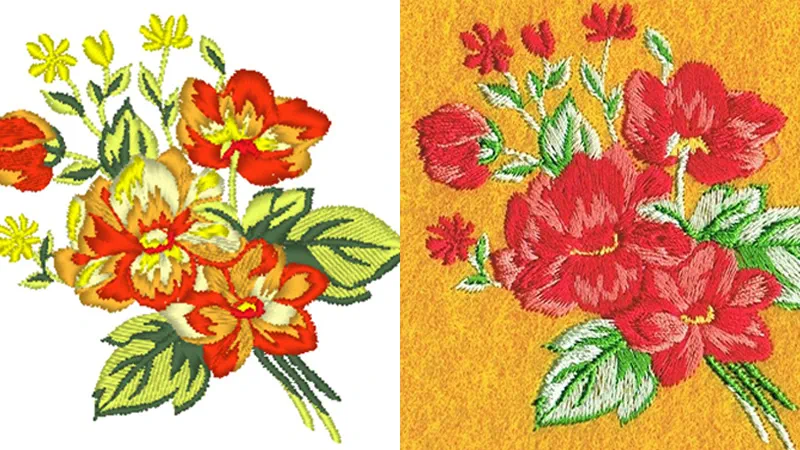
Part of the fun and creativity of machine embroidery is the ability to customize your colors. Your Brother embroidery machine has no idea what thread you are slipping on the spool pin so you can certainly change colors as you work your way through a design. Some Brother machine models allow for color changing right on the screen of the machine so that’s an option too. In this post I’d like to show you yet another way to change up color cues in a design. Using the Brother PE-Design 11 software, I can swap out my colors using the big screen on my computer and have everything ready to stitch when I transfer my design to the machine. I wanted to stitch a floral design on yellow fabric, selecting a design from the Flowers/Plants collection on iBroidery.com.
Here is the link to the design: Bouquet No. 200910480.
There was a lot of yellow already in the design, so I wanted to switch the colors to provide more contrast. Follow along as I show you the steps I took to change colors from flower bouquet A to flower bouquet B.
1. Open or Import the design. See Figure #1a.
[caption id="attachment_24400" align="aligncenter" width="771"]
Figure #1a[/caption]
[caption id="attachment_24401" align="aligncenter" width="638"]
Figure #1b[/caption] 2. Find the first color you want to change in the Sewing Order pane to the left of the design. Click on the section and you’ll see a blue box showing it’s selected. You’ll also see a faint dashed line around the selected section. See Figure #2. [caption id="attachment_24402" align="aligncenter" width="736"]

Figure #2[/caption] 3. Click on the Change Color icon and the window will appear with color palette options. I scrolled down to choose the Simplicity Pro thread chart. See Figure #3.
[caption id="attachment_24403" align="aligncenter" width="800"]

Figure #3[/caption] 4. To view colors in the palette by name and number, click on the box at the bottom of the color palette window, just below the image of the three small hearts. This box allows you to toggle between two options, To-List mode and To-Palette mode. You can easily switch back and forth. In addition, you can also switch between various brands of thread charts. See Figure #4. [caption id="attachment_24404" align="aligncenter" width="489"]

Figure #4[/caption] 5. When I have difficulty seeing the detail of the color I want to change, I like to select an obvious, bold color first. That helps me see the color section more clearly. I did that here by selecting purple. See Figure #5. [caption id="attachment_24405" align="aligncenter" width="800"]

Figure #5[/caption] Once I’m sure of the section I’m dealing with I’ll go ahead and choose a color I like. See Figure #6. [caption id="attachment_24406" align="aligncenter"
width="800"]

Figure #6[/caption] 6. Continue selecting each color section you want to change and choose a color from the thread palette until you are finished and happy with the design. See Figure #7.
[caption id="attachment_24407" align="aligncenter" width="770"]

Figure #7[/caption] Be sure to click on the blue PE Design flower icon select Save As to save your newly colored design file with a different name than the original design. See
Figure #8. [caption id="attachment_24408" align="aligncenter" width="513"]
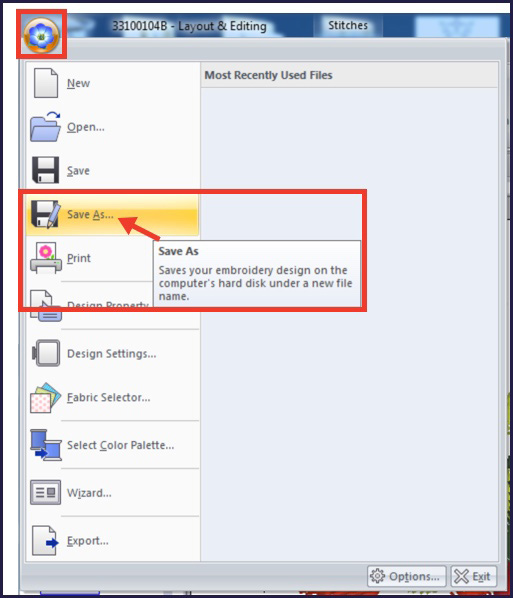
Figure #8[/caption] That’s how easy it is to change your colors in the Brother PE-Design 11 software program!
Related Projects
Stay Connected
* Required fields