Quick Tip: Deleting Colors on the Brother PR670E
Go from this . . .^^^^ To this . . .
 With just a few clicks!
Creating new designs and design combinations with existing designs is a fun way to expand the use of your embroidery design collection. The Brother PR670E
With just a few clicks!
Creating new designs and design combinations with existing designs is a fun way to expand the use of your embroidery design collection. The Brother PR670Ehas a feature built right into the machine and the steps for deleting, aka de-selecting design parts couldn’t be easier. Follow along as I show you how to do this. I like to call this feature “delete and re-design.” Note that the machine manual gives it a more technical name. On page 110 of the manual it has the following title: Deselect Region Setting. Truly, that’s a fancy way of saying that you can subtract parts of a design so they disappear, resulting in a design with a whole new look. The following example shows how I used floral adorned lettering to spell out the word HELLO, and then transformed the design to have a simple unadorned look, for a single color “new” design. Step 1. Select the smaller size of the built-in font with the brass colored letters and floral elements, and then select the first letter. See Figure #1. [caption id="attachment_21620" align="aligncenter" width="249"]
 Figure #1[/caption]
Step 2. Create a combination design spelling the word HELLO, moving letters into place as desired. See Figure #2.
[caption id="attachment_21621" align="aligncenter" width="506"]
 Figure #2[/caption]
Step 3. Touch Edit End to go to the Embroidery Setting Screen. Next, touch the icon that appears as two spools with a blank page. See Figure #3.
[caption id="attachment_21622" align="aligncenter" width="483"]
 Figure #3[/caption]
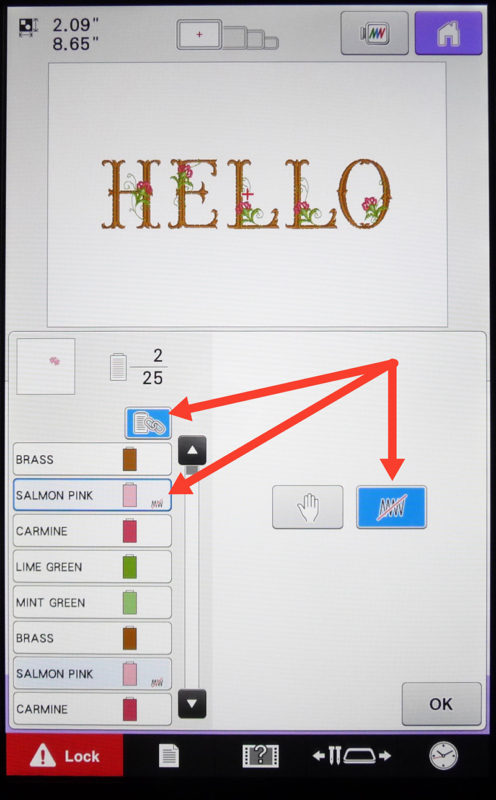
Step 4. A new screen will appear with two new icons. Touch the first color you wish to delete, or deselect. In this case it’s the Salmon Pink. Note that a blue box surrounds the color segment. Next, touch the icon that looks like stitches with a line crossing them out. This tells the machine you want to skip that part of the design, thus de-selecting it. You can work your way through a design by scrolling through the color segments following the above steps to delete parts you want to skip piece by piece. In this case the lettering design repeats the floral colors on each letter. To delete each and every Salmon colored segment touch the link icon. All the Salmon colored segments are highlighted and de-selected at once so they won’t sew. See Figure #4.
[caption id="attachment_21623" align="aligncenter" width="496"]
 Figure #4
[/caption] Step 5. Repeat the steps described above to delete all the color segments except the Brass letters. Touch OK to finish. See Figure #5. [caption id="attachment_21624" align="aligncenter" width="506"]
 Figure #5[/caption]
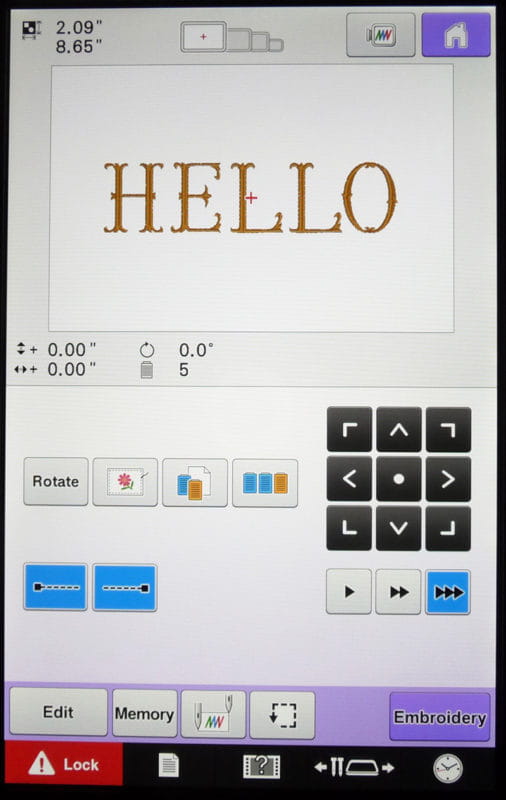
Now it’s a simple matter of proceeding to the embroidery screen to sew the word without any floral accents. See Figure #6.
[caption id="attachment_21625" align="aligncenter" width="487"]
 Figure #6[/caption]
P.S. If you are only stitching one of the letters this process is totally unnecessary. The designers who made this for your Brother machine digitized the design so that the floral accents are stitched last. The letter is stitched first without any gaps so all you need to do is stitch the first color and stop. The easiest way to stop after the letter is to touch the Reserve Stop key at the beginning. The machine will know to sew only the thread color in que and then stop and wait for you.
It’s amazing how smart these machines are, and how they’re designed to make our sewing time easier and more fun. Enjoy using this technique to make new designs with your PR670E!


