Quilted Sewing Machine Mat
This quilted and appliquéd sewing machine mat is designed to enhance your crafting space and help keep small tools handy while you are sewing. In this project you’ll experience the joy of quilting perfectly spaced lines with the walking foot and quilt guide. Decorative stitches outline the pockets and add a custom touch to this simple to sew sewing machine mat. Are you ready? Let’s go sew!
Summary of steps for making this quilted sewing machine mat:
- Prepare pocket piece with appliqués and decorative stitching.
- Quilt top piece using walking foot and quilt guide.
- Layer folded pocket with top and bottom piece.
- Sew contrast binding to all four edges and sew pocket lines to finish.
Note: Finished mat measures approximately 27” wide X 18” long. This mat will fit most standard size Brother sewing machines with the wide extension table attached. See options and ideas at the end of these instructions for thoughts about making other sizes.
Materials and Supplies
- Brother
Sewing Machine with decorative stitches. Featured machine is the Pacesetter PS200T. - Basic Sewing notions including good quality sewing thread to match fabrics and a removable marker.
- Brother Polyester Embroidery Thread
for decorative stitching. Note: You can opt for using standard thread for the decorative stitching. However, the decorative thread has a nice sheen and makes the decorative stitches more prominent. - Walking foot, Quilt guide, and wide extension table.
Note: These accessories are on my “must have” list for quilting and sewing large projects. Optional accessories for many Brother machine models, they are included with the Pacesetter PS200T.
- Optional: SA145
Brother Clearview foot for stitching appliqué pieces. - Fusible medium weight interfacing for pocket piece and fusible craft fleece for quilted piece and appliqués.
Materials for quilted mat, pocket piece, appliqués, and binding:
Fabric A: One yard of solid or tone on tone cotton print for mat and front pocket:- Cut one piece measuring 27” wide X 18” long for Top Side of Quilted Mat. Cut a piece of craft fleece measuring 26” wide X 17” long, center it on wrong side of top piece and fuse in place.
- Cut one piece measuring 27” wide X 18” long for Bottom Side of Quilted Mat.
- Cut one piece measuring 27” wide X 10” long for Front Pocket. Fuse medium weight interfacing to the wrong side of entire pocket piece.
- Cut five strips measuring 2½” wide X 20” long for Binding Edges.
- Cut three pieces measuring 2” square for Appliqués on Pocket. Fuse 2” squares of fusible fleece to wrong side of each piece.
Note: A fat quarter is a piece of fabric measuring approximately 22” wide X 18” long. It’s the perfect size for this project. If you can’t get a fat quarter, purchase ½ yard of fabric.
Steps to Create Quilted Sewing Machine Mat
1. Prepare binding as follows:- Set aside two 20” strips to use for binding short sides.
- Cut one of the remaining strips in half so it equals 2½” wide X 10” long.
- With right sides together, place each 20” strip and 10” strip opposite one another. Mark stitching lines from point to point on the diagonal.
- Sew a diagonal seam to create long strips. Press seams open, trim seam allowance to ¼” and set aside these two long strips for binding longer sides. See enhanced photos in Figure #1a, and Figure #1b.
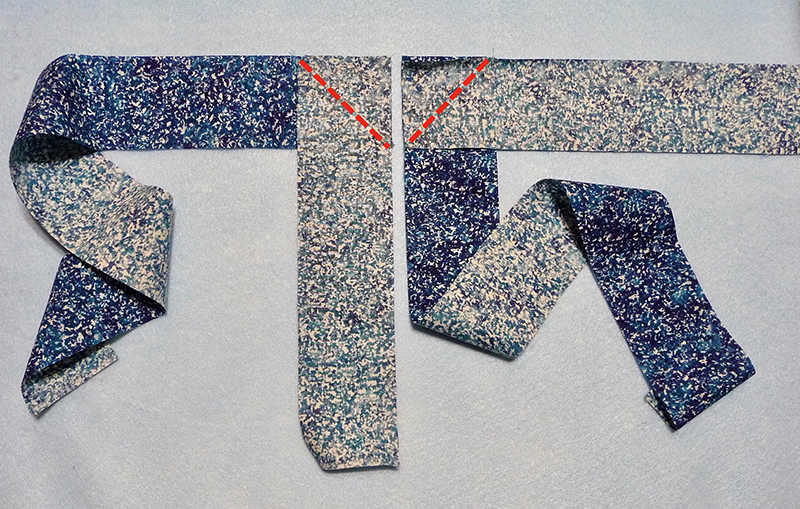 Figure #1a[/caption]
[caption id="attachment_23884" align="aligncenter" width="800"]
Figure #1a[/caption]
[caption id="attachment_23884" align="aligncenter" width="800"] Figure #1b[/caption]
Gather pieces for making mat. Note: All pieces except the 27” wide X 10” long pocket piece are shown in Figure #2 below:
[caption id="attachment_23885" align="aligncenter" width="800"]
Figure #1b[/caption]
Gather pieces for making mat. Note: All pieces except the 27” wide X 10” long pocket piece are shown in Figure #2 below:
[caption id="attachment_23885" align="aligncenter" width="800"] Figure #2[/caption]
2. Choose a couple different thread colors to use for decorative stitching on the pocket. I chose colors to match the decorative face of the machine. Select the 27” wide X 10” long interfaced piece cut for pocket. Mark equally spaced lines for pockets, mark fold line for top of pocket, and then mark off seam lines. Center each of the squares inside the pocket and seam lines, tilting them to form diamond shapes. See Figure #3 with a listing of measurements for line spacing.
[caption id="attachment_23886" align="aligncenter" width="800"]
Figure #2[/caption]
2. Choose a couple different thread colors to use for decorative stitching on the pocket. I chose colors to match the decorative face of the machine. Select the 27” wide X 10” long interfaced piece cut for pocket. Mark equally spaced lines for pockets, mark fold line for top of pocket, and then mark off seam lines. Center each of the squares inside the pocket and seam lines, tilting them to form diamond shapes. See Figure #3 with a listing of measurements for line spacing.
[caption id="attachment_23886" align="aligncenter" width="800"] Figure #3[/caption]
- Fold line for pocket 5” from top edge.
- Pocket lines 6” apart.
- ½” seam allowance along the side and lower edges.
Tip: When satin stitching it’s always a good idea to test your settings on fabric remnants that mimic your actual project pieces. Adjust the width of the stitch as needed to make sure it fully covers the raw edge and secures the appliqué piece. Adjust the length so the stitches form close together but still flow easily through the machine.
Stitch over your previous stitches, forming a satin stitch on the raw edge. See Figure #4.
[caption id="attachment_23887" align="aligncenter" width="800"] Figure #4[/caption]
Additional tips for stitching the appliqués: Be sure to remove pins as you sew. For neatly finished points, pivot your stitching at each point, taking a couple stitches across the point. Pivot again, turning the corner and adjust the position of the foot if needed so stitch forms fully over the next edge. This is where the optional clear view foot really shines as it allows you to see the edge as you are stitching. You could also use this foot for decorative stitching in the next step.
4. Prepare for decorative stitching as follows: Choose two decorative stitches to use side by side. Follow instructions in the manual for setting up each stitch.
Tip: Begin each new line of stitching by re-selecting it. This brings the stitch back to the beginning of the pattern, so each line of stitching looks the same at the starting point.
This example features stitch No.14 (stitched in blue thread) and No.SS1-35 (stitched in lilac thread). Both stitches are set for the full width of 7mm. For each line of stitching begin at the pocket fold line and stitch to the bottom raw edge. Stitch each row closest to marked pocket line with edge of presser foot along the line. See enhanced photo in Figure #5.
[caption id="attachment_23888" align="aligncenter" width="800"]
Figure #4[/caption]
Additional tips for stitching the appliqués: Be sure to remove pins as you sew. For neatly finished points, pivot your stitching at each point, taking a couple stitches across the point. Pivot again, turning the corner and adjust the position of the foot if needed so stitch forms fully over the next edge. This is where the optional clear view foot really shines as it allows you to see the edge as you are stitching. You could also use this foot for decorative stitching in the next step.
4. Prepare for decorative stitching as follows: Choose two decorative stitches to use side by side. Follow instructions in the manual for setting up each stitch.
Tip: Begin each new line of stitching by re-selecting it. This brings the stitch back to the beginning of the pattern, so each line of stitching looks the same at the starting point.
This example features stitch No.14 (stitched in blue thread) and No.SS1-35 (stitched in lilac thread). Both stitches are set for the full width of 7mm. For each line of stitching begin at the pocket fold line and stitch to the bottom raw edge. Stitch each row closest to marked pocket line with edge of presser foot along the line. See enhanced photo in Figure #5.
[caption id="attachment_23888" align="aligncenter" width="800"]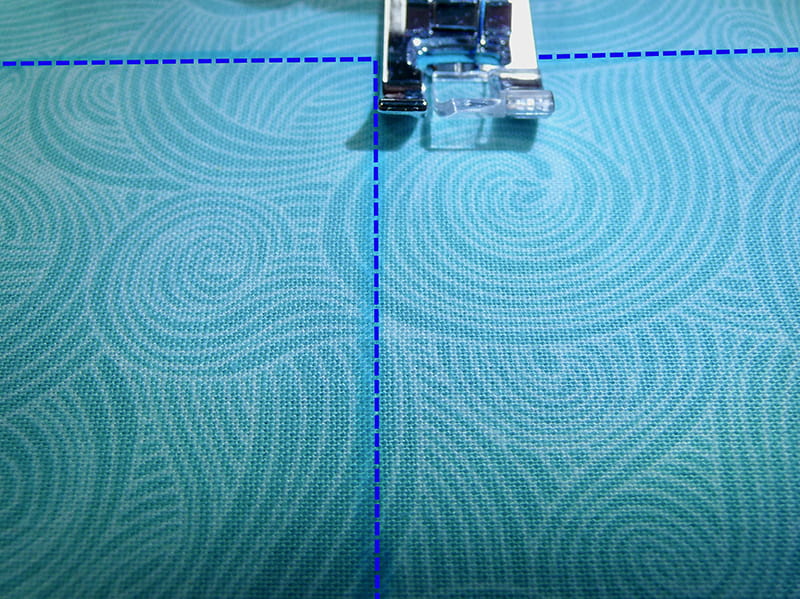 Figure #5[/caption]
Stitch the second line by lining up the edge of the presser foot with the first line of stitching. Remove markings. Fold pocket in half and press top fold line. See Figure #6.
[caption id="attachment_23889" align="aligncenter" width="800"]
Figure #5[/caption]
Stitch the second line by lining up the edge of the presser foot with the first line of stitching. Remove markings. Fold pocket in half and press top fold line. See Figure #6.
[caption id="attachment_23889" align="aligncenter" width="800"] Figure #6[/caption]
5. Prepare to quilt the top piece. Select top piece with fusible batting and mark two diagonal lines for your first quilting lines. See Figure #7.
[caption id="attachment_23890" align="aligncenter" width="800"]
Figure #6[/caption]
5. Prepare to quilt the top piece. Select top piece with fusible batting and mark two diagonal lines for your first quilting lines. See Figure #7.
[caption id="attachment_23890" align="aligncenter" width="800"] Figure #7[/caption]
Set up machine for quilting with the walking foot. Set machine for a center needle straight stitch and change stitch length to 3.5. Stitch one marked line and then the other from end to end.
Tip: Start your stitching on a small piece of stabilizer so the teeth on the walking foot have something to grab ahold of as you start to stitch. See Figure #8.
[caption id="attachment_23891" align="aligncenter" width="800"]
Figure #7[/caption]
Set up machine for quilting with the walking foot. Set machine for a center needle straight stitch and change stitch length to 3.5. Stitch one marked line and then the other from end to end.
Tip: Start your stitching on a small piece of stabilizer so the teeth on the walking foot have something to grab ahold of as you start to stitch. See Figure #8.
[caption id="attachment_23891" align="aligncenter" width="800"] Figure #8[/caption]
6. Next, slide the quilt guide into the hole on the foot and position it 1½” from the needle. Aligning the quilt guide with each previous row of stitching, sew parallel rows of quilting on each side of each line, working from the center outward until you have filled the whole piece with diagonal quilting lines. See Figure #9.
[caption id="attachment_23892" align="aligncenter" width="800"]
Figure #8[/caption]
6. Next, slide the quilt guide into the hole on the foot and position it 1½” from the needle. Aligning the quilt guide with each previous row of stitching, sew parallel rows of quilting on each side of each line, working from the center outward until you have filled the whole piece with diagonal quilting lines. See Figure #9.
[caption id="attachment_23892" align="aligncenter" width="800"] Figure #9[/caption]
Remove markings and press. See Figure #10.
[caption id="attachment_23893" align="aligncenter" width="800"]
Figure #9[/caption]
Remove markings and press. See Figure #10.
[caption id="attachment_23893" align="aligncenter" width="800"] Figure #10[/caption]
Tip: Since this is a small piece and the batting is fused in place, directional stitching is not too important. However, you may find it best to alternate your stitching lines, stitching in one direction and then the other, rolling the bulk of the fabric out of the way as you stitch the rows.
7. Layer the pieces as shown in Figure #11 below, with bottom side facing wrong side up, top side facing right side up, and folded pocket piece layered last.
[caption id="attachment_23894" align="aligncenter" width="800"]
Figure #10[/caption]
Tip: Since this is a small piece and the batting is fused in place, directional stitching is not too important. However, you may find it best to alternate your stitching lines, stitching in one direction and then the other, rolling the bulk of the fabric out of the way as you stitch the rows.
7. Layer the pieces as shown in Figure #11 below, with bottom side facing wrong side up, top side facing right side up, and folded pocket piece layered last.
[caption id="attachment_23894" align="aligncenter" width="800"] Figure #11[/caption]
Make sure all raw edges are even, trim if necessary, and pin layers together. See Figure #12.
[caption id="attachment_23895" align="aligncenter" width="800"]
Figure #11[/caption]
Make sure all raw edges are even, trim if necessary, and pin layers together. See Figure #12.
[caption id="attachment_23895" align="aligncenter" width="800"]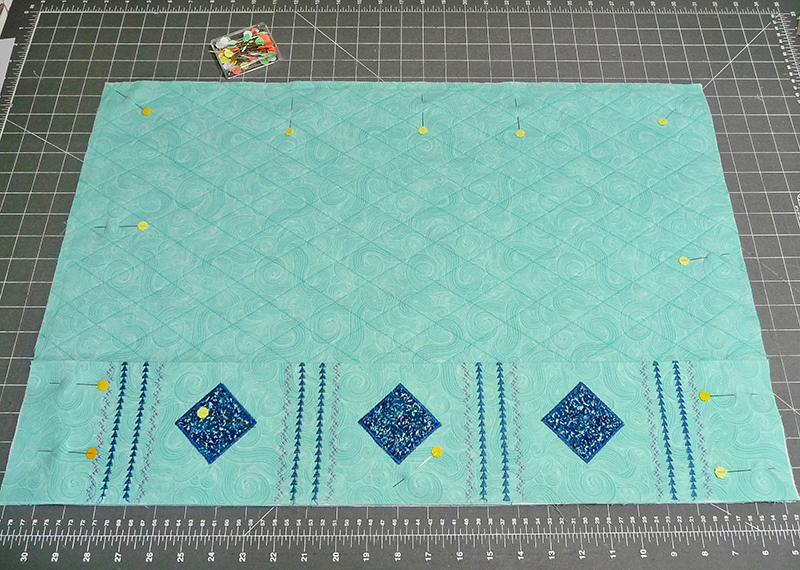 Figure #12[/caption]
8. To make it easier to sew the binding, use a narrow zig zag stitch to secure all the layers together, with stitching catching raw edge of fabric layers. See Figure #13.
[caption id="attachment_23896" align="aligncenter" width="800"]
Figure #12[/caption]
8. To make it easier to sew the binding, use a narrow zig zag stitch to secure all the layers together, with stitching catching raw edge of fabric layers. See Figure #13.
[caption id="attachment_23896" align="aligncenter" width="800"]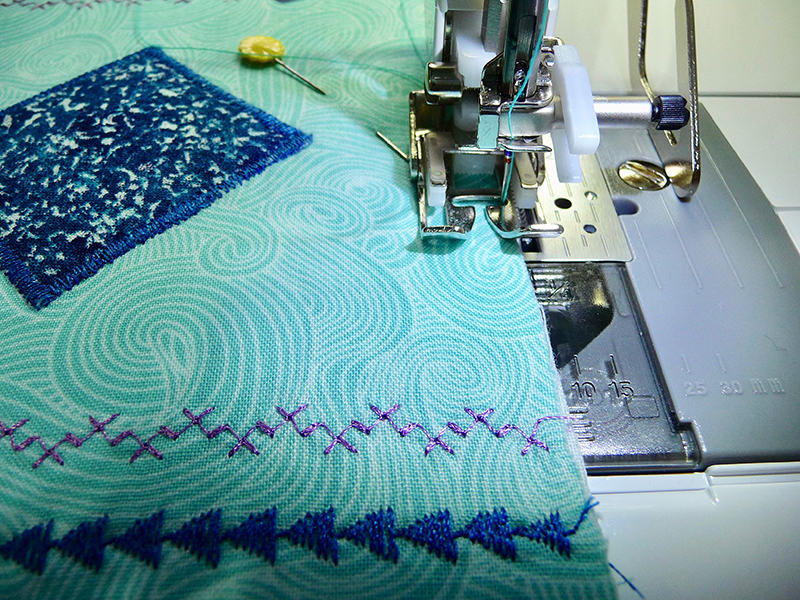 Figure #13[/caption]
9. Prepare to bind the edges as follows:
• Beginning with one long edge, pin binding with right sides together and excess extending at each end. Sew a ½” seam. See Figure #14a and Figure #14b.
[caption id="attachment_23897" align="aligncenter" width="800"]
Figure #13[/caption]
9. Prepare to bind the edges as follows:
• Beginning with one long edge, pin binding with right sides together and excess extending at each end. Sew a ½” seam. See Figure #14a and Figure #14b.
[caption id="attachment_23897" align="aligncenter" width="800"] Figure #14a[/caption]
[caption id="attachment_23898" align="aligncenter" width="800"]
Figure #14a[/caption]
[caption id="attachment_23898" align="aligncenter" width="800"] Figure #14b[/caption]
• Open out binding and press. Next, press under ½” on remaining long raw edge. Turn and press so binding wraps to wrong side. Trim excess binding at each end. See Figure #15.
[caption id="attachment_23899" align="aligncenter" width="800"]
Figure #14b[/caption]
• Open out binding and press. Next, press under ½” on remaining long raw edge. Turn and press so binding wraps to wrong side. Trim excess binding at each end. See Figure #15.
[caption id="attachment_23899" align="aligncenter" width="800"] Figure #15[/caption]
• Note that the binding is slightly wider on the bottom side than it is on the top. Working from the top side, top stitch close to the edge of the binding, catching the fold on the bottom as you go. See Figure #16.
[caption id="attachment_23900" align="aligncenter" width="800"]
Figure #15[/caption]
• Note that the binding is slightly wider on the bottom side than it is on the top. Working from the top side, top stitch close to the edge of the binding, catching the fold on the bottom as you go. See Figure #16.
[caption id="attachment_23900" align="aligncenter" width="800"] Figure #16[/caption]
• Repeat sewing and trimming steps for opposite long edge.
10. Follow the same basic steps to bind each short edge, leaving ½” at each end to fold under and enclose raw edge. See Figure #17a, Figure #17b, and Figure #17c.
[caption id="attachment_23901" align="aligncenter" width="800"]
Figure #16[/caption]
• Repeat sewing and trimming steps for opposite long edge.
10. Follow the same basic steps to bind each short edge, leaving ½” at each end to fold under and enclose raw edge. See Figure #17a, Figure #17b, and Figure #17c.
[caption id="attachment_23901" align="aligncenter" width="800"] Figure #17a[/caption]
[caption id="attachment_23902" align="aligncenter" width="800"]
Figure #17a[/caption]
[caption id="attachment_23902" align="aligncenter" width="800"] Figure #17b[/caption]
[caption id="attachment_23903" align="aligncenter" width="800"]
Figure #17b[/caption]
[caption id="attachment_23903" align="aligncenter" width="800"] Figure #17c[/caption]
11. Finish the mat by stitching pocket lines in between each of the decoratively stitched sections. See Figure #18.
[caption id="attachment_23904" align="aligncenter" width="800"]
Figure #17c[/caption]
11. Finish the mat by stitching pocket lines in between each of the decoratively stitched sections. See Figure #18.
[caption id="attachment_23904" align="aligncenter" width="800"]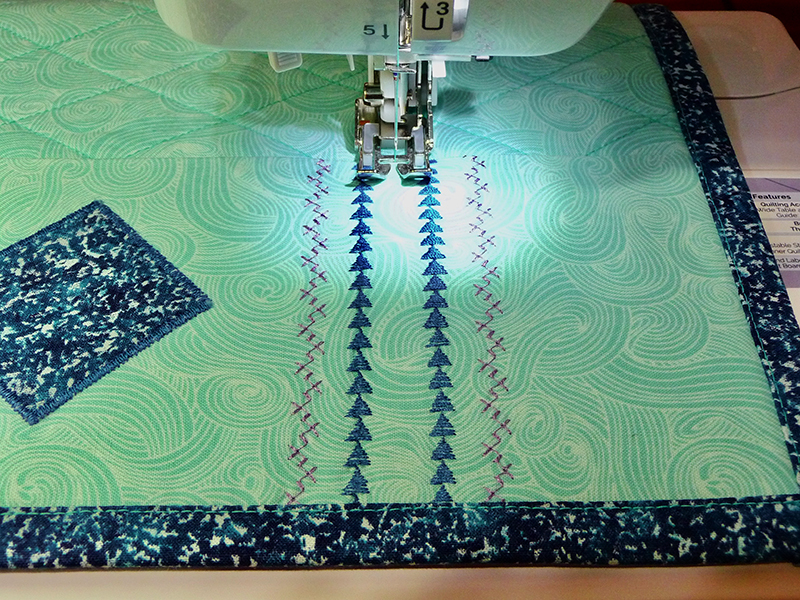 Figure #18[/caption]
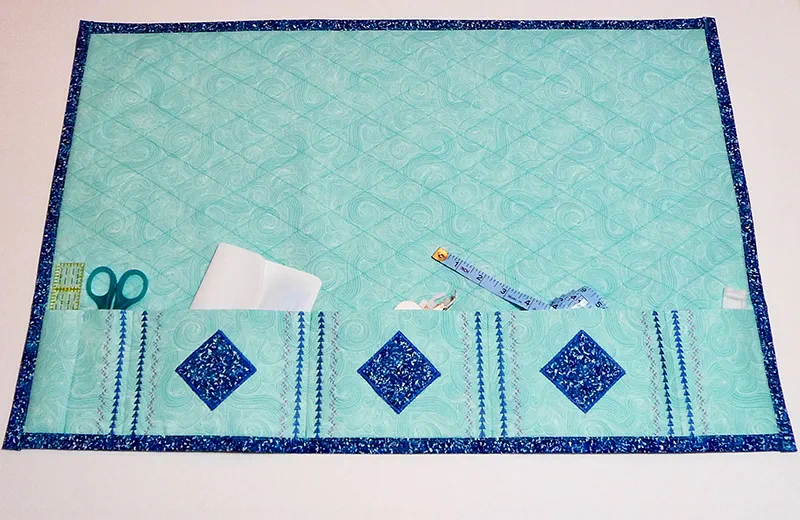
Stitch two additional lines for small pockets at one end to hold supplies like a ruler and small scissors. You are finished! Enjoy!
See the completed sewing machine mat below:
Figure #18[/caption]
Stitch two additional lines for small pockets at one end to hold supplies like a ruler and small scissors. You are finished! Enjoy!
See the completed sewing machine mat below:
Options and Ideas:
- Layer top and bottom pieces together and quilt through both layers, then layer pocket on top and bind the edges.
- For another alternative, you can skip the binding and sew the mat as follows: Pin pocket piece in place on the quilted top piece. With right sides facing, layer with bottom piece. Stitch all four sides, leaving an opening for turning. Turn right side out, close opening and top stitch to flatten the edge.
- To make this mat for other size machines I recommend putting paper on the surface where your machine sits. Next, place your machine on top and determine how much excess you want around the mat. Be sure to leave a margin at the sides and back and fold paper at the edge of the table to decide on pocket depth. Note: If your pockets are too deep they will get in the way as you sit in front of the machine. Draw rough lines to show desired size. Remove the paper, straighten out the lines, and use as a pattern for the main pieces, adding seam allowance where needed.
Related Projects
Stay Connected
* Required fields