How to Machine Bind
There are a couple of ways to attach quilt binding to the quilt: hand binding and machine binding. This blog tutorial focuses on the latter method. With this method, it is faster, and the quilts will hold up better over time.

For those that aren’t familiar with binding, binding is the long strip of fabric around the edge of a quilt project. It works to cover the raw edges of the quilt sandwich (three layers of the quilt – quilt top, batting and back). Binding works to provide strength and longevity to a project, and it is usually considered the final step in quilt making.
Supplies & Tools:

- Basic sewing machine – the Brother Innovis BQ3100 from the Quilt Club Series (Opens in a new tab)was used in this tutorial
- Prepared quilt binding as outlined in the quilt pattern
- Squared-up /trimmed quilt sandwich
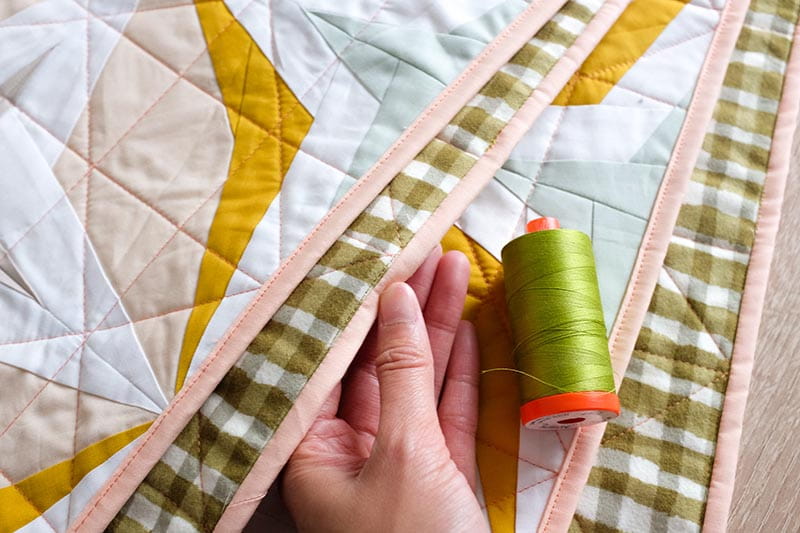
- Coordinating threads, 50wt cotton – ideally, bobbin thread color is as close as possible in color with the quilt back. This is going to help hide any wonky seams or seams that show from the front of the quilt. See below for example:
- Rotary cutter
- Quilting ruler
- Fabric pen or pencil
- Fabric scissors
- Pins
- Seam ripper
- Sewing clips (optional)
- Iron (optional)
Please read through all the instructions before commencing. This will help you identify what supplies you will need and give you an understanding of what to expect throughout the project.
Step 1: If you haven’t done so yet, prepare quilt binding as outlined in the quilt pattern.
Step 2: Take the quilt sandwich, turn it so that the back side of the quilt is facing up. Align the raw edge of the binding strip with the raw edge of the quilt sandwich. Start sewing about 4in from the edge of the binding strip and ¼in from the raw edges.

Step 3: Keep sewing until your sewing machine needle is ¼in from the corner. Stop here and backstitch. Then remove the quilt from the sewing machine.

Step 4: Turn the quilt sandwich 90-degrees. Therefore, the raw edge of the quilt should be on the right. Fold the binding at a 45-degree angle and then fold the binding strip back down so the raw edge is aligned with the raw edge of the quilt sandwich. Hold this in place.


Step 5: Then, take the quilt sandwich and folded binding back to the sewing machine to continue attaching the binding as in Steps 2 to 4 until you reach approximately 6in to 8in from the start of the binding. Don’t forget to backstitch at the start of each edge to secure the binding in place.


Step 6: Lay the quilt flat on your work surface with the quilt back and binding strip ends facing up. Take the start of the binding and lay it flat and aligned with the raw edge of the quilt sandwich. Then take the end of the binding, lay it on top of the start of the binding strip with the raw edge lined up with the quilt sandwich.

Take a quilting ruler, measure and mark with a fabric pen or pencil ¼in past the start of the binding, so the two ends overlap each other. Cut on the marked guideline.


Step 7: With right sides together, match the shorter edge of the binding strip and pin. Sew together using a ¼in seam allowance and press the seams open. By pressing the seams open, it reduces seam bulk and allows the binding to sit flat.


Step 8:Attach the rest of the binding to the back side of the quilt sandwich with a ¼in seam allowance. Don’t forget to backstitch before removing the project from the sewing machine for additional enforcement.
Step 9: We’re now halfway through attaching binding to the quilt! Turn the quilt sandwich over so that the quilt top is facing up*. Then fold binding over from the back of the quilt sandwich to the front of the quilt sandwich and edge sew the binding to secure it in place.
*Optional: Clip and/or press the binding over to the front of the quilt prior to securing the binding with the sewing machine. This would make this step easier and less fiddly.

When you reach approximately 2in from the corner of the quilt, stop and leave the needle and presser foot in their down positions.

Step 10: Gently fold and hold down the finished edge of the binding on the quilt so the quilt top so there is a 45-degree angle overhang of binding at the corner of the quilt. Then fold the binding perpendicular to the edge you have just attached, toward the centre of the quilt, to form the corner of the quilt. Temporarily secure this corner fold in place with your hands, pins or clip.

Step 11: Continue sewing, and when you get to the tip of the corner fold, leave the needle in. Hold down the ‘Reinforcement / tie-off stitch’ button (button with circle icon), if your sewing machine has that function. By pressing this button, the machine sews 3-5 stitches in the same spot. By doing this, it provides additional enforcement to the corner of the binding. If you don’t have this on your machine, backstitch one stitch.


Then lift the presser foot up and pivot the quilt sandwich 90-degrees, counter-clockwise so that the bulk of the quilt sandwich is on the left of the sewing needle and the binding is on the right and continue sewing the binding to the quit top.


Step 12: Repeat Steps 9 to 11 to complete the quilt.
Step 13: When you reach the start of the binding, don’t forget to backstitch to strengthen your binding. Trim any loose threads and enjoy!

Related Projects
Stay Connected
* Required fields