Skewing Designs to Fit with Dream Motion Pro
Rectangles, squares, and triangles, oh, my! These shapes do account for a lot of our piecing needs, but what about interesting shapes, like diamonds and the points of a mariner's compass? Dream Motion Pro
includes tools you can use to fit quilting motifs to those shapes as well.
Choosing a Design:
- Open Select & Sew and navigate to the Block folder. Take a close look at the designs; some have more points (corners) than others, and a few have mid-points that might fool the eye into thinking they're corners as well. For example:
- 1-rotated (and 1): this is definitely a four-cornered design, but those corners can create a stable square or an on-point diamond.
- 3: because it Fills the area completely, it's hard to think of this as anything but a square. It might be skewed into a diamond shape, but the relatively high number of lines in the design may become awkward when skewed.
- Beach Ball: without definite corners, this design won't ever quite Fill a square, but it could be used in a hexagon or octagon, or in combination with corner designs.
- 6-sided triangle: perfect for hexagons.
- Block 3: this design has four corners and four mid-points. Placed in an octagonal shape, those midpoints will fit into the other four corners of the shape for a nice Fill.
- Choose the design you want to manipulate and click Open to go to the Quilting Interface.
Manipulating the Design Profile
- First, let's create a diamond shape, such as you'd use in a Broken Star quilt. Click the Settings icon at the top of the workspace. Click Four Points as the Placement Method and Stretch as the Fill, then click OK.

- This combination of Placement and Fill ties the four corners of the design to the four points you choose with the machine. To begin, move your machine to one corner of the diamond and then click the top left placement icon. Move the machine to the next corner of the diamond, working counterclockwise, and click the top right icon on the screen. Continue around the diamond to place all four corners. You can see that you've pulled and distorted the motif to fit the diamond shape.

- By changing the relationship among the four corners/placement points, we can change the motif again so that it fills the point of a mariner's compass block. It's easy now to imagine how many shapes can be filled with the Four Points/Stretch setting combination.

TIP: Choose simpler motifs with fewer lines when quilting shapes with tapering points. Complex designs may not adapt as well to the distortion, and building up too many lines of stitching in one area can make the quilt stiff or cause cupping.
- Another use for Four Points/Stretch is to position a square motif on point. The placement works the same way: just click on each of the four corner locations in turn as you move your machine around the block to be quilted.

Going On-Point Another Way
- If you're following along, close your Quilting Interface and restart Select & Sew. Choose a square motif. Click the Settings icon at the top of the screen and choose On Point as the Placement Method and Stretch as the Fill, then click OK.

- Are you surprised to see that the square motif didn't rotate onto one point? Instead, it's stretched within the diamond shape, which means that the corners of the square motif have expanded or contracted to lie on the diamond's outlines. To position the quilting motif itself on point, you'll need to open the Pattern Sizer by clicking on the pink box at the lower right.

- Click the icon to rotate the design 45 degrees. With the design I'm using, direction doesn't matter, but you can click Reverse to change the direction of rotation if it does make a difference.

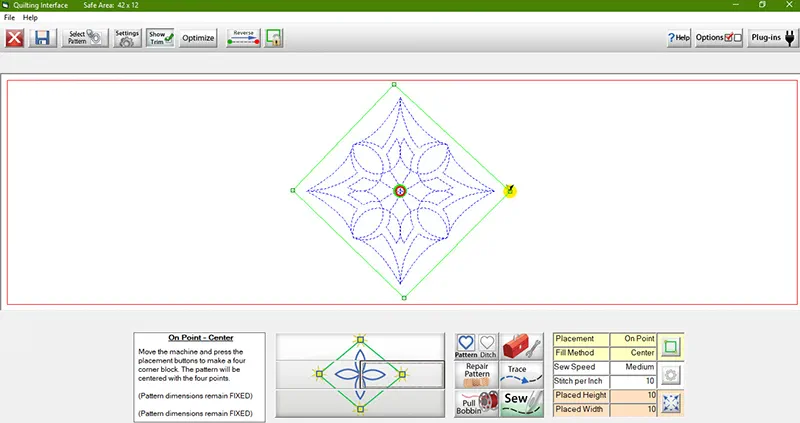
- One difference with On-Point positioning is that the corners of the stitched motif don't snap to the marked corner locations as they did with Four-Point positioning. You can see the difference that makes by looking at the top of the design in the next illustration. Try switching the Fill method to Center to see what difference that makes.

- To counteract the corner mismatch – most visible if the quilt block is slightly wonky or if the quilt layers are not entirely straight (and it happens to all of us) – make your motif a little smaller than the block defined by the corner positioning marks. I do this in the Pattern Sizer by setting the size I want, clicking the lock icon to preserve the aspect ratio, and checking the Enforce icon to keep the design at exactly the measurement I specified. Be sure Center is the chosen Fill method.

- The result is a motif that floats within the quilt block. The stitched corners don't need to align exactly with the block corners because the margin of empty space is there.
 No pun intended – if you get my point – but this is just the tip of the iceberg for skewing designs in Dream Motion Pro
. As always, the best way to learn which feature you like best is to try different ideas and push a lot of buttons. You may stumble upon a surprising and attractive way to use every quilting design in your library.


