Welcome to Week 3 of Spring Serenade quilt along!
Time to Complete: 3 to 5 hours (for Spring Serenade QAL) and 5+ hours (for bonus project)
Skill Level: Beginner

This week, we’re diving into the second block of the Spring Serenade quilt pattern, a design inspired by the beauty of blooming flowers and springtime landscapes. This block’s arrangement of squares and rectangles creates a sense of petals unfolding in a field of flowers. It combines the four-at-a-time half-square triangle (HST) method with the no-waste flying geese technique from last week, both selected to simplify the piecing process and help you sew efficiently. As you construct this block, you’ll appreciate how thoughtful techniques and time-saving methods bring this design to life effortlessly!
If you’re following along, grab your Spring Serenade quilt pattern and flip to pages 7 to 9. Haven’t snagged your free copy yet? Don’t worry—you can download it here.
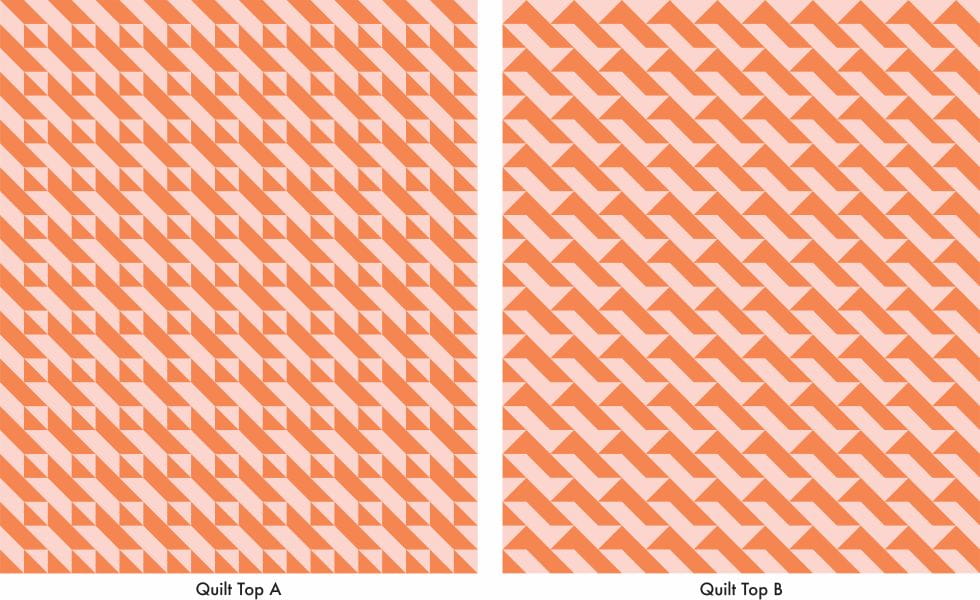
Now for the fun part—this blog post features a bonus project to make the most of your four-at-a-time HST skills! I’ll walk you through creating two different throw-size quilt tops using this method, complete with cutting dimensions and step-by-step instructions to only make the quilt tops. The supplies and tools listed, and the cutting directions below are the same for either quilt top.
Whether you save this project for after completing your Spring Serenade quilt or jump right into making one of these HST beauties alongside it, these quick and rewarding designs will definitely end up in your ‘to-make’ list.
This is the third blog post in the six-week Spring Serenade QAL series, with a new post dropping every Monday (starting March 5, 2025). Each week’s post will feature tips for completing that week’s tasks or fun bonus projects that build on the skills being explored. Even if you’re not following the Spring Serenade pattern, these insights can be applied to future quilt projects. Sign up for the weekly QAL newsletter* here to stay up-to-date on tasks, tips, and bonus content. The newsletter will only run for the six weeks of the QAL, so you won’t miss a thing.
For a comprehensive overview of what the QAL entails—including the schedule, tools, supplies, and more—check out the previous Spring Serenade QAL blog post here. Remember, you’re welcome to join at any time and work at your own pace. If you’d prefer, you can save the posts and follow along at a later date.
All weekly tips, tricks, and resources will be centralized here for easy reference, so don’t forget to bookmark it!
*By signing up for the Spring Serenade QAL updates, you also agree to sign up to be on The Weekend Quilter and Brother International email newsletter list. We will not sell your email or spam you.
For More Tips…
If you’re looking for additional advice on HSTs, be sure to check out my previous guest blog post on Brother Stitching Sewical:

Supplies and Tools
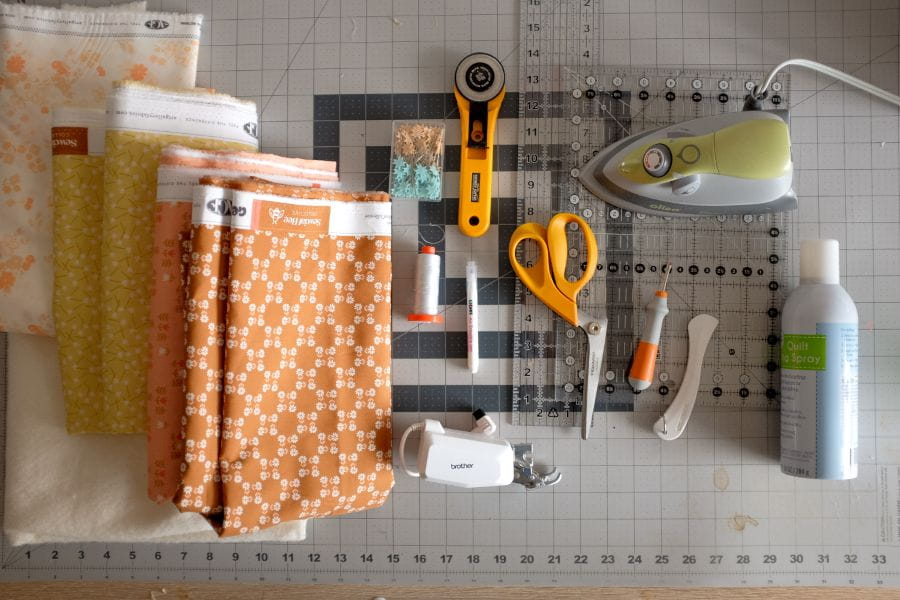
To create one of the two, four-at-a-time HST quilt top designs featured in this week’s bonus project, you’ll need the following materials and tools. Both designs require the same number of supplies and follows the same cutting directions:
- Basic sewing machine – the Brother Innovis BQ3100 from the Quilt Club Series was used in this tutorial
- Rotary cutter
- Quilting ruler
- Cutting mat
- Fabrics, quilting cotton – Fabric requirements are based on 42in width of fabric (WOF). I encourage you to use contrasting fabrics for Fabric A and Fabric B. This is also a great opportunity to use up any scraps from your stash to make a one-of-a-kind quilt top. Although this tutorial takes you through how to make the quilt top only, I have also included fabric requirements for the quilt back, binding, and batting (or wadding) to complete your project:
Quilt Top:- Fabric A (orange): 3¾ yards (343 cm). Cut:
Twenty (20), 6½in x WOF, sub-cut into one hundred and twenty (120), 6½in squares. -
Fabric B (pink): 3¾ yards (343 cm). Cut:
Twenty (20), 6½in x WOF, sub-cut into one hundred and twenty (120), 6½in squares.
Quilt Binding: ½ yard (46 cm). Cut: 7 strips, 2½in x WOF
Batting (or wadding) – There needs to be at least 4in overhang on each side of the quilt top. Therefore, batting needs to be at least 68in x 80in in size. - Fabric A (orange): 3¾ yards (343 cm). Cut:
- Coordinating thread, 50wt cotton for piecing
- Fabric pen or pencil
- Pins
- Fabric scissors
- Seam ripper
- Iron and ironing board or wool pressing mat
- Batting – cut at least
- Basting spray (if spray basting) or safety pins (if pin basting)
- Hera marker or a non-serrated dull knife – to mark quilting guidelines
Directions
Read through all the directions before you start. Seam allowance throughout the project is ¼in unless specified. The directions are broken down into three key parts: Half-Square Triangle Units; Quilt Blocks; and Quilt Top Assembly. As previously mentioned, the directions do not include instructions on how to baste, quilt, and bind (final steps of quilting). For more tips and tricks, be sure to check out these two past guest blog posts by yours truly on the Brother Stitching Sewical blog:
Half-Square Triangle (HST) Units
Step 1: For both quilt top designs, pair one (1) Fabric A 6½in square with one (1) Fabric B 6½in square and follow Block B – Half-Square Triangle (HST) Units, Steps 1 to 4 (page 8) of the Spring Serenade quilt pattern.
All together there should be a total of one hundred and twenty (120) Fabric A/B 6½in square pairs to make four hundred and eighty (480) HST units. Fabric A squares in this tutorial are noted as A1 squares, and Fabric B squares in this tutorial are noted as B1 squares in the Spring Serenade Quilt Pattern.
If you haven’t downloaded your free copy of the Spring Serenade PDF Quilt Pattern yet, you can do so here
Quilt Blocks
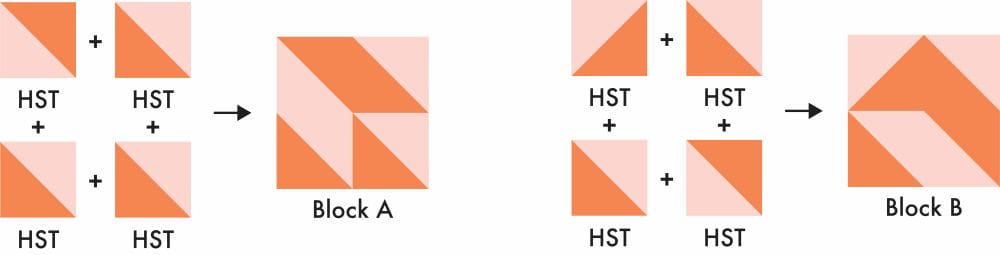
Step 1: Noting the orientation of the HST units, sew together four (4) HST units to make one (1) Block A unit for Quilt Top A as shown in the diagram below. Press the seams as you go. If you’re following Quilt Top B, sew together four (4) HST units, as shown in the diagram, to make one (1) Block B unit.
Repeat this step to create a total of one hundred and twenty (120) Block A units for Quilt Top A, and one hundred and twenty (120) Block B units for Quilt Top B.
Quilt Top Assembly
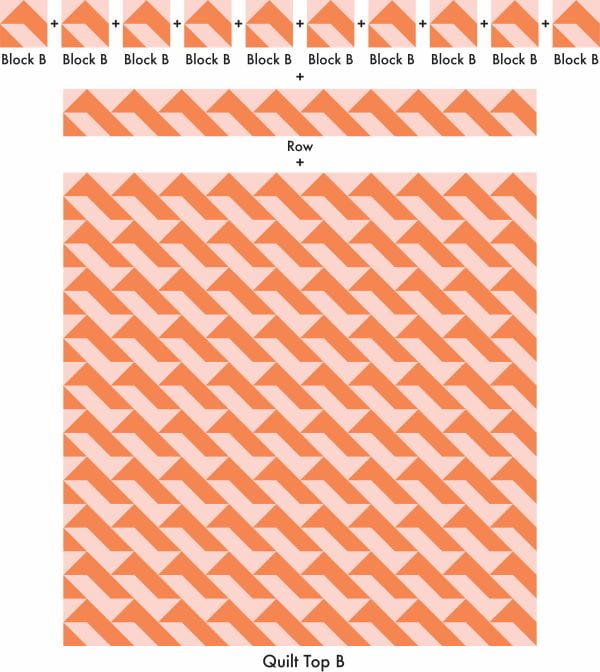
Step 1: For both Quilt Tops, sew together twelve (12) rows of ten (10) blocks. Then sew rows together. Press all the seams as you go.

Step 2: Press the quilt top and backing fabric. Layer the backing, batting, and quilt top. Baste, quilt, and bind as desired.
Step 3: Trim any loose threads and enjoy!
And there you have it—two stunning quilt top designs using the four-at-a-time HST method! These projects are not only a fantastic way to practice this efficient technique but also an opportunity to create something uniquely yours. Whether you opt for a bold, graphic look or a softer, more traditional layout, the possibilities with HSTs are endless!
Seeing your work brings us so much joy! Be sure to share your works-in-progress on social media by tagging Wendy @The.WeekendQuilter and @BrotherSews and using the #SpringSerenadeQuilt #BrotherSews hashtags.
Till next time, happy sewing!
Related Projects
Stay Connected
* Required fields