UPCYCLING: Adding Peep hole Sleeves to a Shirt
It's time for another Upcycling post! This time I went into my closet and pulled out a button up shirt that I had once loved but had made it's way to back of my closet. The bare shouldered Peep-holed Sleeve trend that you'll see in stores is easy to add to this type of shirt and gives it all new life, so go get that shirt from the back of YOUR closet and let's get started! Machine: Supplies:
- button down shirt
- ½” or ¼” double fold bias tape
- scissors
- fabric marking pen
- pins
- photo supplies
- Lay the shirt flat. Locate the top of the shoulder and outside arm. Measure along the shoulder seam from the neck edge to where you want the edge of the hole to start. In my case I am going to start 2” to 3” from the neckline.

- With a fabric marking pen, mark the top opening of the hole at the shoulder position.

- Mark the bottom of the hole opening. Choose a spot above the elbow along the outside edge of the sleeve.
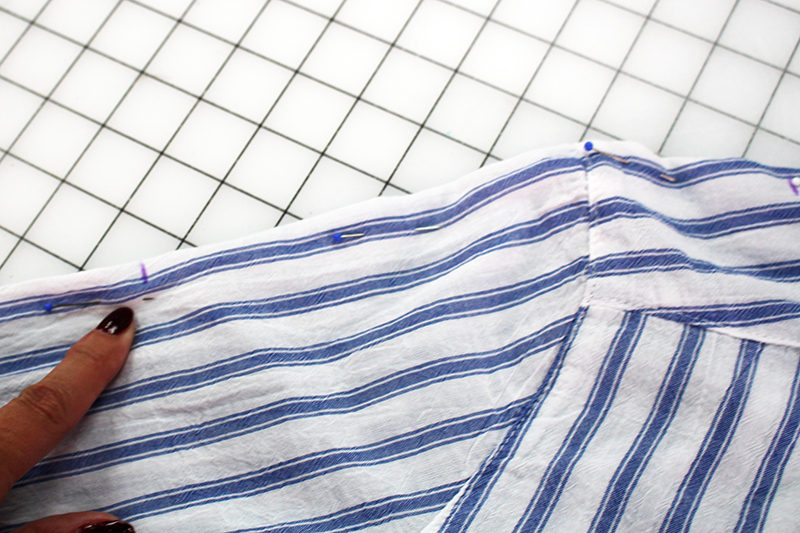
- Draw an oval like the one I have here. The oval doesn’t have to be perfect, just free-hand draw the curve. Keep in mind this includes the ½” seam allowance, so if you think you need a smaller opening after sewing, draw a smaller oval.

- Cut along the markings.

- In order to make both sides the same, transfer the cut piece from one side to the other side.

- Cut out the other side.

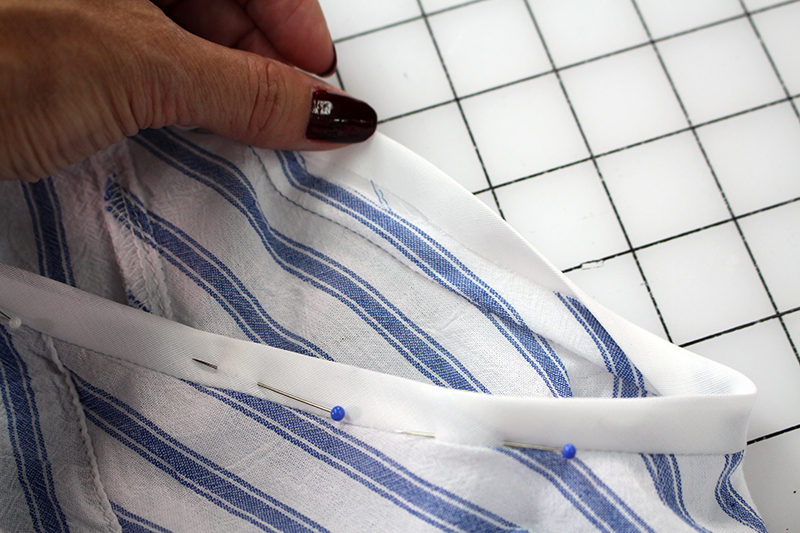
- Open the bias tape and pin the edge of the bias tape to the hole opening, with right sides together.

- Pin all the way around and when you get to the starting point, mark where the bias tape meets. Turn the bias tape as shown and pin the ends of the bias tape together on a diagonal as shown with right sides together (see the purple marking).

- Stitch across that marking.

- Trim the seam allowance as shown.

- Press the seam allowance open. Continue to pin the bias tape to the hole opening.

- Stitch the bias tape to the hole opening with a ½” seam allowance (1/4” seam allowance if using a 1/2” bias tape).

Tip: Use the sew straight laser light to sew a line following the pressed edge on the bias tape.

- Fold the other edge of the bias tape over the raw edge and pin from the right side of the shirt.


- From the right side of the shirt, stitch 1/8” from the edge of the bias tape.


- Fold the bias tape one more time to the inside of the garment.


- Topstitch 3/16” ” from the edge of the fold.


- The bias tape will stay toward the inside of the hole, but feel free to topstitch a second row about ¼” inside of the first row. That's it!

 Happy Sewing,
Angela
Happy Sewing,
Angela

Related Projects
Stay Connected
* Required fields
Follow Us
- Product Support
- Product Support Assistant
- Terms of Sale
- Product-Registration
- Search Supplies/Accessories
- Ordering & Shipping Information
- Ordering & Account FAQs
- View Order Status
- Warranty & Extended Warranty Information
- Recall Information
- Return Policy
- Security Support Information(Opens in a new tab)
- Contact Brother
